Onboarding teardown · Slack
Slack onboarding, screen by screen: from signup to a first message
We had an AI agent sign up for Slack as a fictional product manager setting up a workspace for their team, and go through onboarding until it had posted a first message in a channel. A person stepped in twice: to submit the email address, and to press Create Workspace, which accepts Slack's terms. These are the screens it saw, in order, with what each one does well and what gets in the way.
By the UserOnboarding Academy teamRecorded 5 Nov 2026How we recorded it
UserOnboarding Academy isn't owned by Slack or any onboarding tool, and Slack didn't sponsor or review this page. The workspace was created for this recording only and deleted afterwards.
In short
Slack asks for one email address and a six-character code, then shows its terms in a dialog with a Create Workspace button. Setup is three screens with a progress bar and a live sketch of the Slack window: the workspace's name, your name, and an invite step you can skip. Much of it is filled in from the email address: the workspace name from its domain, the user's name from the part before the @, and a ticked box that lets anyone at that domain join. Setup never asks what the team works on, so the first channel is called new-channel. Two welcome questions follow, then a plan dialog whose only buttons start a Business+ trial or a checkout. The free plan is one screen further, behind Compare plans, and the workspace was already on a free Pro trial for its first month, which Slack had started without asking. After that, Slack is plain and quick: a real channel, a message box, and a first message sent with Enter.
- Screens to first value
- 14
- Setup questions
- 4
- Form fields shown
- 9
- Steps a person did
- 2
The flow at a glance
marks a step a person did
 01Slack homepage with a Get started button in the header and the hero
 02First, enter your email
 03We emailed you a code
 04Start a new workspace: the terms and a marketing email question
 05Name your Slack workspace, prefilled from the email domain
 06What's your name? The field holds the email's user name
 07Invite your teammates, with Skip this step
 08Skip without inviting? A second check before going on alone
 09Welcome to Slack: How familiar are you with Slack?
 10How do you want to use Slack? Six goals to tick
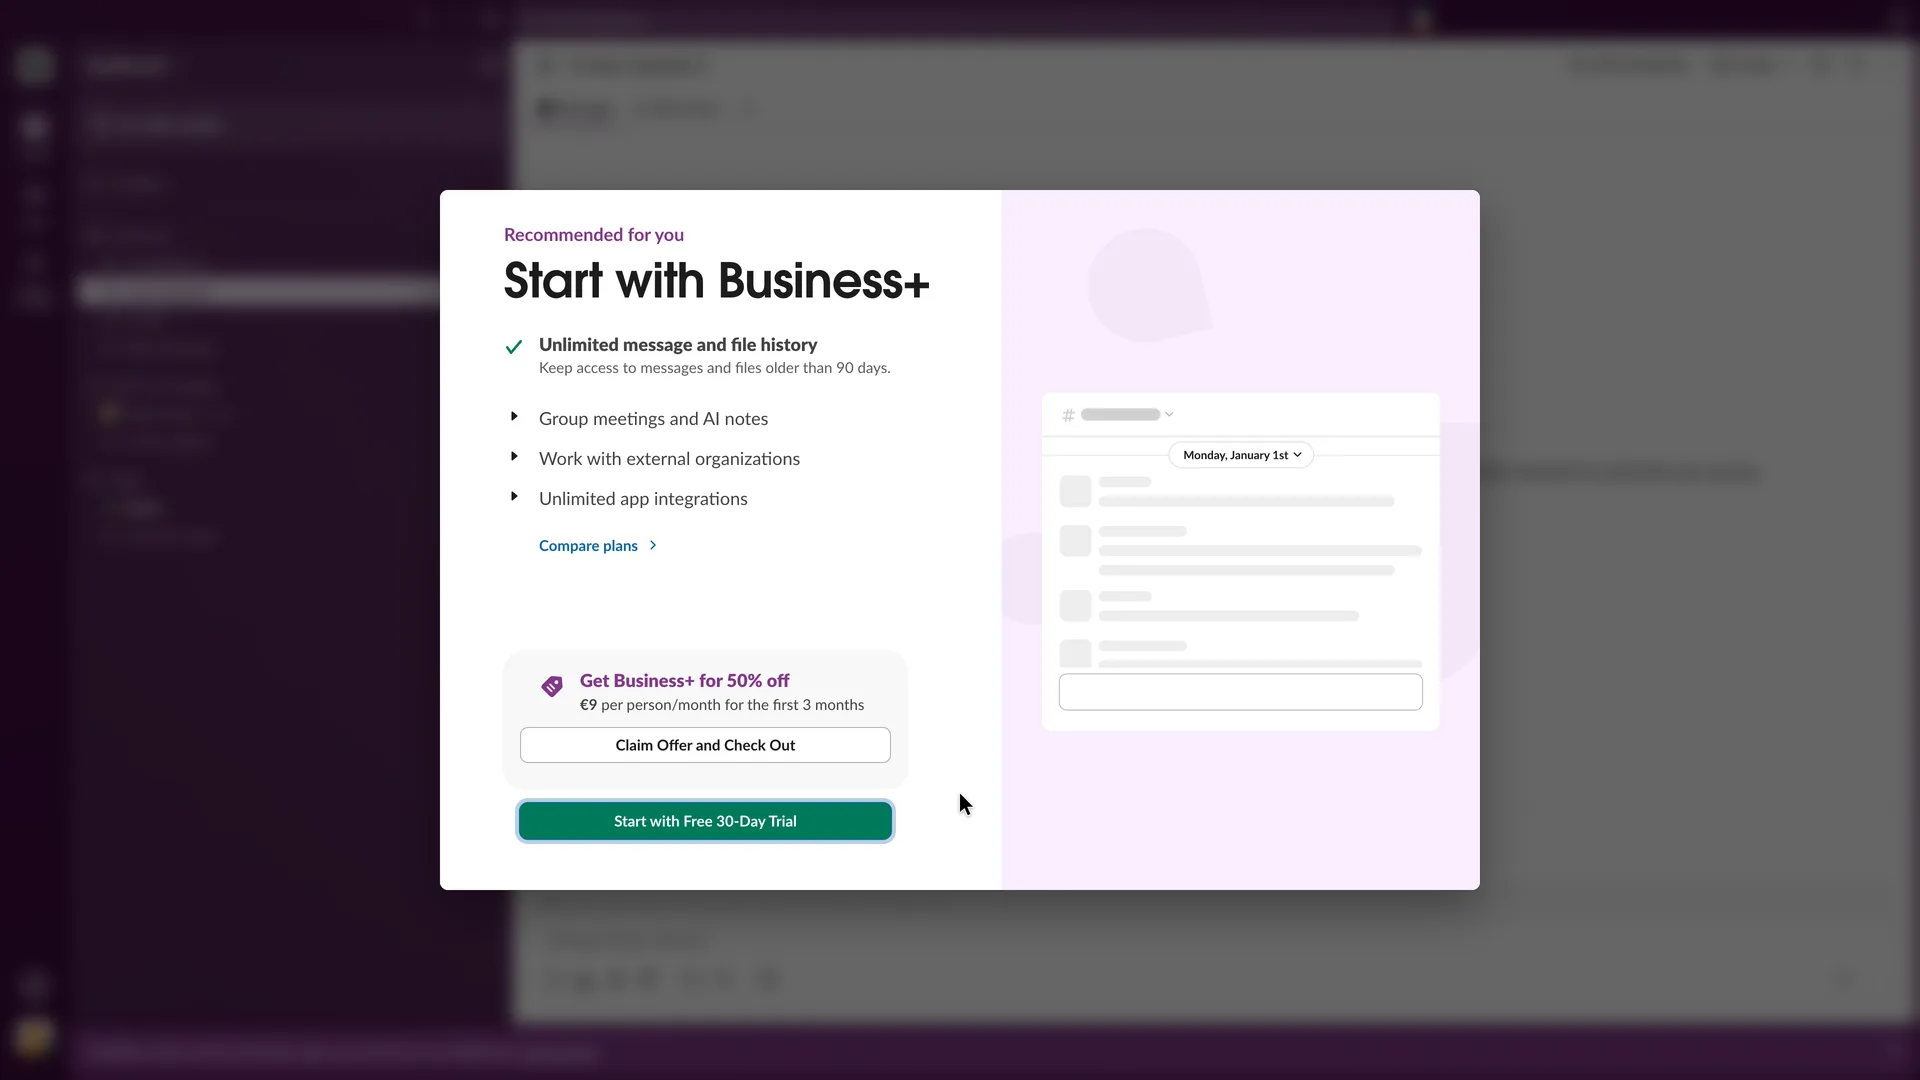 11Choose a plan: Start with Business+, with no free option on screen
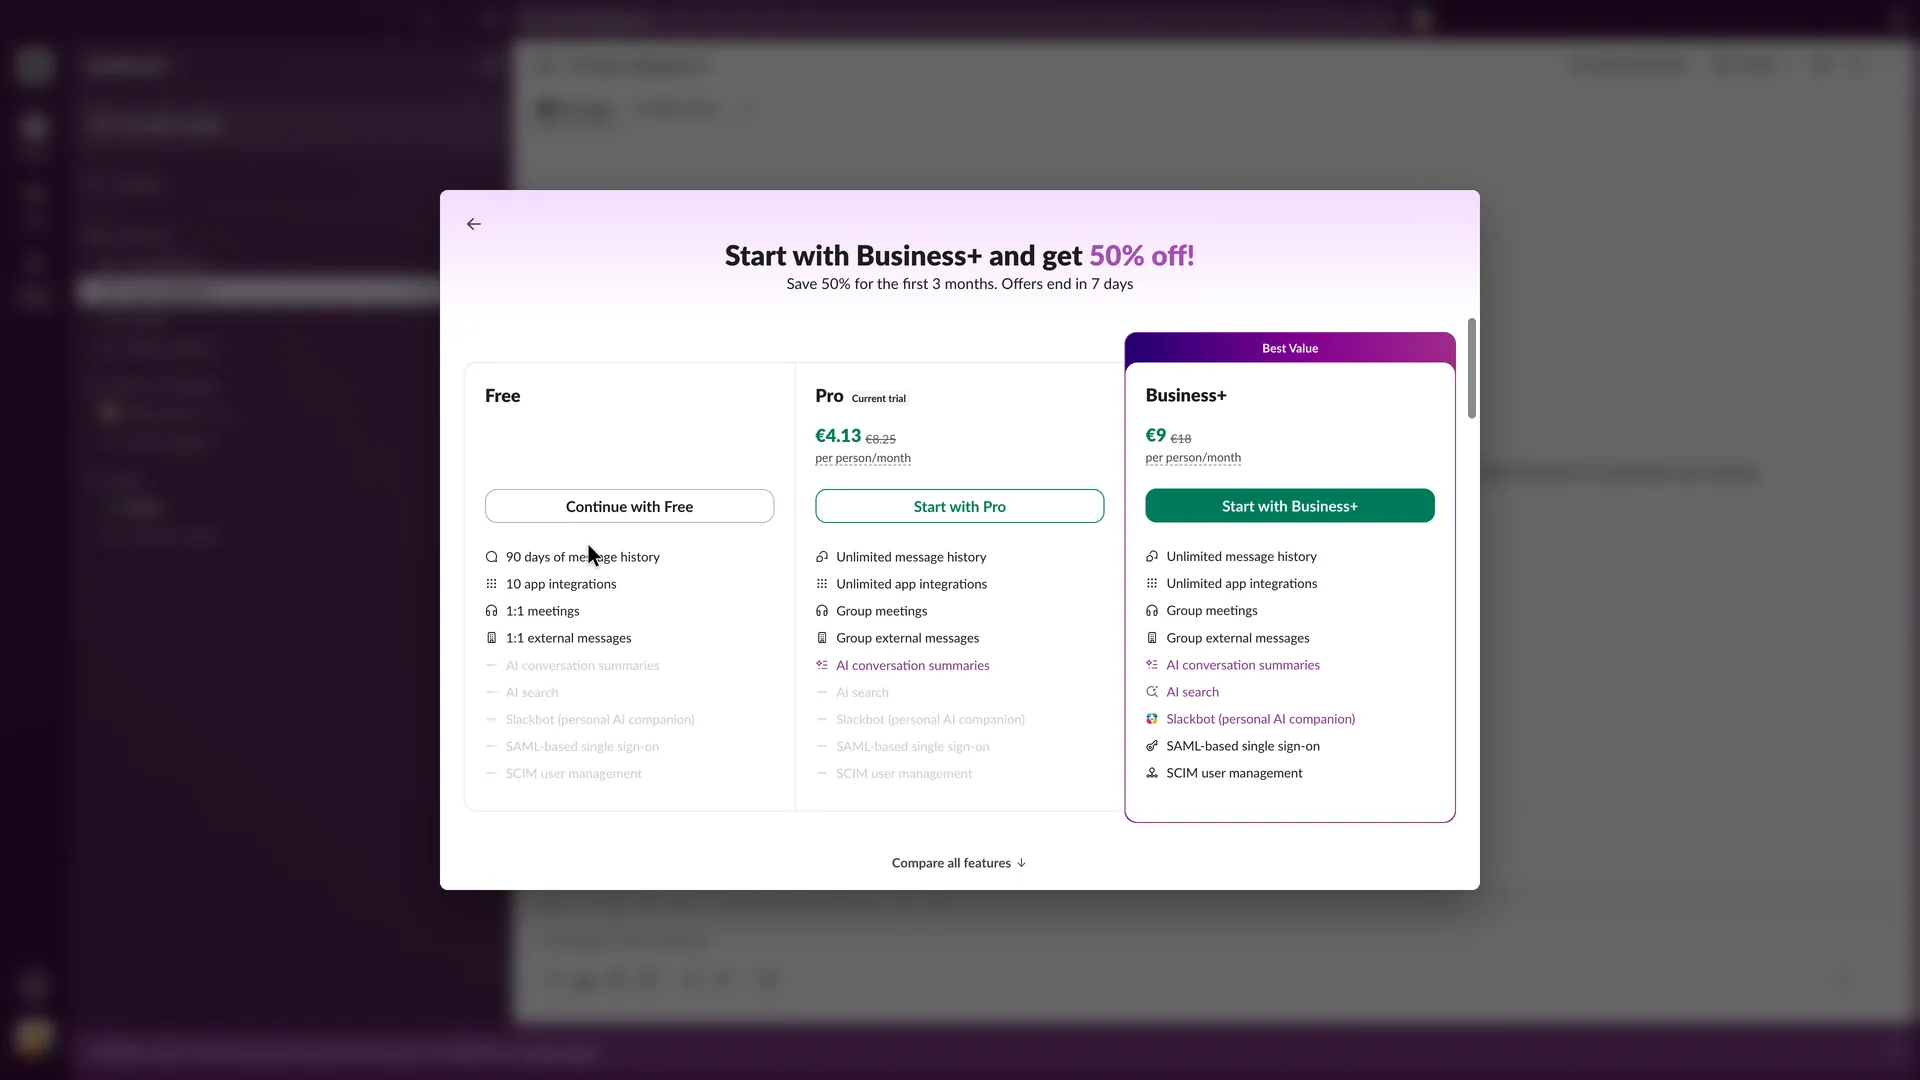 12Compare plans: Continue with Free, one click behind the offer
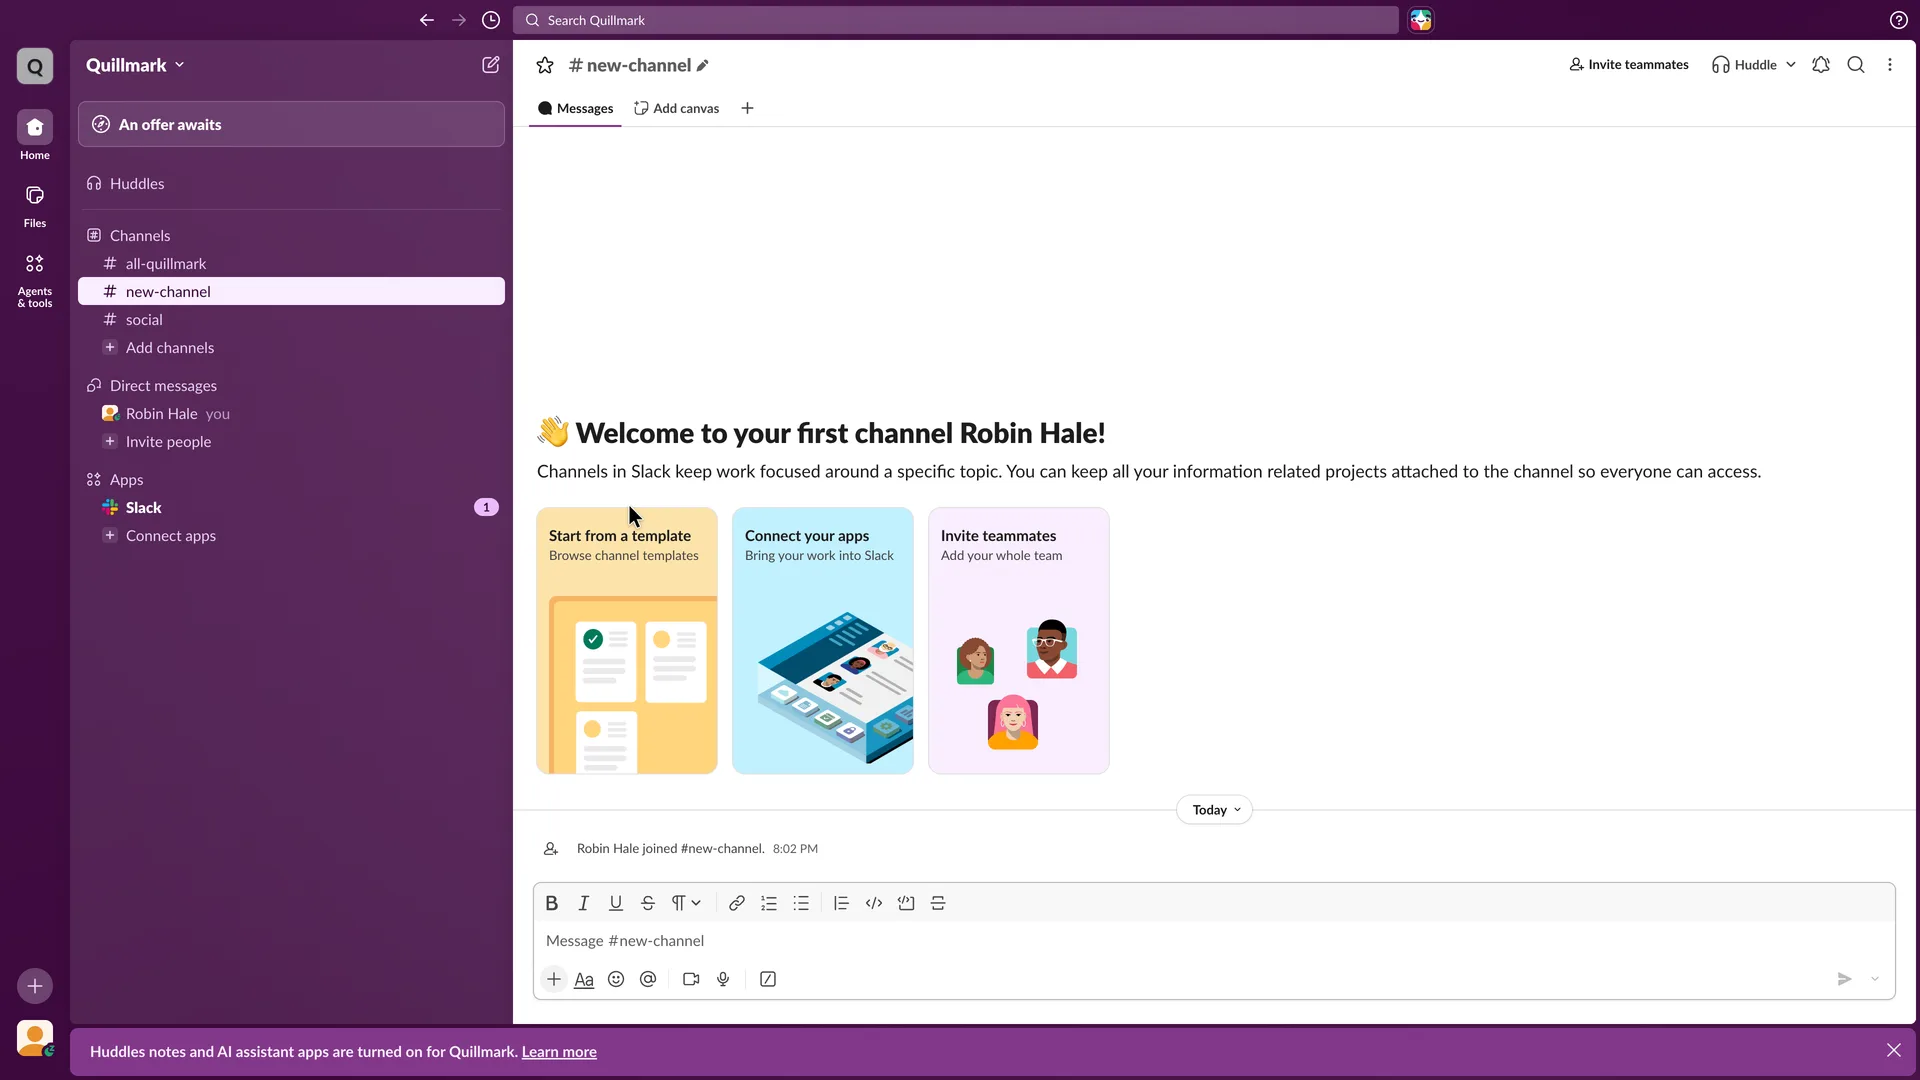 13The workspace opens on #new-channel with three welcome cards
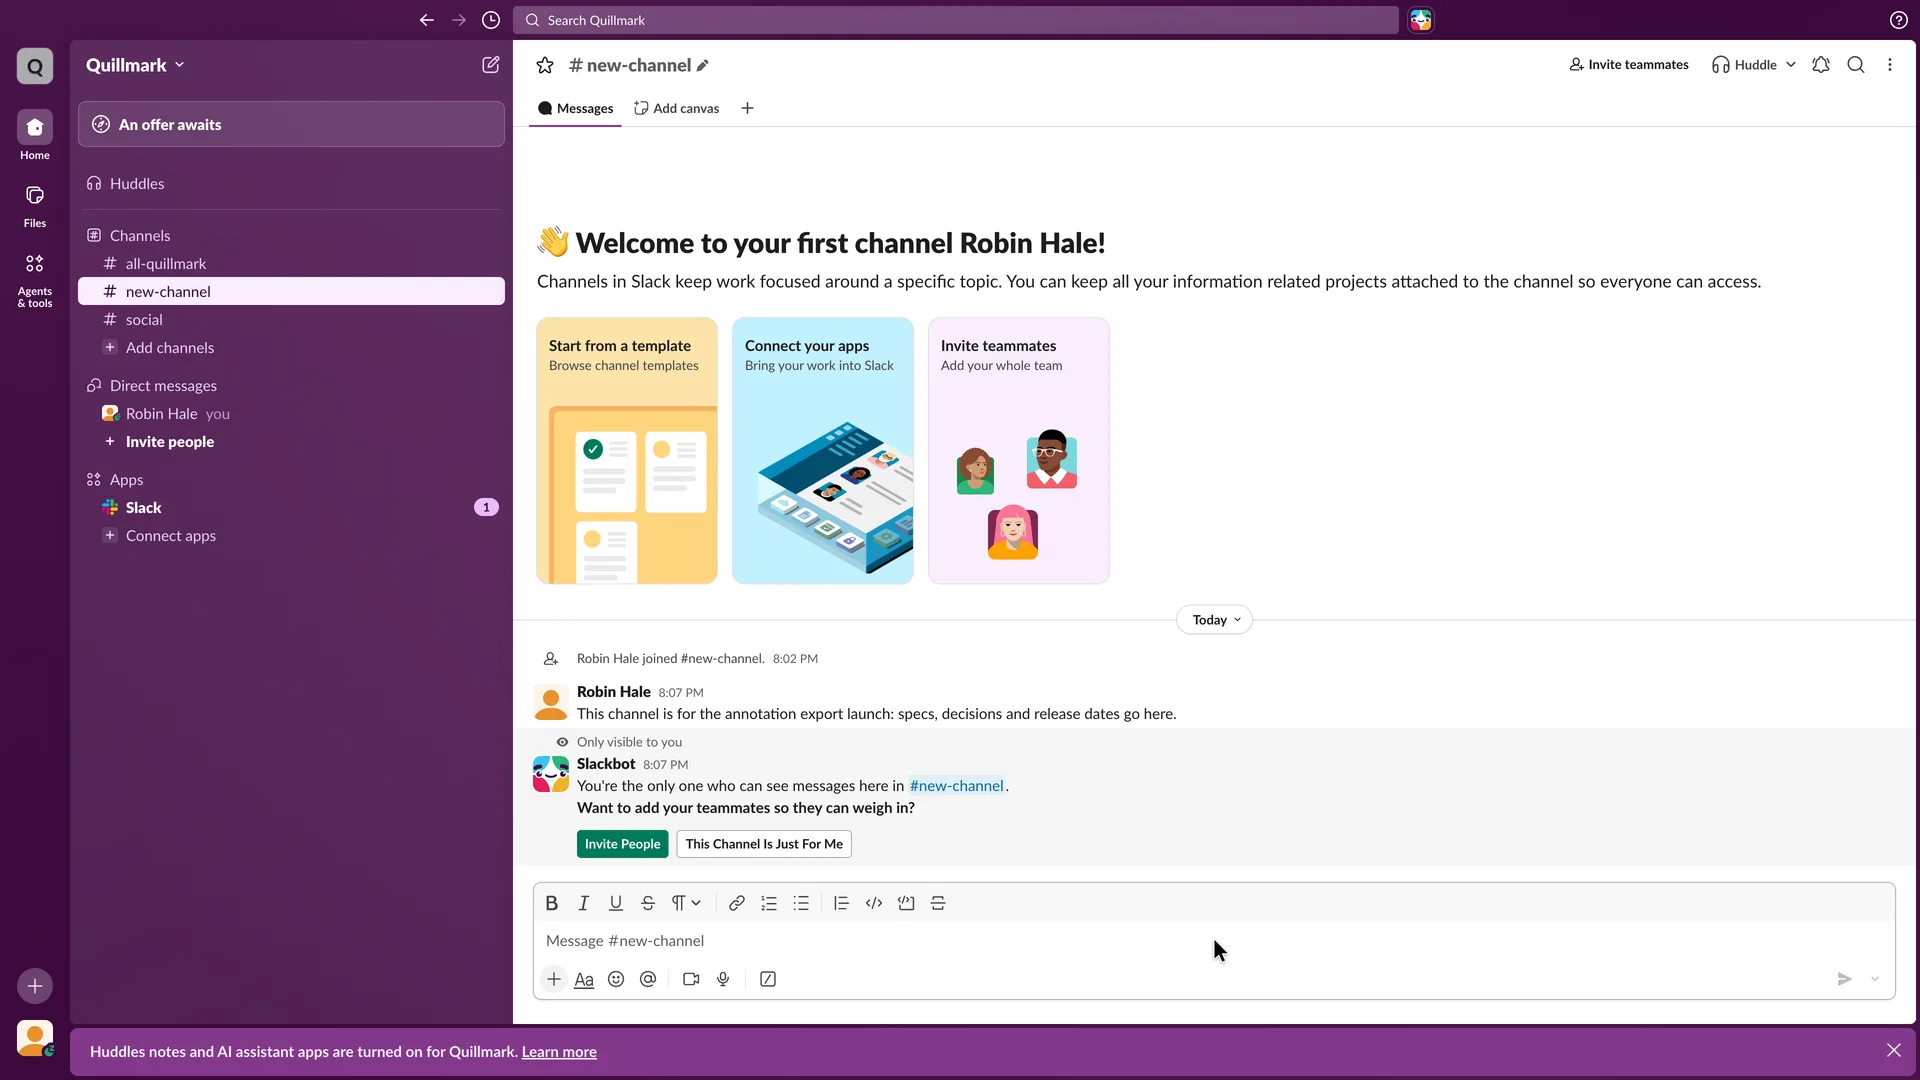 14 · first valueRobin's first message in #new-channel, and Slackbot's reply
Step 1 of 14:Other
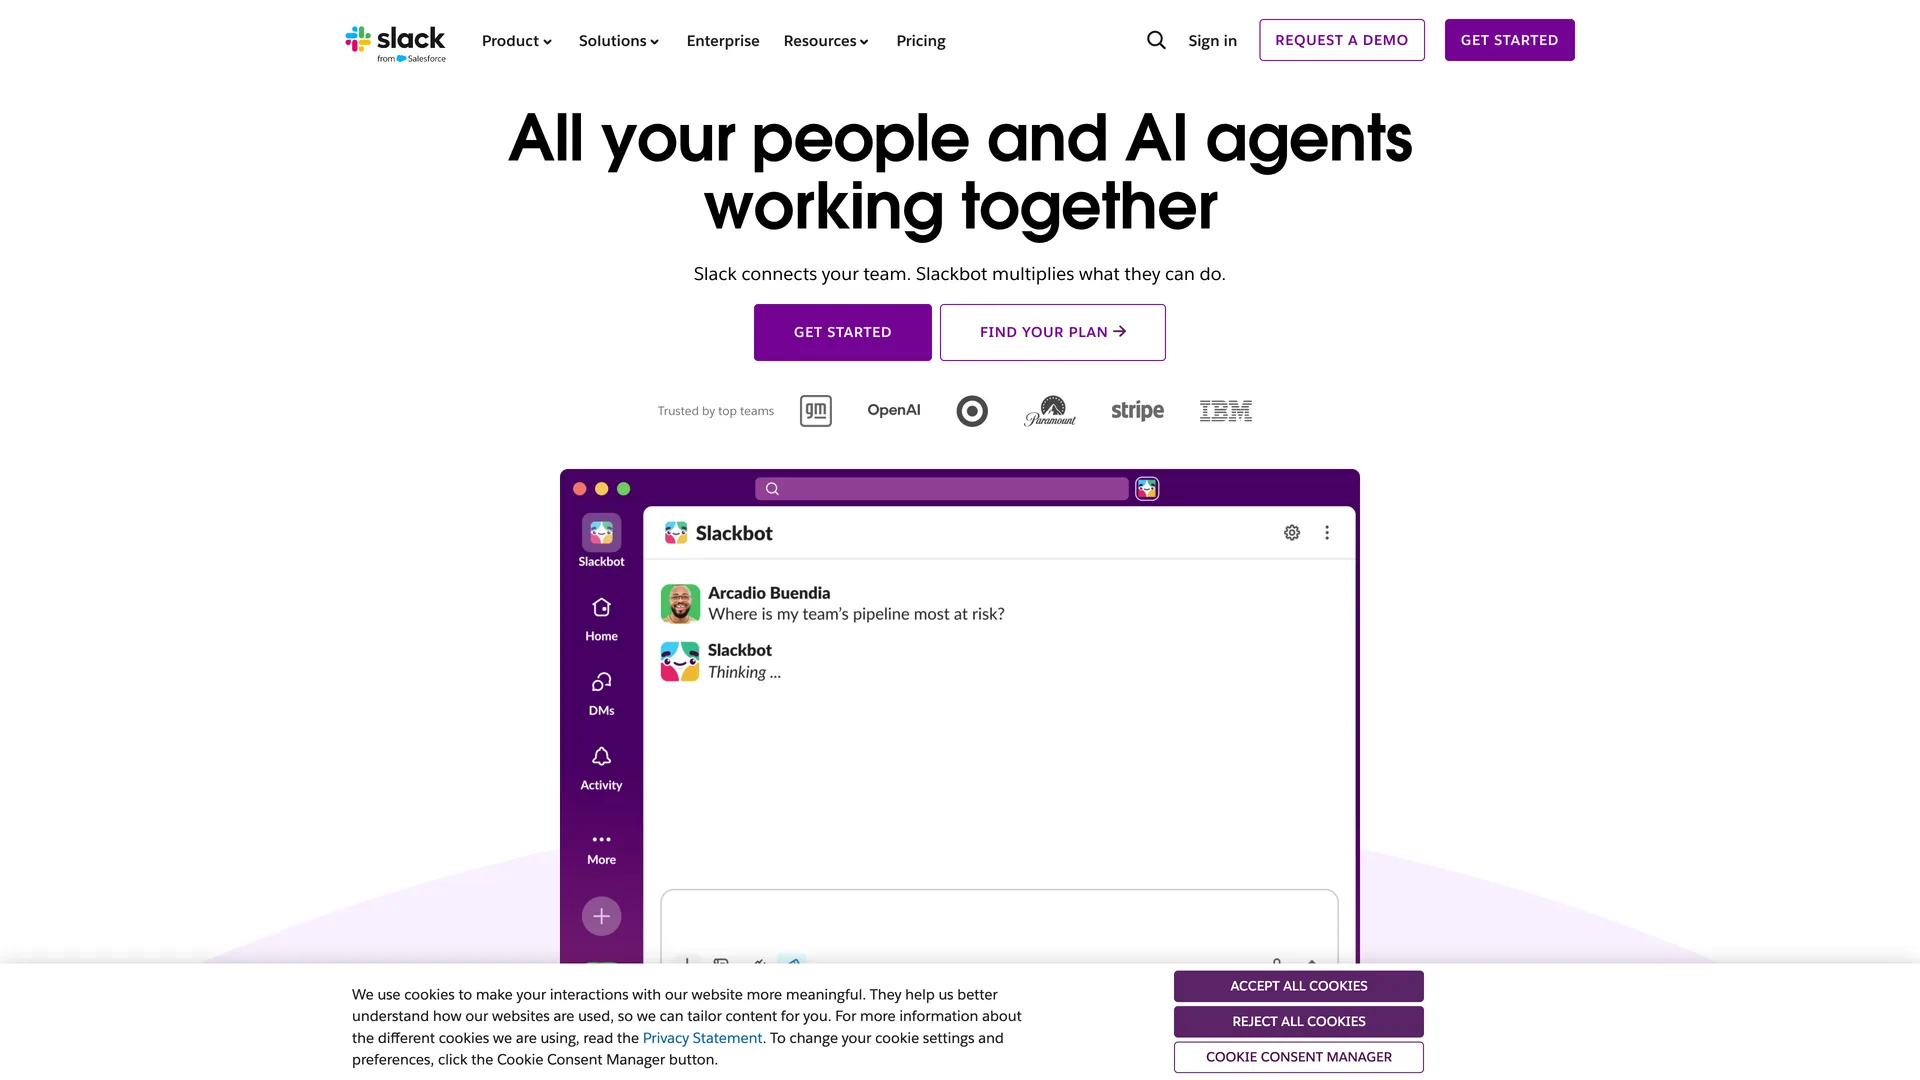
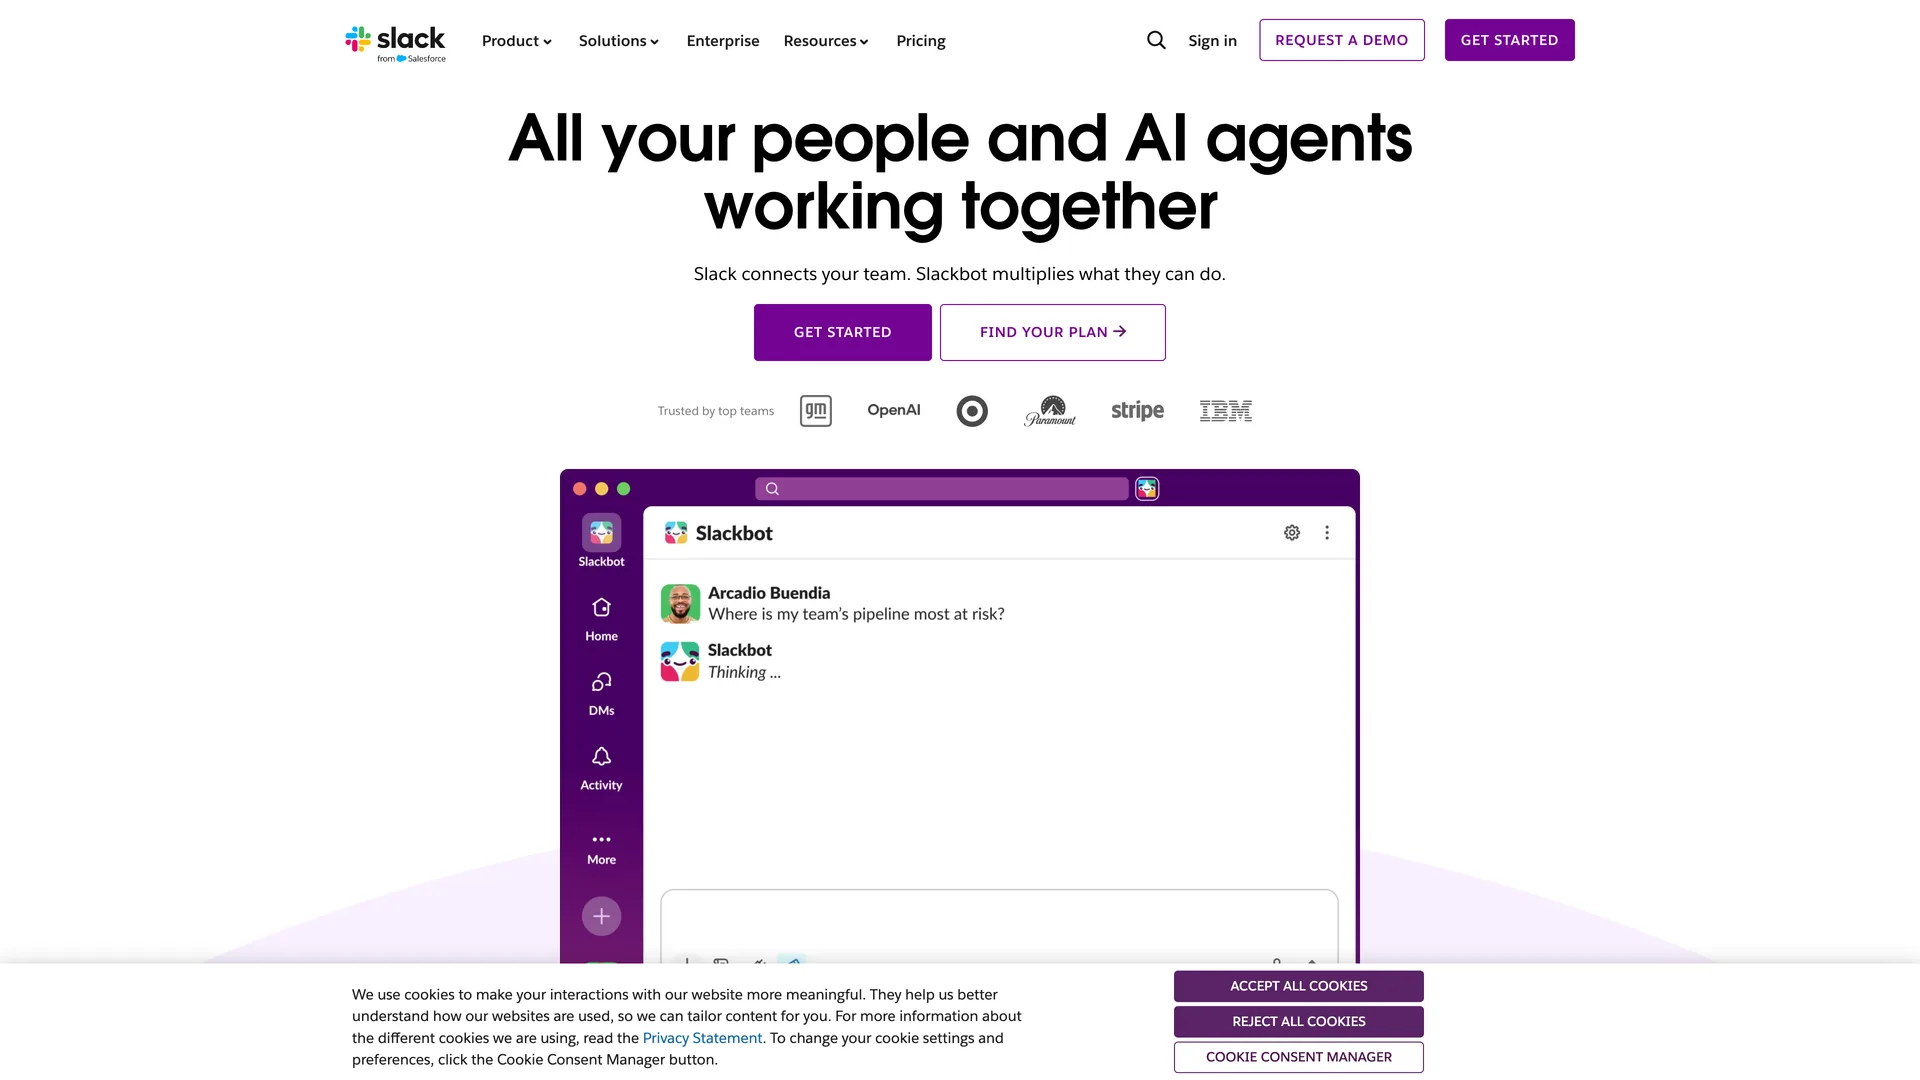
Slack homepage with a Get started button in the header and the hero
Opened slack.com as a visitor from a search would, pressed Reject All Cookies on the cookie banner, then pressed Get started in the header
Why it works
One action, repeated in the header and the hero, with the same wording; pricing is one click away for anyone who wants to check the cost first. Reject All Cookies is a button as large as Accept, so refusing costs one click.
What’s on this screen
The hero reads "All your people and AI agents working together" with the line "Slack connects your team. Slackbot multiplies what they can do." Under it sit Get started and Find your plan, then six customer logos (GM, OpenAI, Target, Paramount, Stripe, IBM) and an animated product picture of Slackbot running a research prompt. The header has Sign in, Request a demo and Get started. A cookie banner across the bottom offers Accept All Cookies, Reject All Cookies and Cookie Consent Manager. No signup form on the page itself; every Get started leads to the same signup page.
Step 2 of 14:Signup formDone by a person
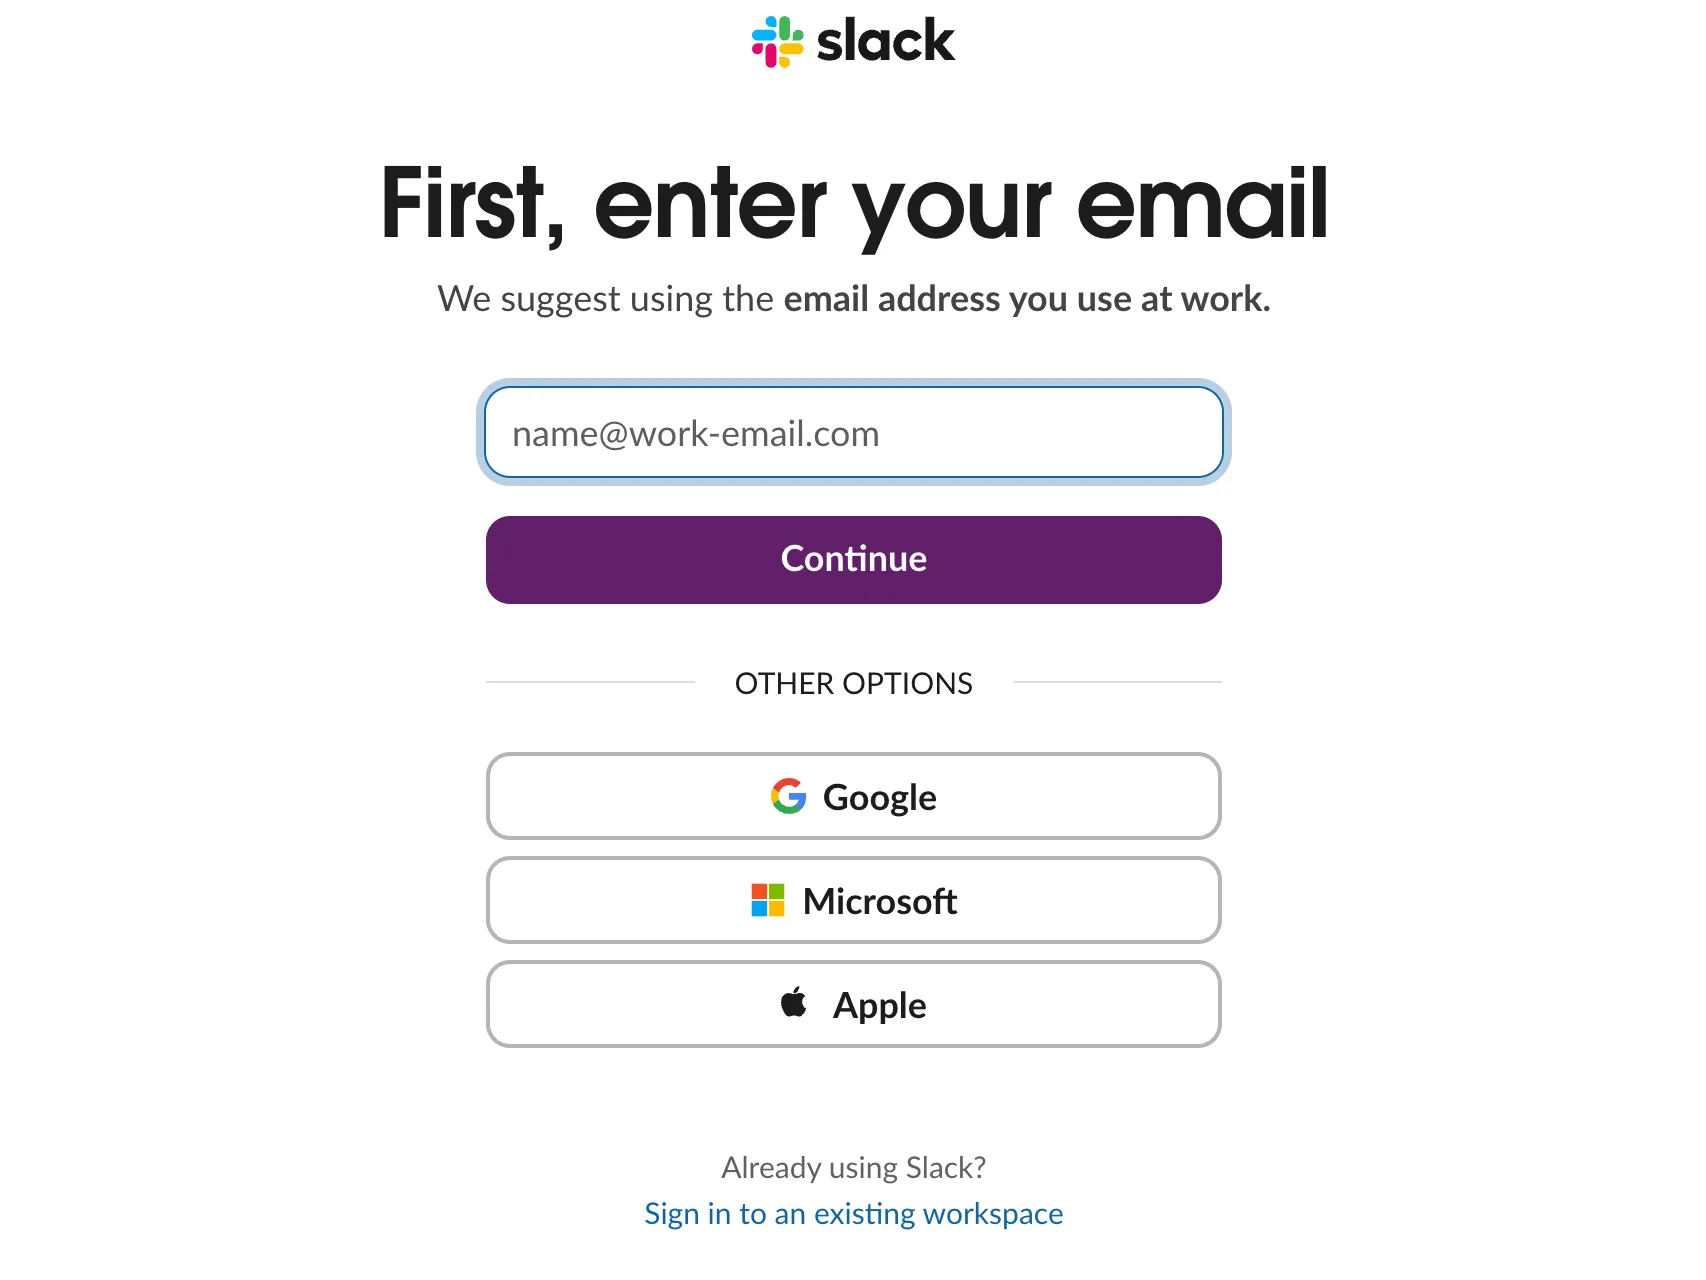
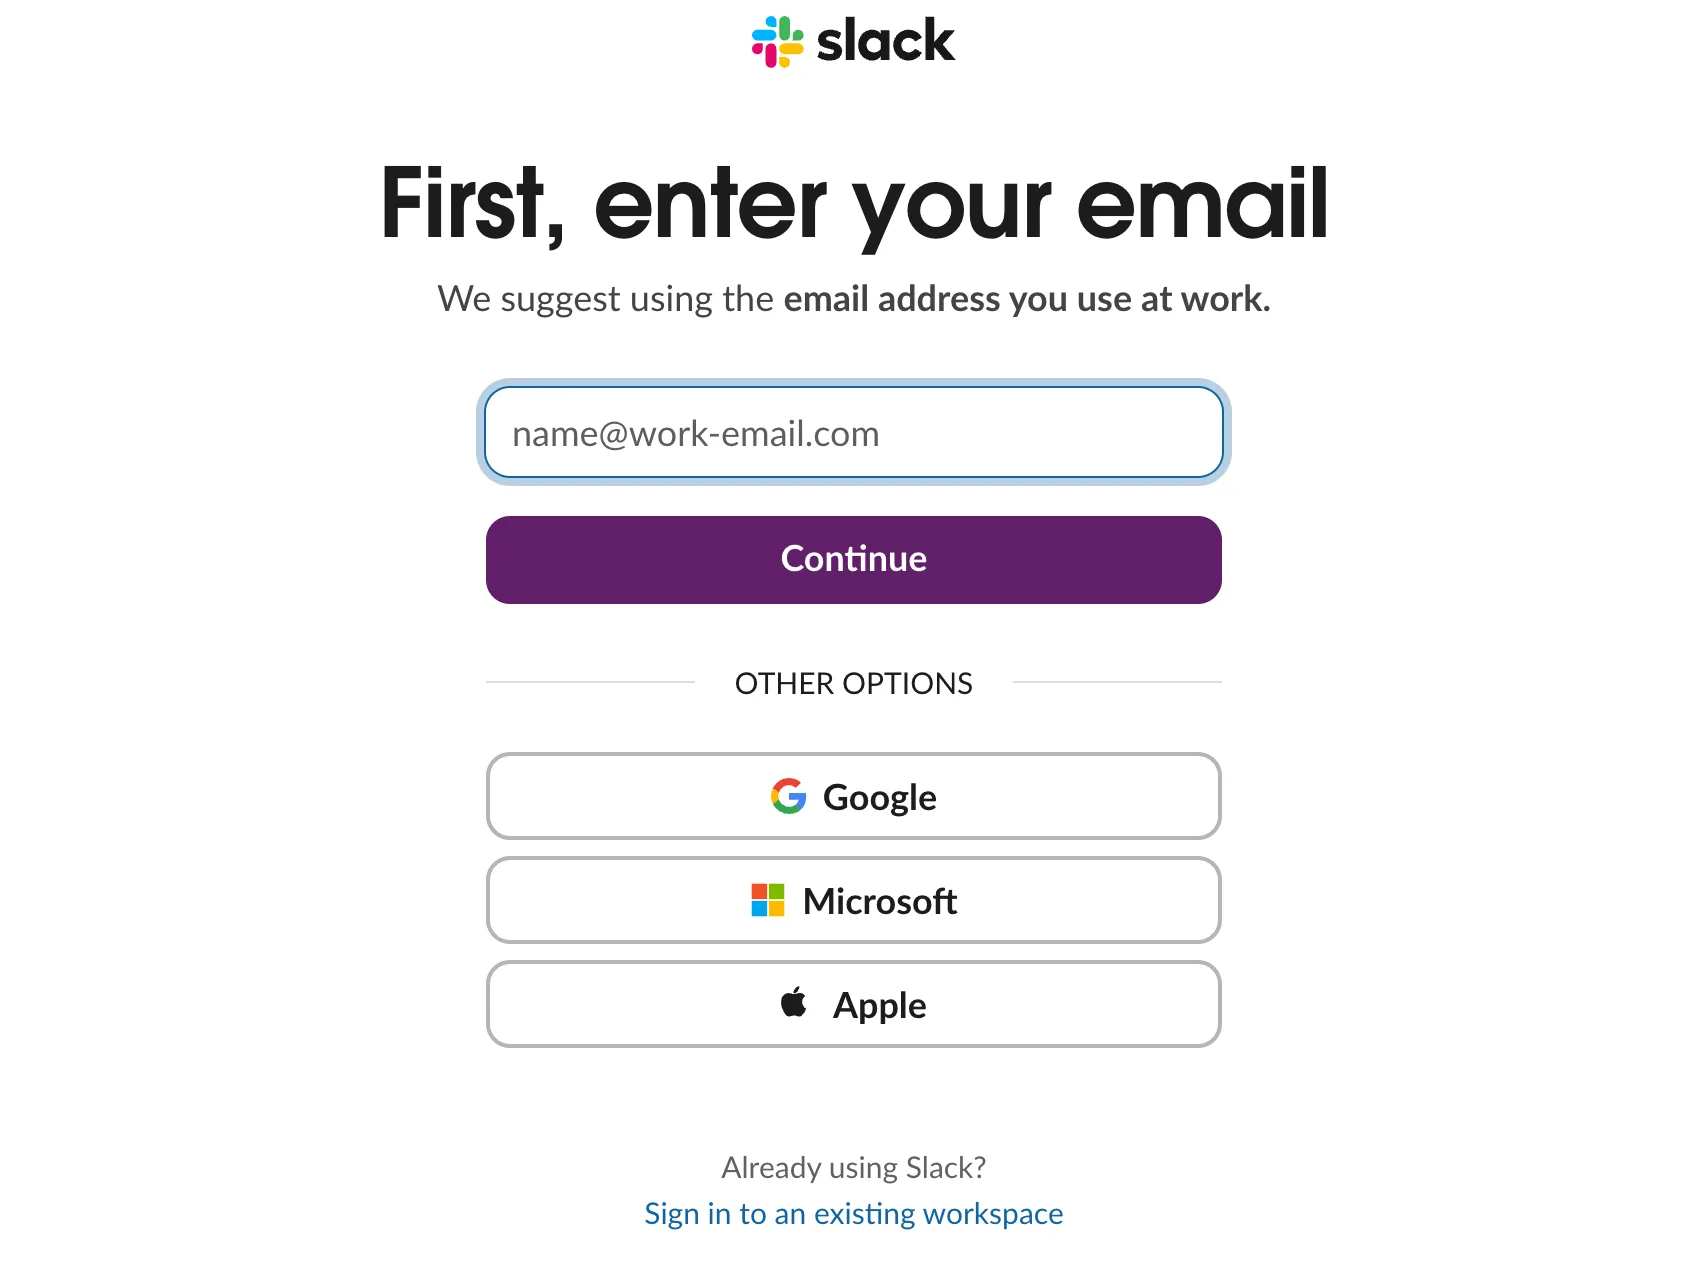
First, enter your email
Typed the signup email; a person pressed Continue
Why it works
One field and one button. No password to invent: Slack confirms the address with a code instead. The work-email hint tells the user which address to use before Slack later reads the domain from it.
What’s on this screen
A single page with the heading "First, enter your email" and the line "We suggest using the email address you use at work." One Email address field (placeholder name@work-email.com) and a Continue button, then OTHER OPTIONS: Google, Microsoft and Apple. Under them: "Already using Slack? Sign in to an existing workspace". No password field, no name, no terms notice on this screen.
Step 3 of 14:Email verification
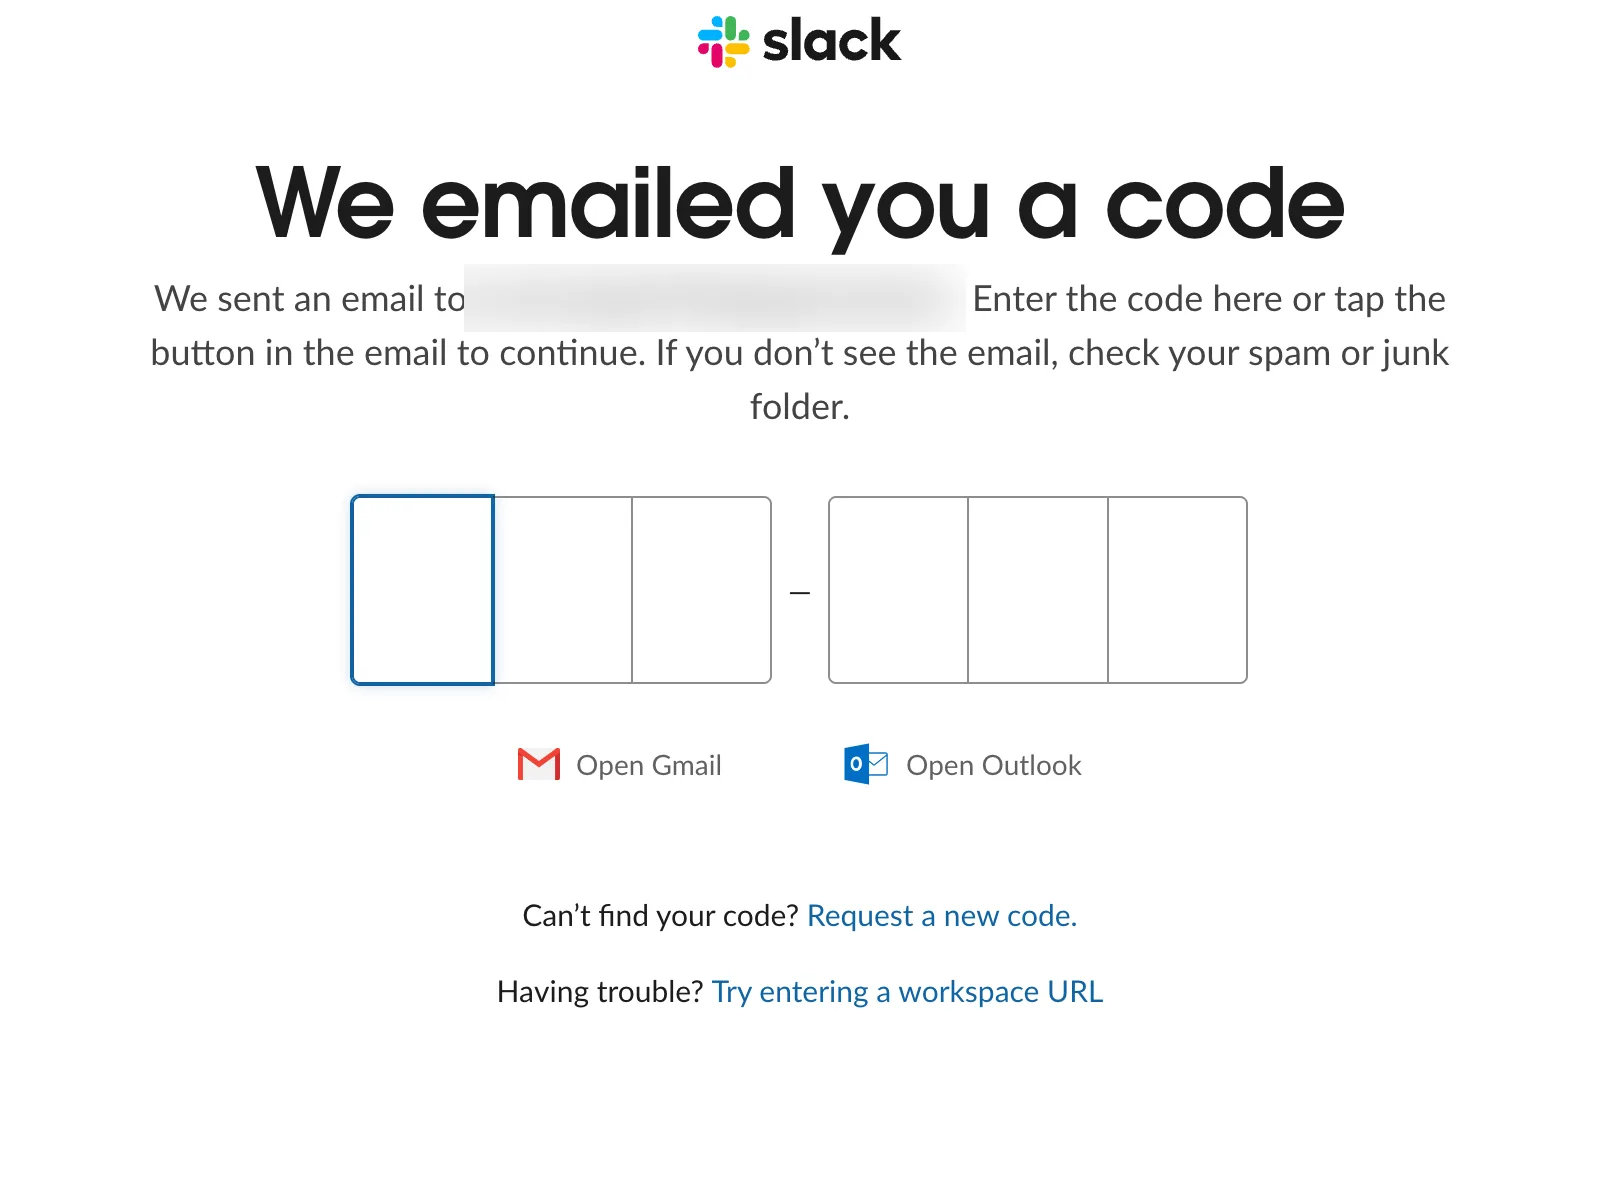
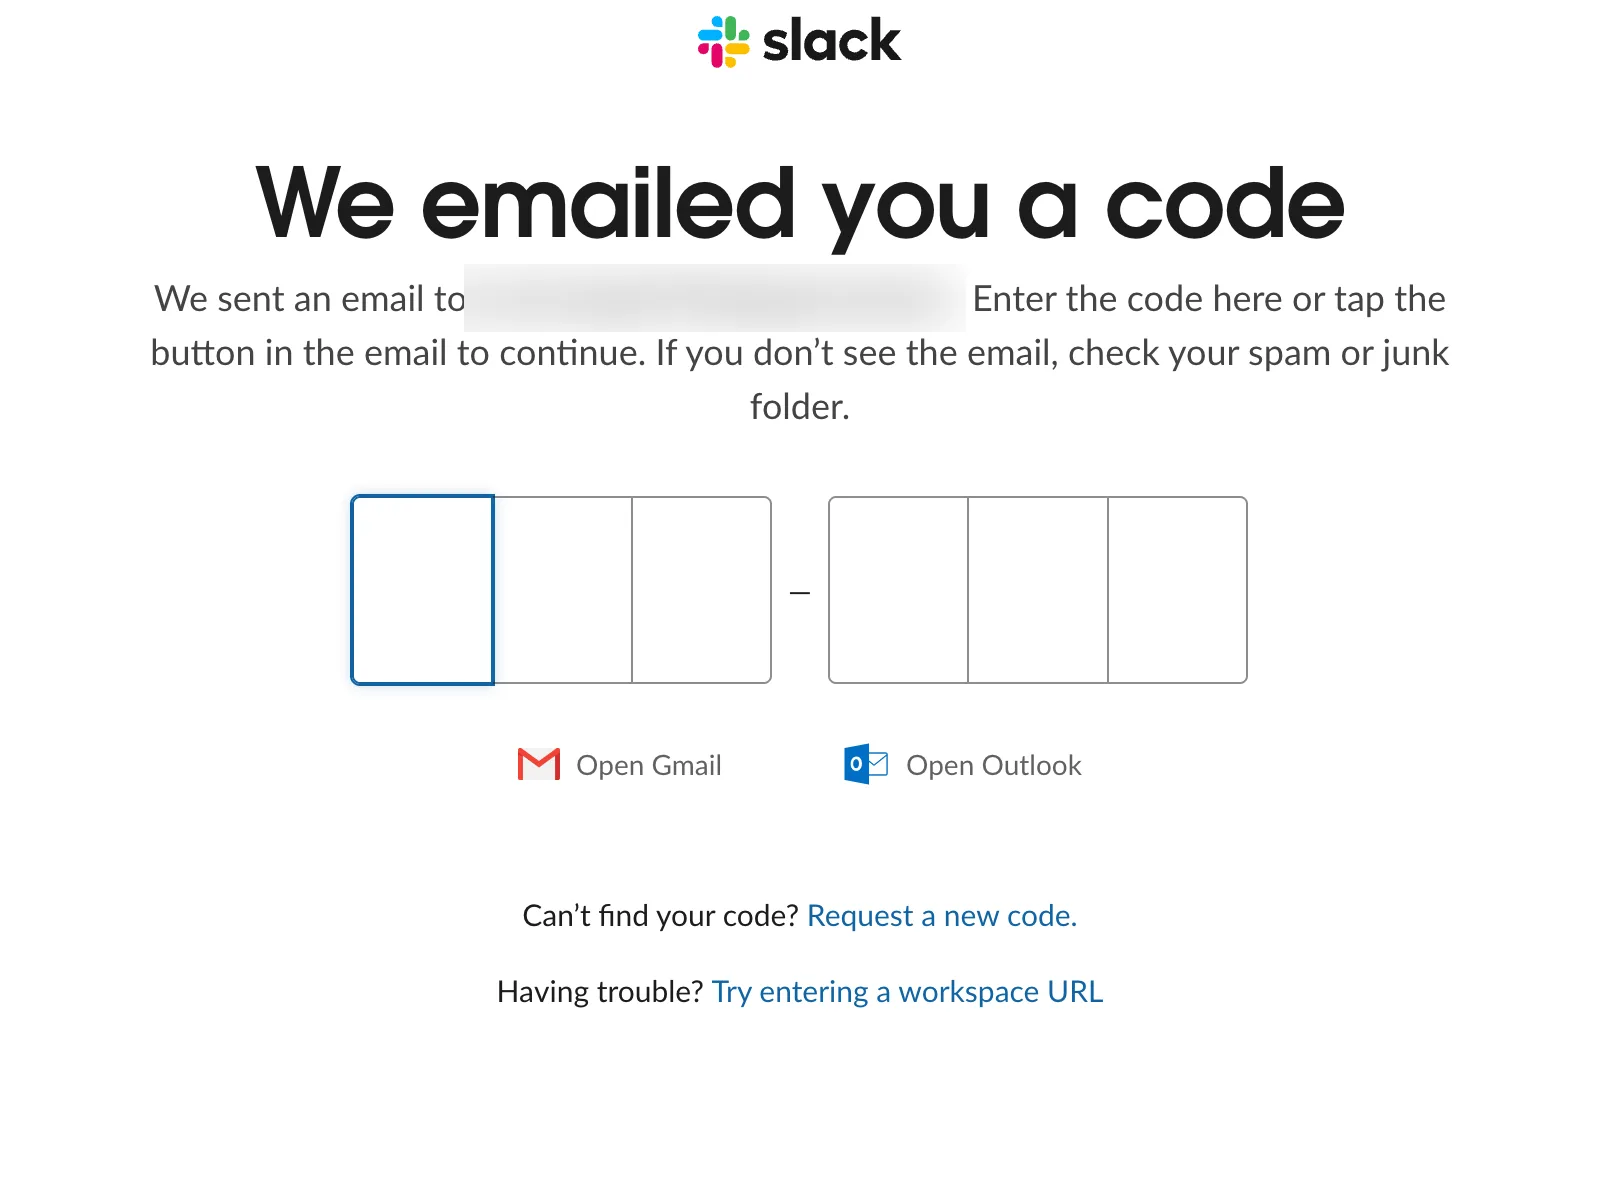
We emailed you a code
Read Slack's email ("Slack confirmation code: …", which arrived within 30 seconds) and typed the six-character code
Why it works
The code is in the email subject, so it can be read from a notification without opening the message. The boxes submit on the last character, with no Confirm button to find; the Gmail and Outlook links save a tab switch.
What’s on this screen
"We emailed you a code" with the address in bold and the instruction to enter the code or tap the button in the email, plus a spam-folder hint. Six boxes in two groups of three, split by a dash. Open Gmail and Open Outlook links, "Request a new code" and "Try entering a workspace URL". The email holds the code and a Confirm and Sign In button, and asks for nothing else. After the sixth character the page showed "Checking your code…" for a few seconds, then opened the next dialog.
Step 4 of 14:Signup formDone by a person
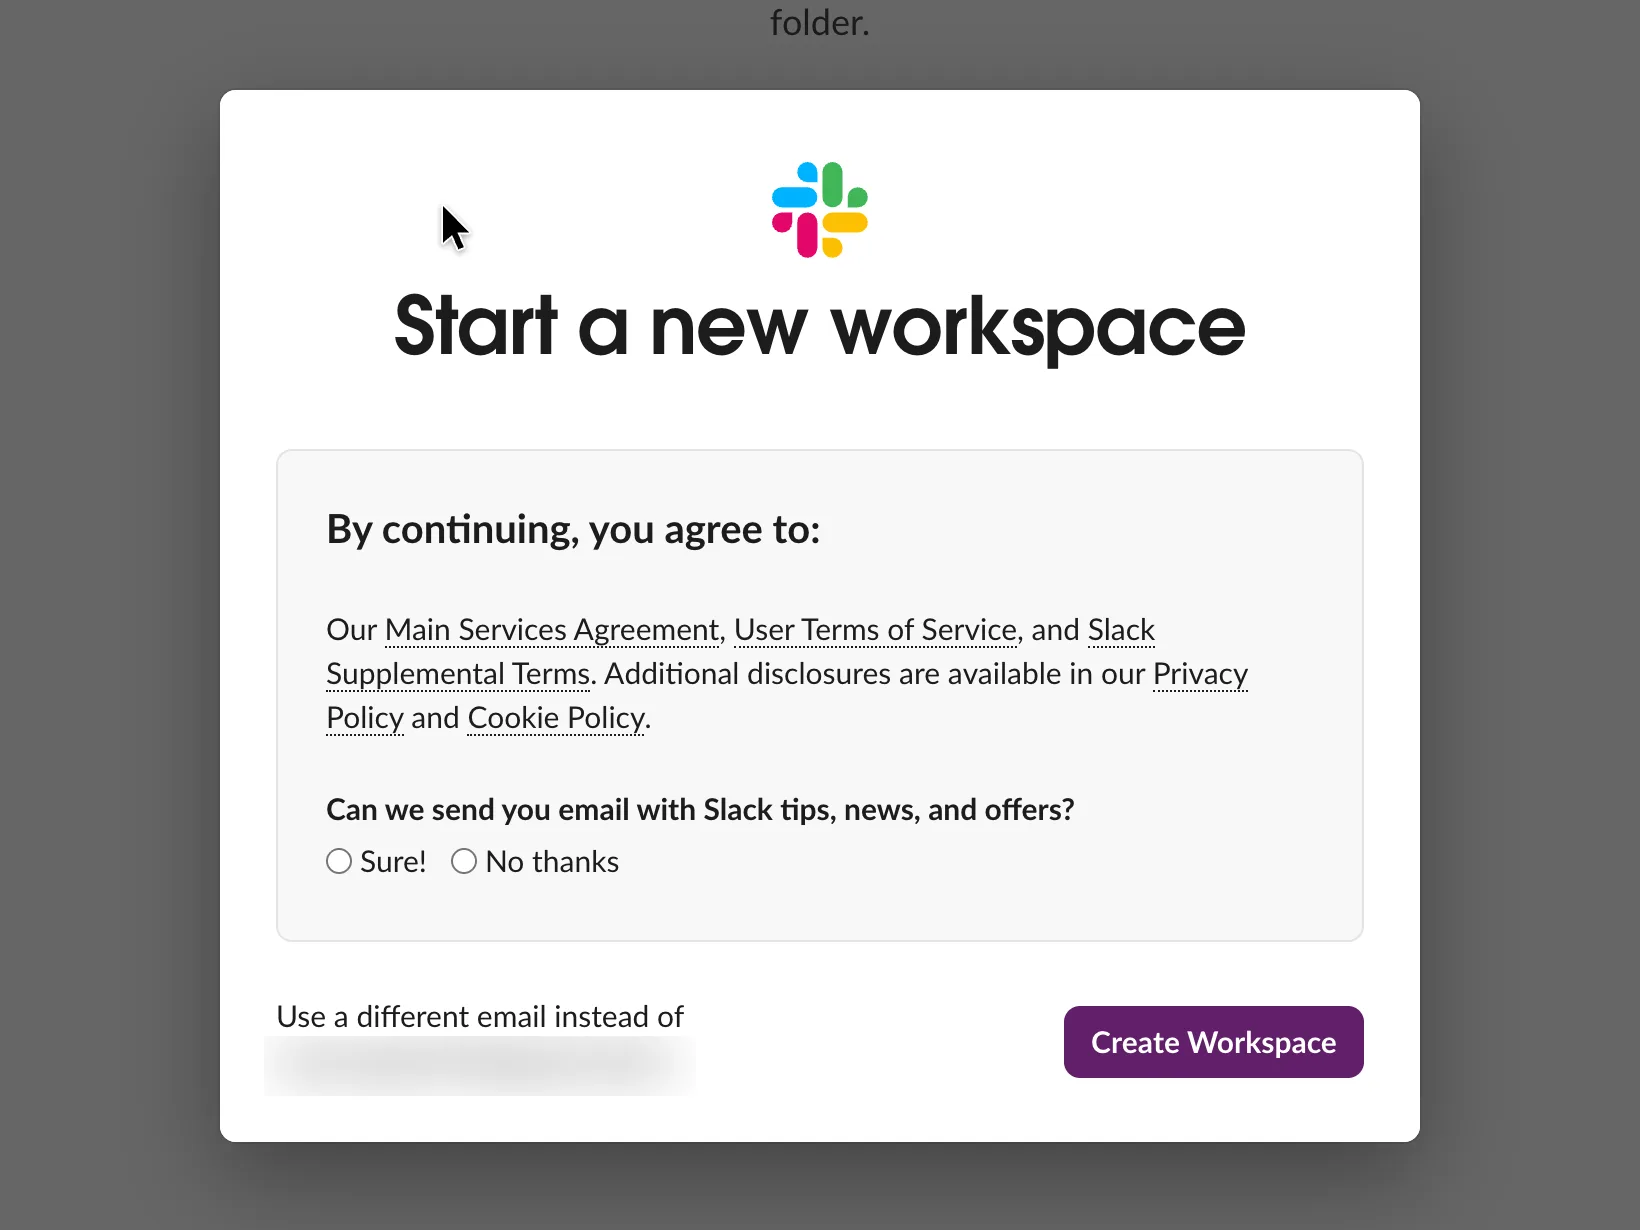
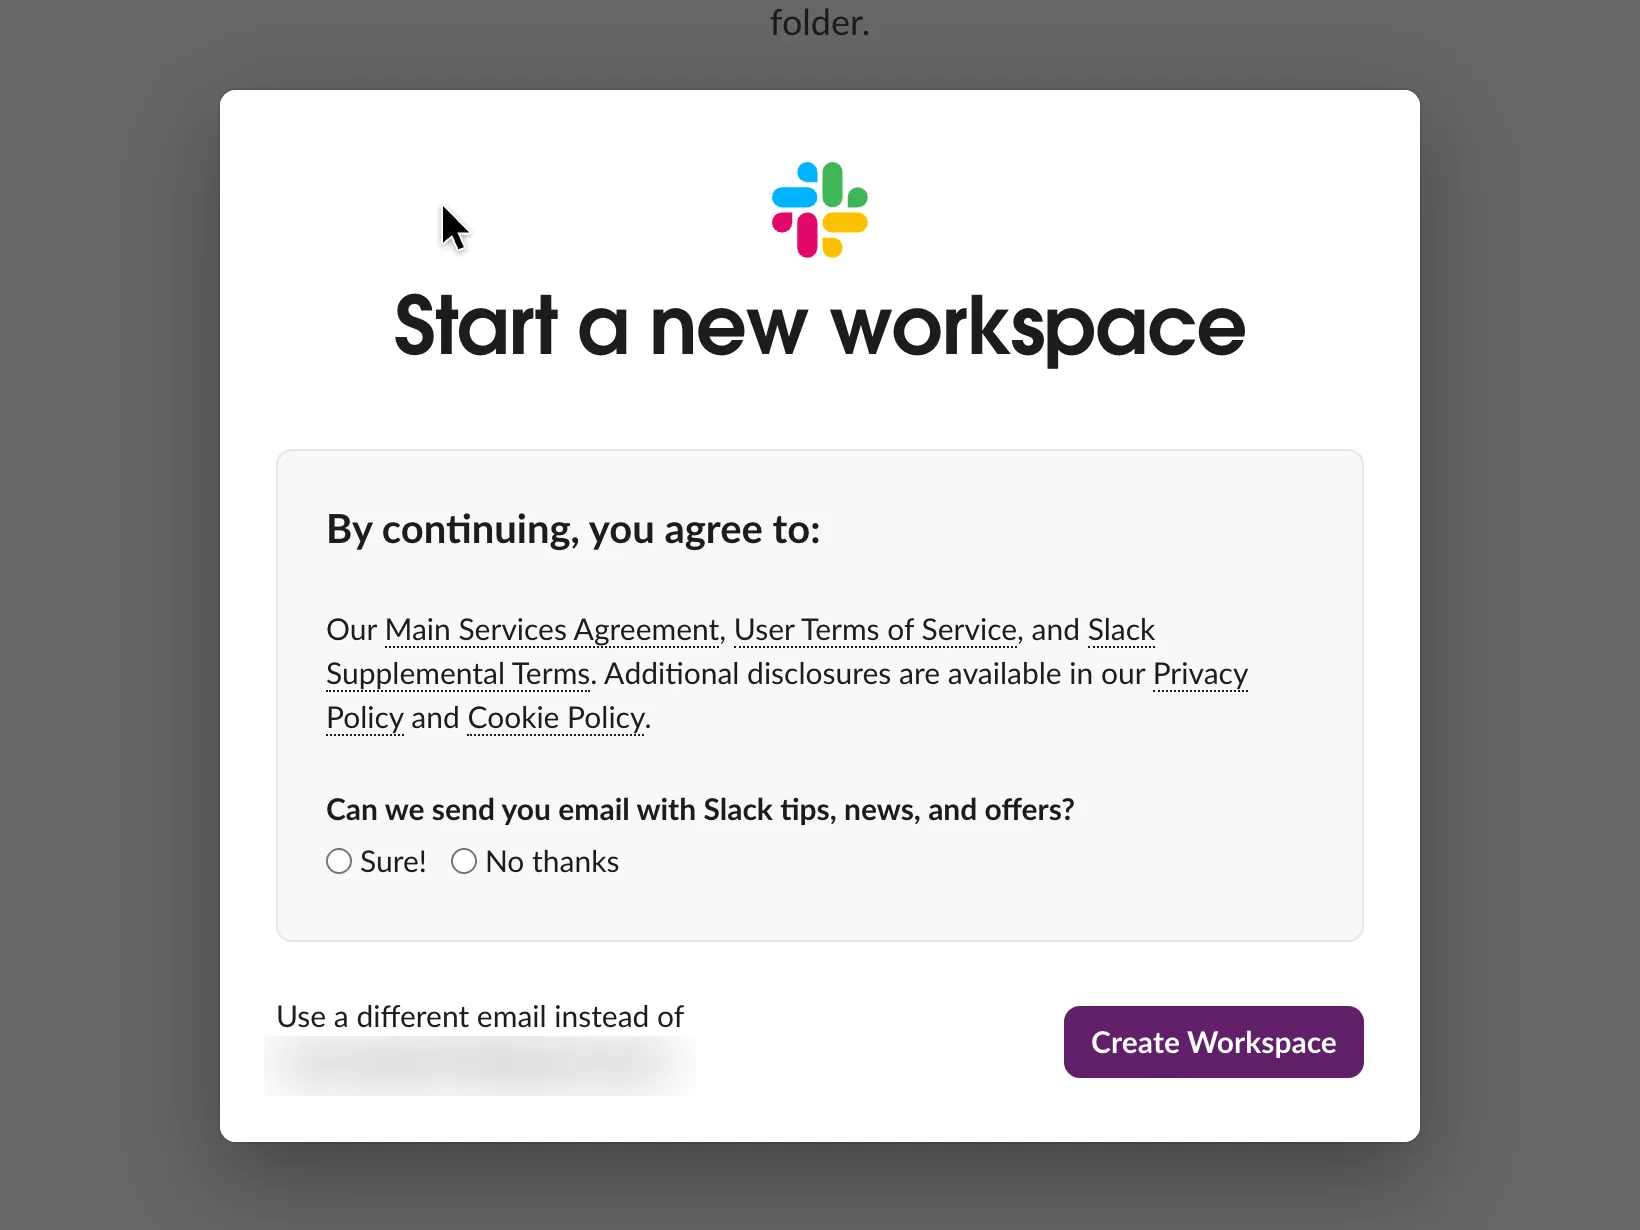
Start a new workspace: the terms and a marketing email question
Chose No thanks for Slack tips, news and offers; a person then pressed Create Workspace, which accepts the terms
Why it works
The terms sit on the button that creates the workspace, so the user agrees at the moment it means something. The marketing question has no preselected answer, so nobody is opted in by default.
What’s on this screen
A dialog over the code page, titled "Start a new workspace". "By continuing, you agree to:" the Main Services Agreement, User Terms of Service and Slack Supplemental Terms, with links to the Privacy Policy and Cookie Policy. A question, "Can we send you email with Slack tips, news, and offers?", with Sure! and No thanks radios, neither selected. At the bottom: "Use a different email instead of" the address, and Create Workspace.
Step 5 of 14:Setup question
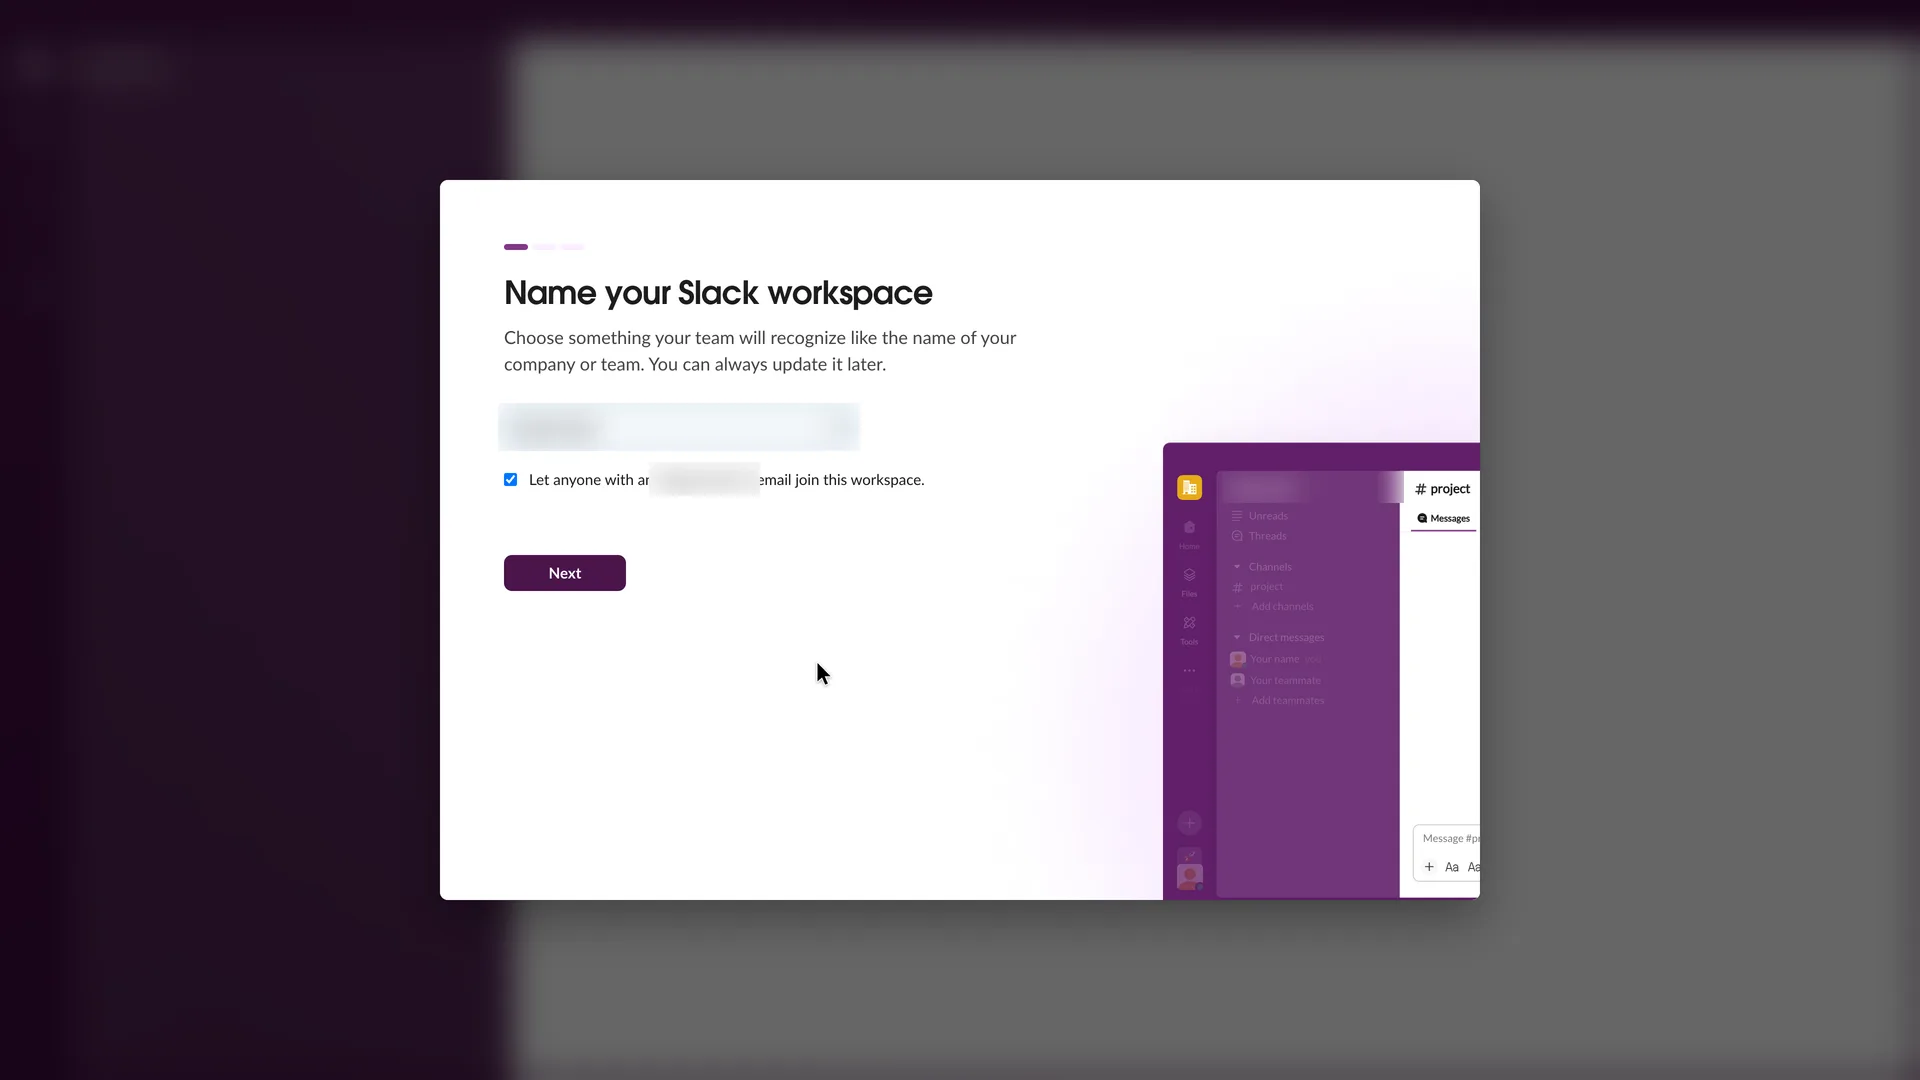
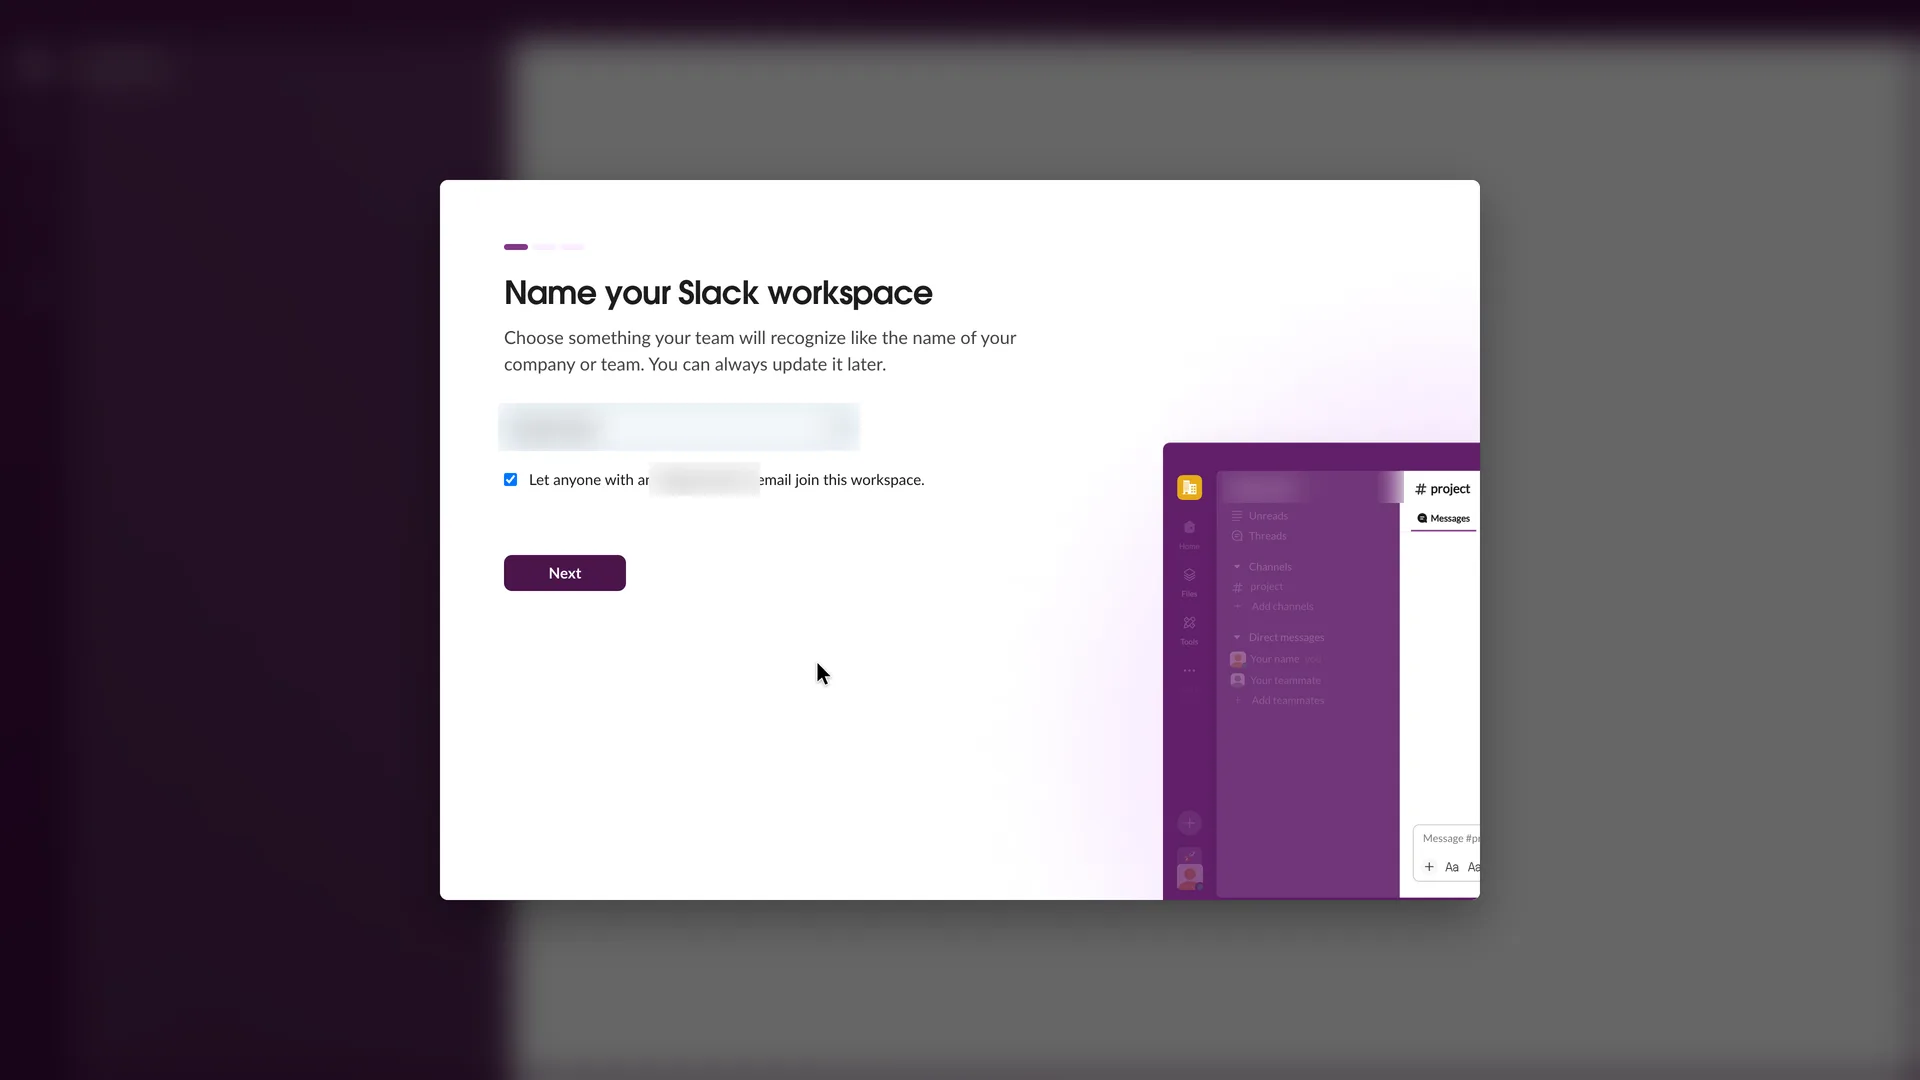
Name your Slack workspace, prefilled from the email domain
Replaced the prefilled name with Quillmark, unticked the box that lets anyone with the email's domain join, and pressed Next
Why it works
One question per screen with a progress bar that shows three, and a live sketch of the sidebar that takes the name as it is typed. "You can always update it later" takes the weight off the choice.
What gets in the way
The box that lets anyone with an address at the email's domain join the workspace is ticked by default. Unless the user notices and unticks it, anyone at that domain can join without an invite. Our test address was at an email provider's domain, and Slack still offered and ticked the box, so any of that provider's users could have joined; with a work address, it admits anyone at the company.
What’s on this screen
Slack's app opens behind a dialog with a three-part progress bar, step 1 lit. "Name your Slack workspace": "Choose something your team will recognize like the name of your company or team. You can always update it later." The name field is already filled with a name made from the email's domain, with a character counter. Below it, ticked by default: "Let anyone with an @<the email's domain> email join this workspace." On the right, a sketch of the Slack window shows the name in the sidebar, a #project channel, "Your name (you)", "Your teammate" and Add teammates.
Step 6 of 14:Setup question
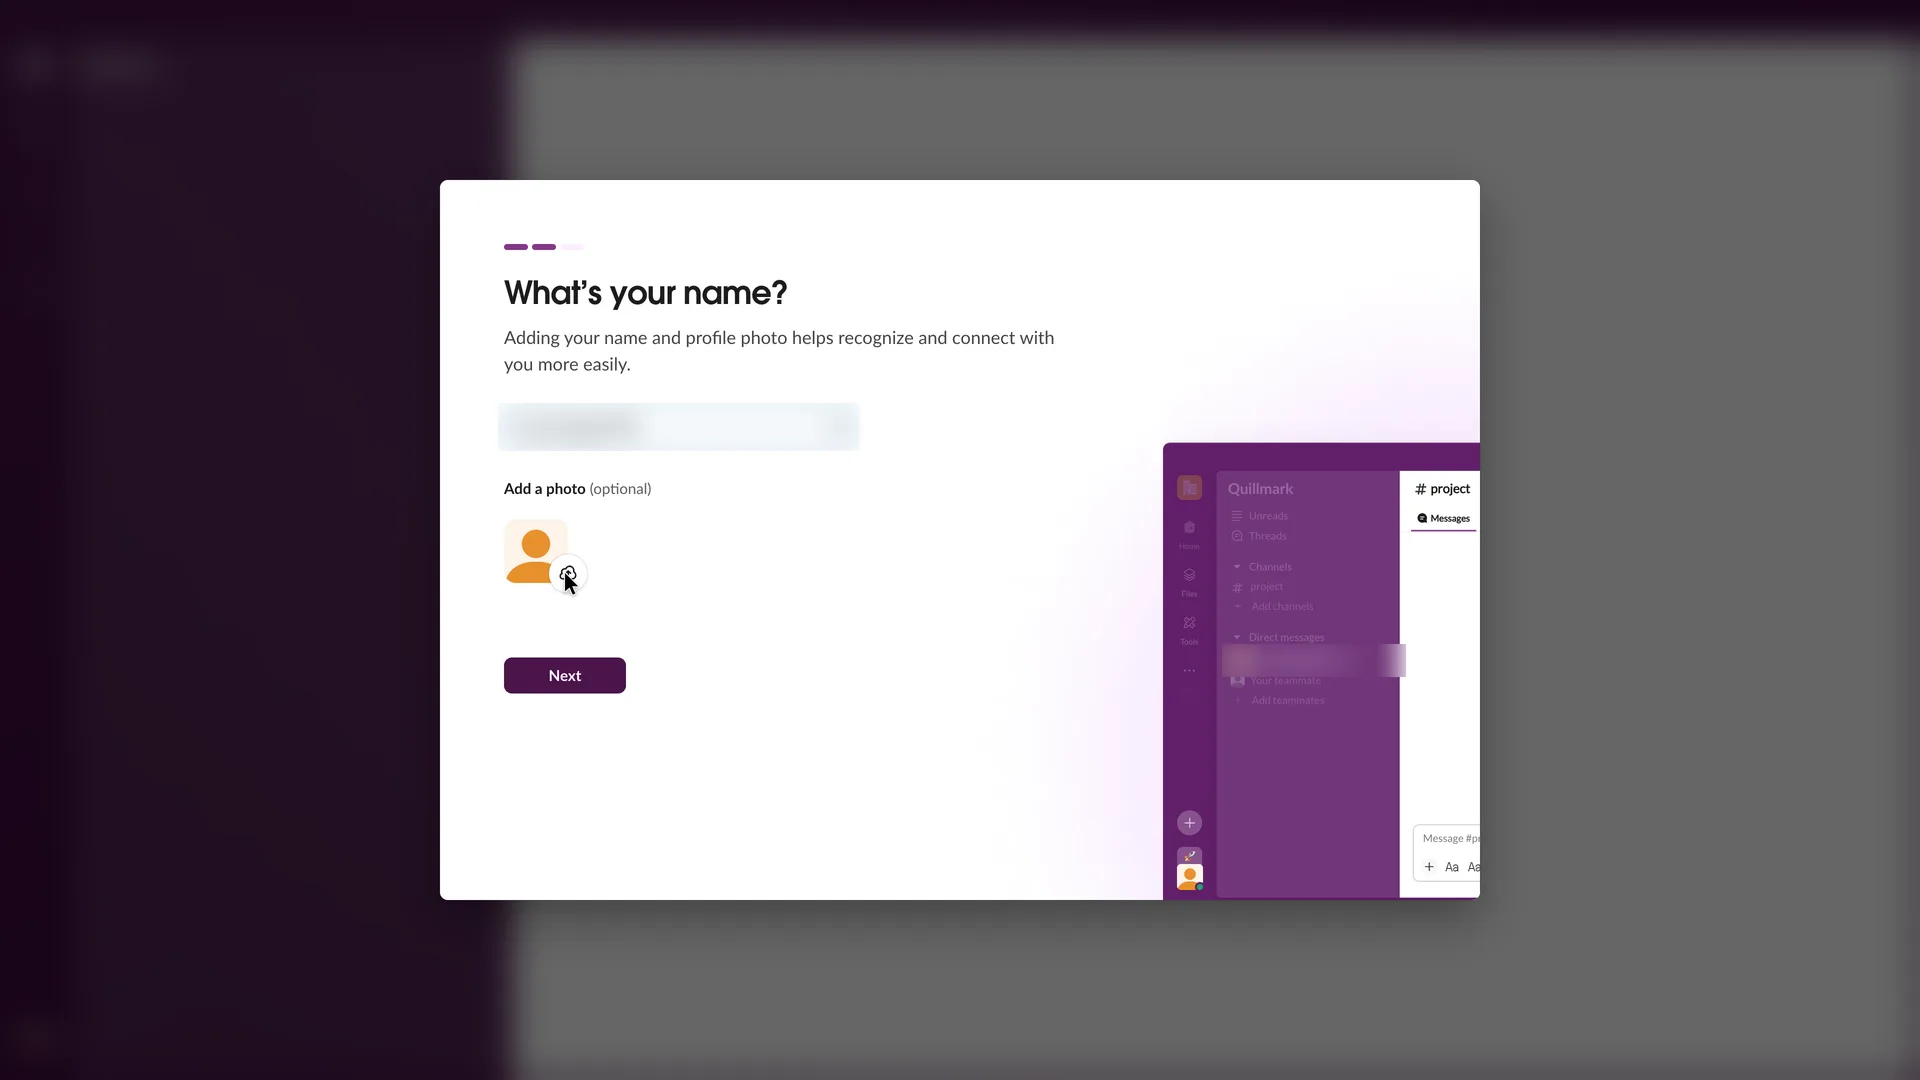
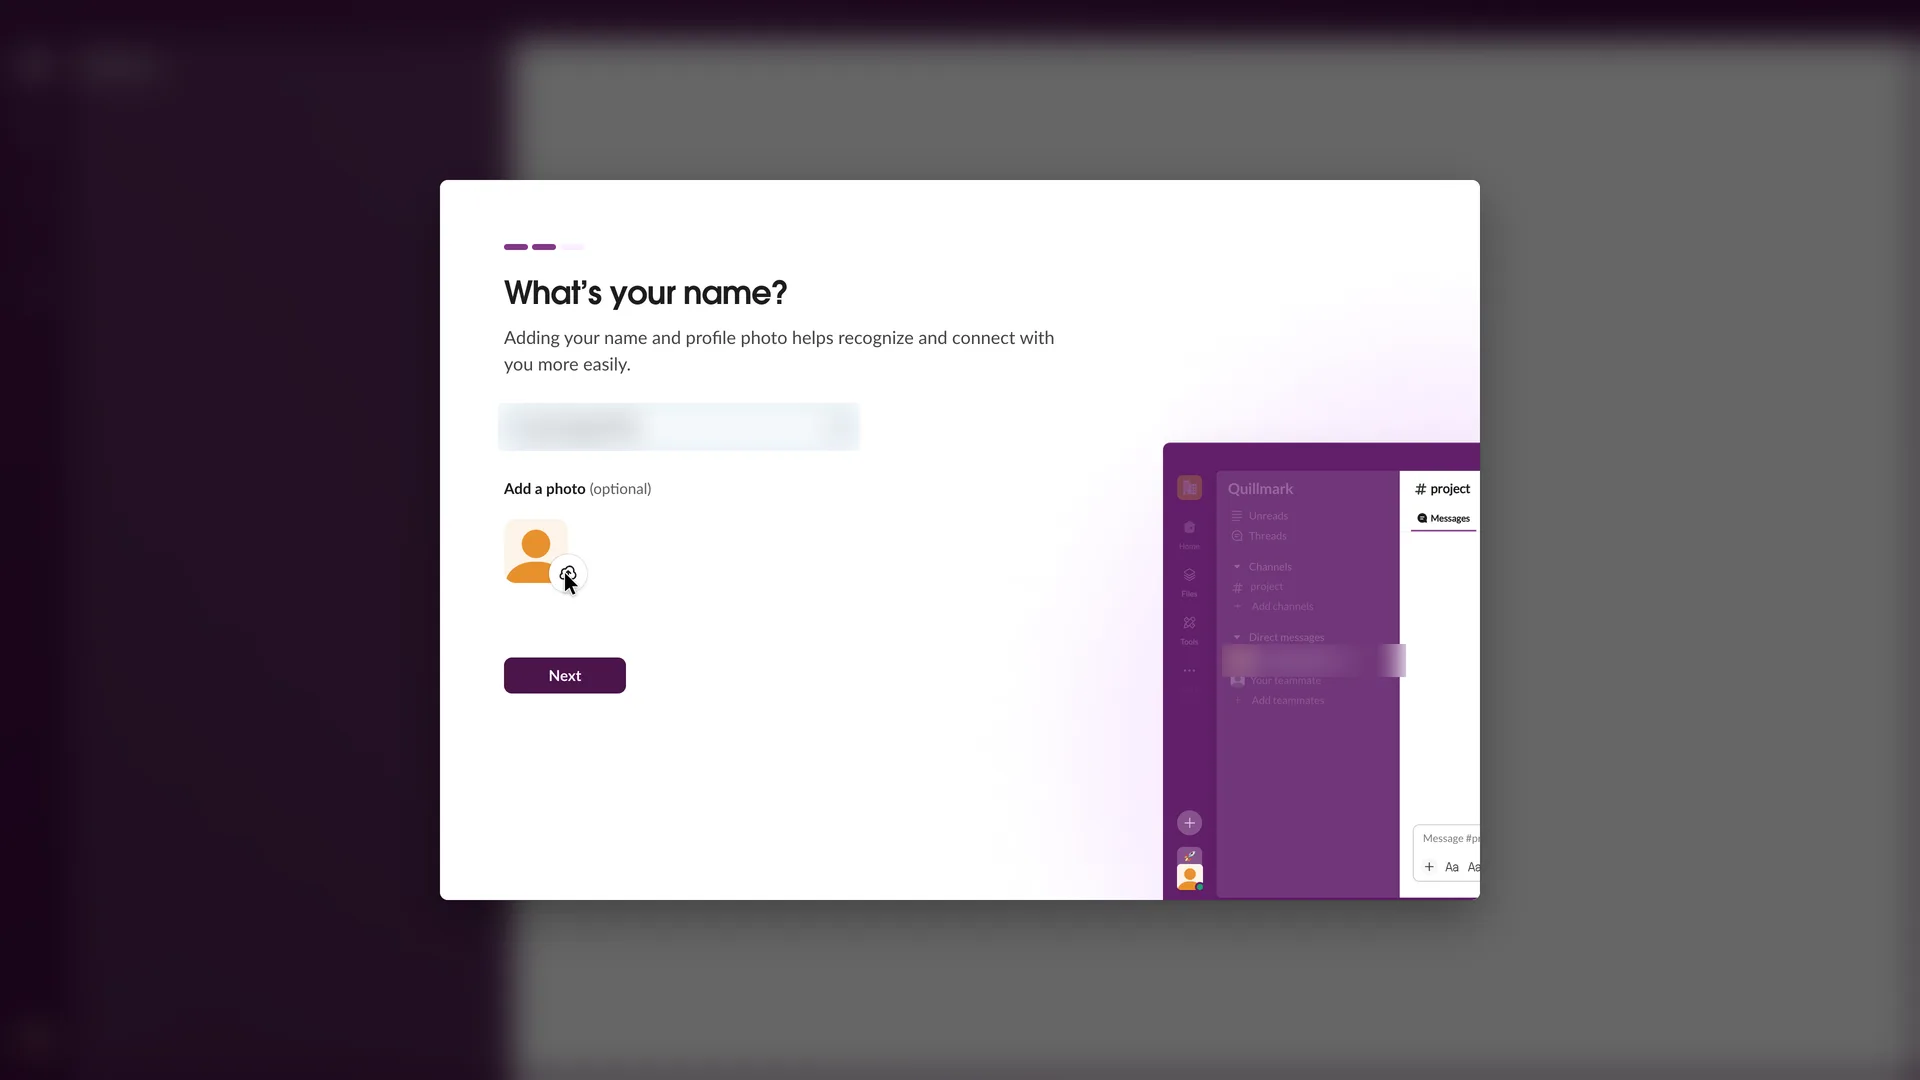
What's your name? The field holds the email's user name
Replaced the prefilled name with Robin Hale, added no photo, and pressed Next
Why it works
The sketch shows where the name will appear (the direct-message list), which explains why Slack asks. The photo is marked optional, so it doesn't hold up the step.
What gets in the way
The field arrives filled with the part of the email address before the @ rather than a name, so the user has to notice it and type their own.
What’s on this screen
Step 2 of the three-part bar. "What's your name?" with the line "Adding your name and profile photo helps recognize and connect with you more easily." The First and last name field is prefilled with the part of the email address before the @, and has a character counter. "Add a photo (optional)" with an upload button. The sidebar sketch on the right now shows Quillmark and puts the prefilled name under Direct messages with "you" after it.
Step 7 of 14:Invite teammates
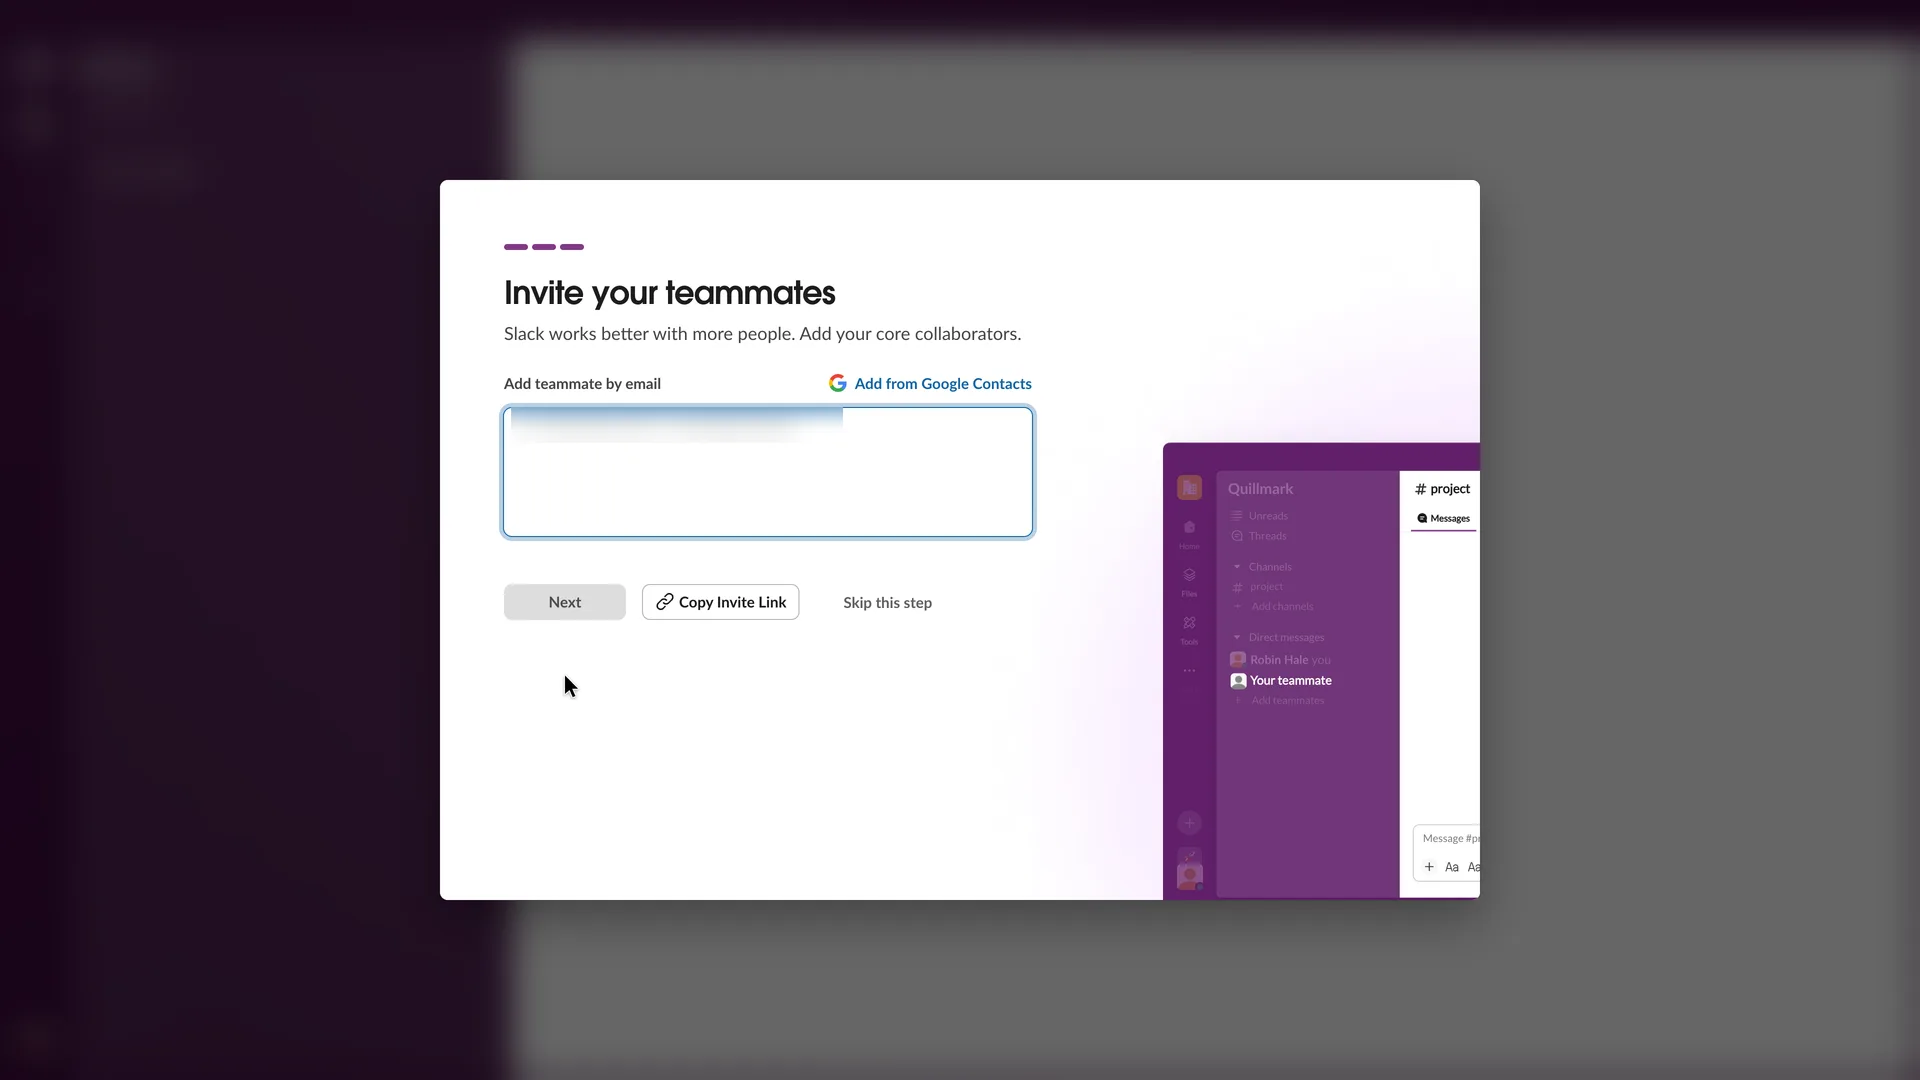
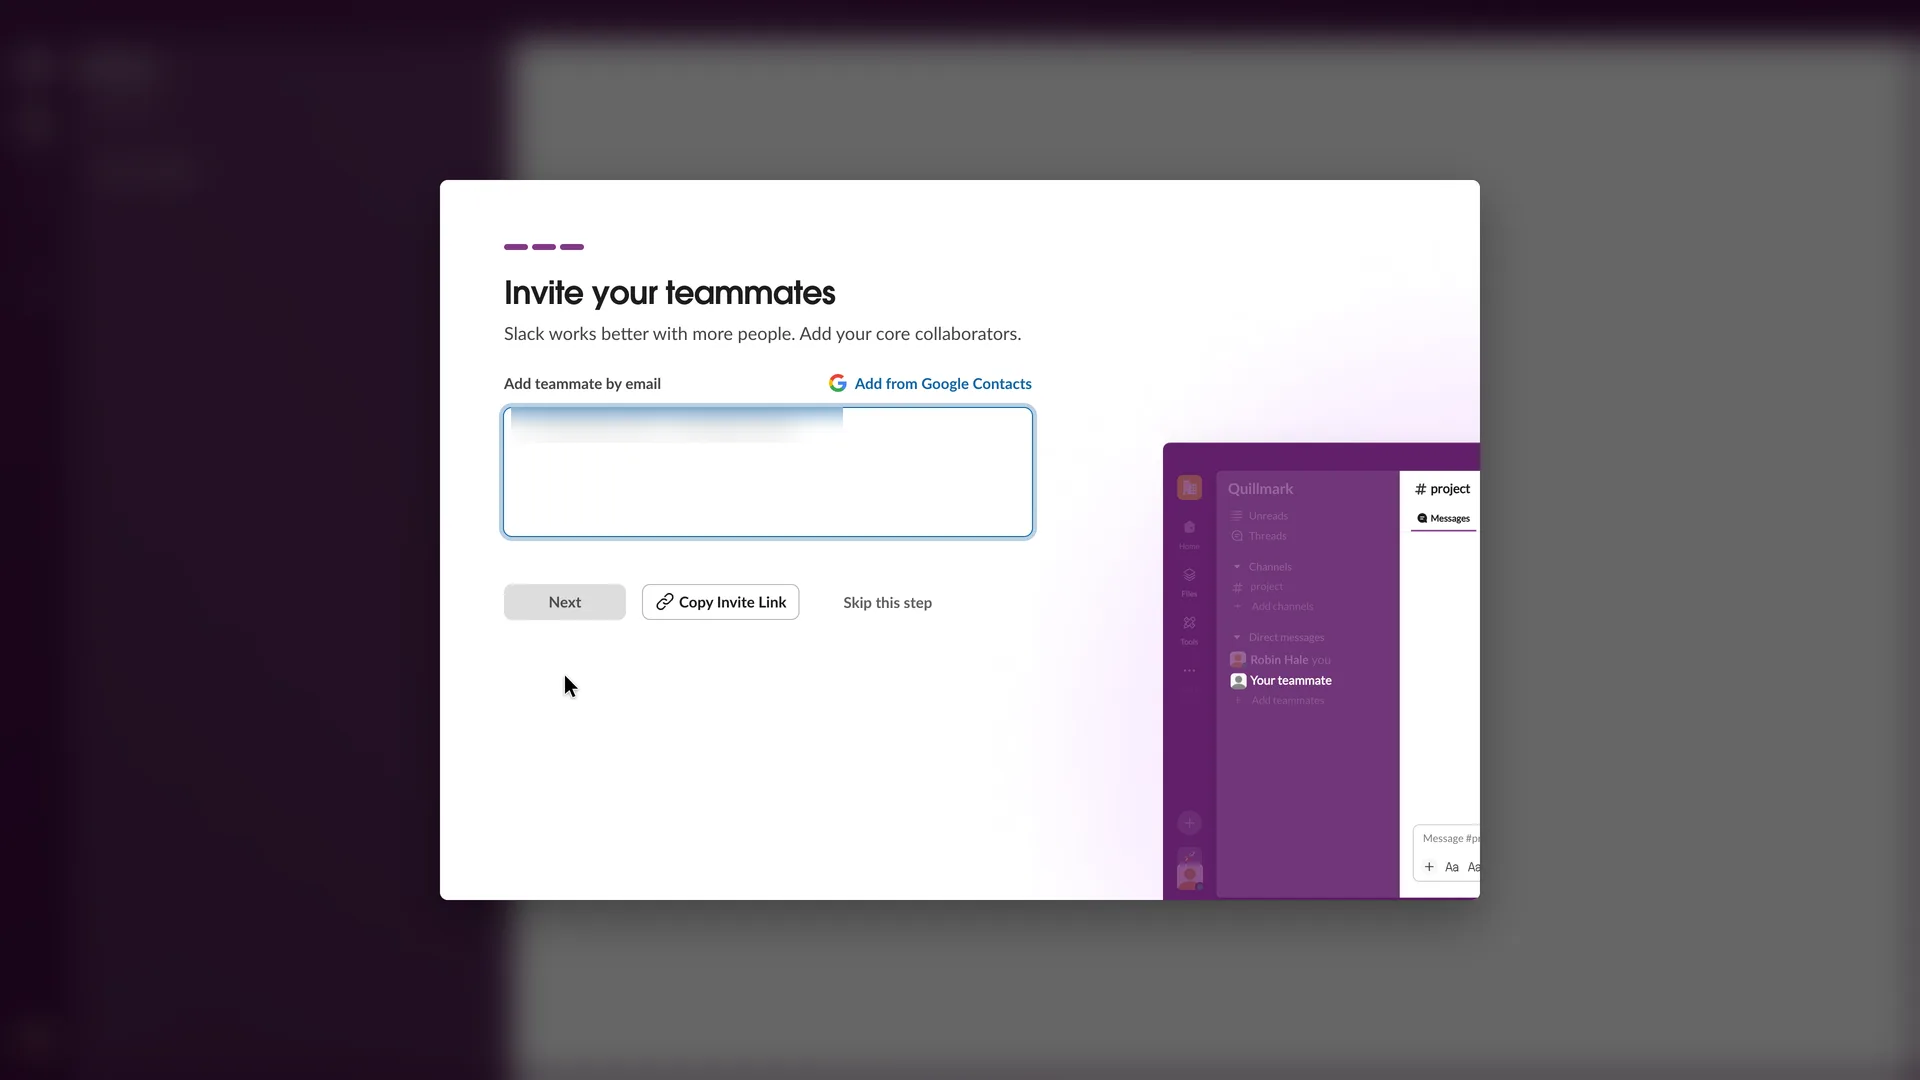
Invite your teammates, with Skip this step
Pressed Skip this step; invited no one
Why it works
Three ways to bring people in (typed emails, Google Contacts, a link) and a visible Skip this step, so a person setting up alone can go on. The bar shows this is the last setup screen.
What gets in the way
Skip this step is grey text beside two buttons, so the way on for someone setting up first looks like the least important option. The example addresses take the user's own email domain.
What’s on this screen
All three parts of the bar are lit. "Invite your teammates": "Slack works better with more people. Add your core collaborators." An "Add teammate by email" box whose example addresses use the signup email's domain, an "Add from Google Contacts" link, a Next button greyed out until an address is typed, Copy Invite Link, and Skip this step as plain text. The sketch highlights "Your teammate" under Robin Hale.
Step 8 of 14:Invite teammates
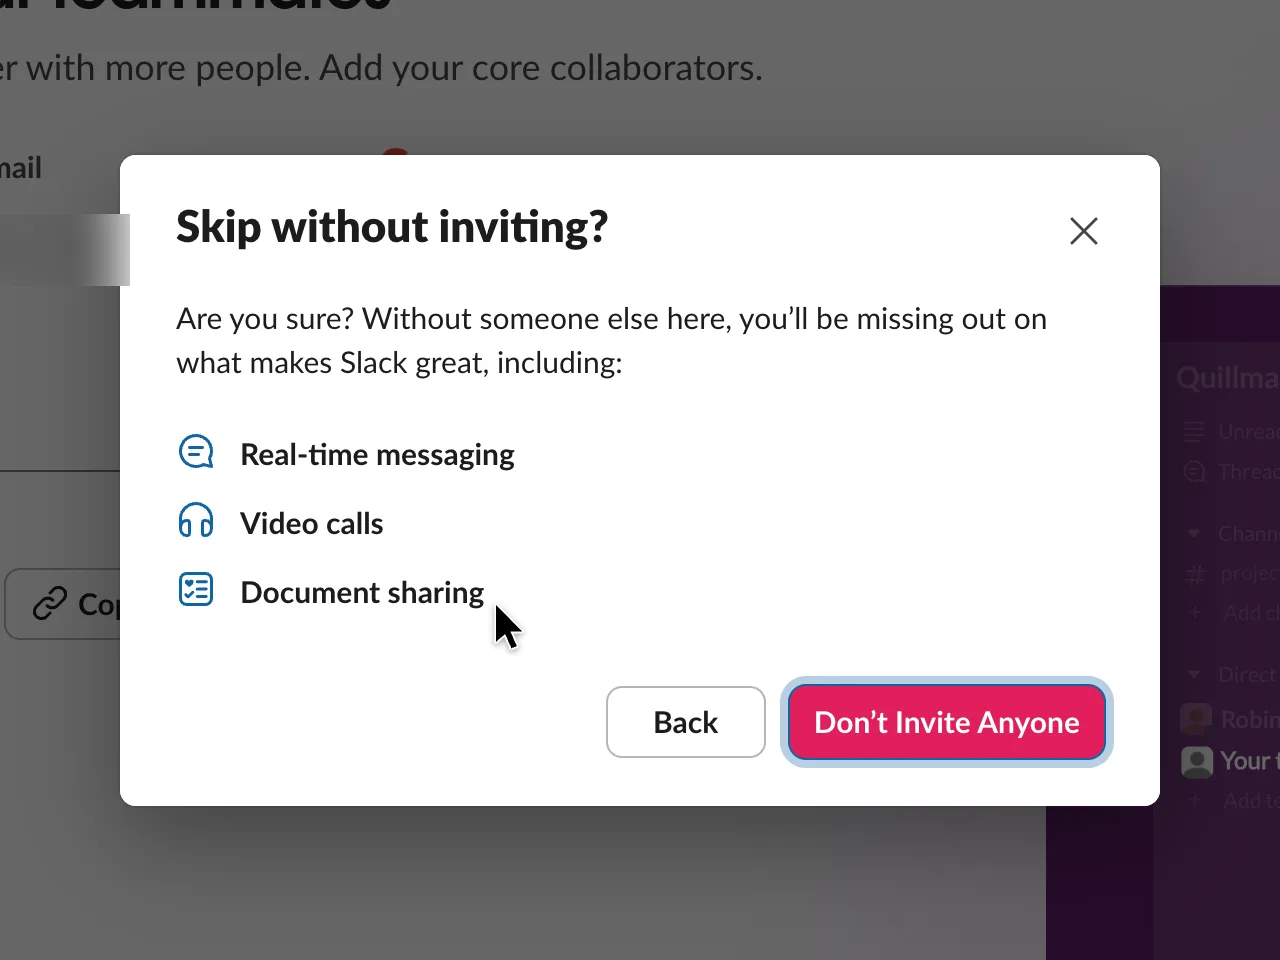
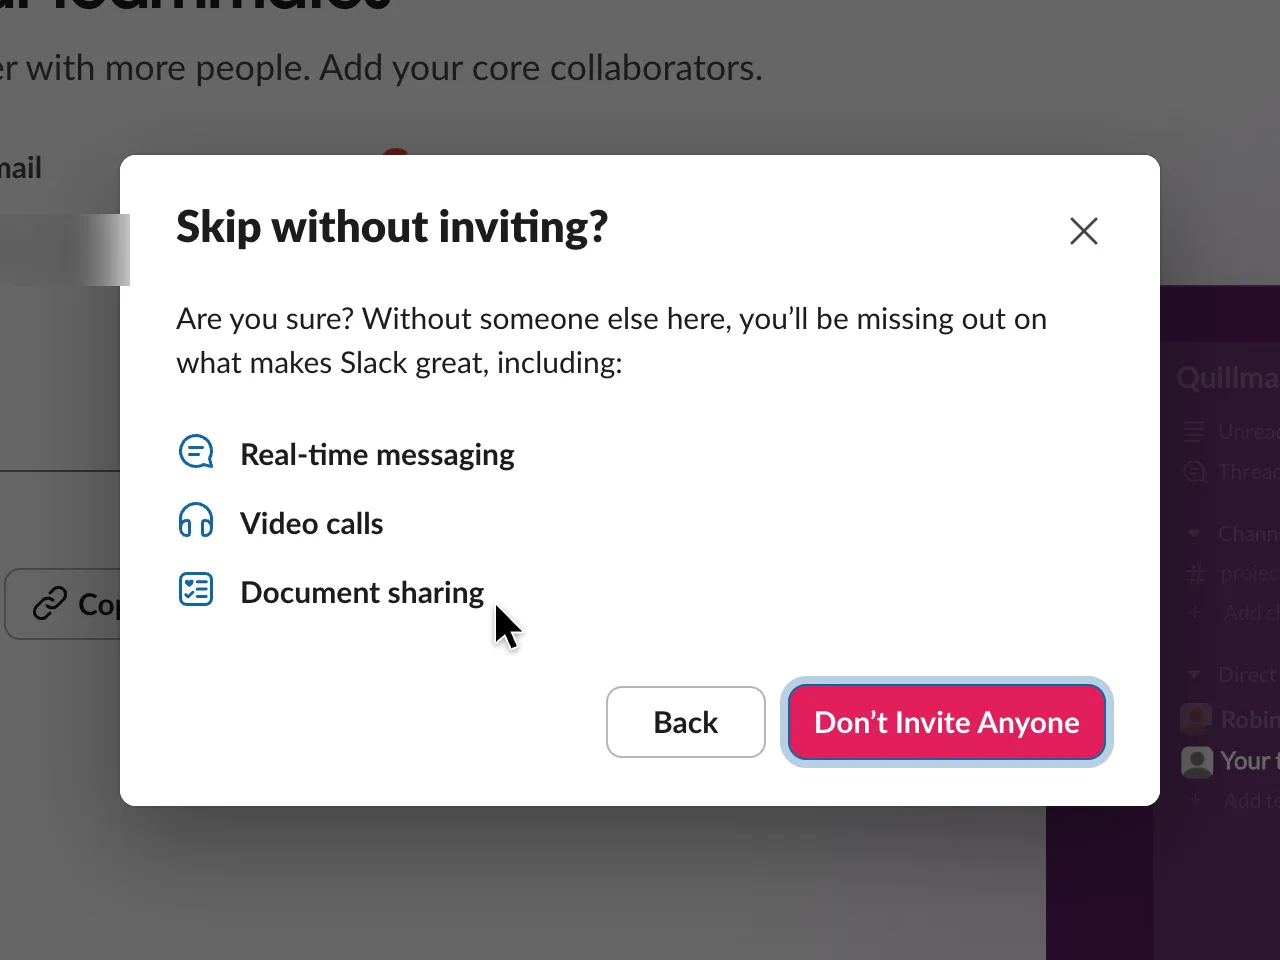
Skip without inviting? A second check before going on alone
Pressed Don't Invite Anyone
Why it works
It names what Slack is for in three words each, and both answers are plain buttons with the refusal focused, so going on costs one click.
What gets in the way
A second screen for a choice the user has just made, worded as a warning; the person who is setting the workspace up before inviting anyone gets told they are missing out.
What’s on this screen
A smaller dialog over the invite step: "Skip without inviting?" and "Are you sure? Without someone else here, you'll be missing out on what makes Slack great, including:" followed by Real-time messaging, Video calls and Document sharing. Buttons: Back and Don't Invite Anyone (the focused one), plus a close cross.
Step 9 of 14:Setup question
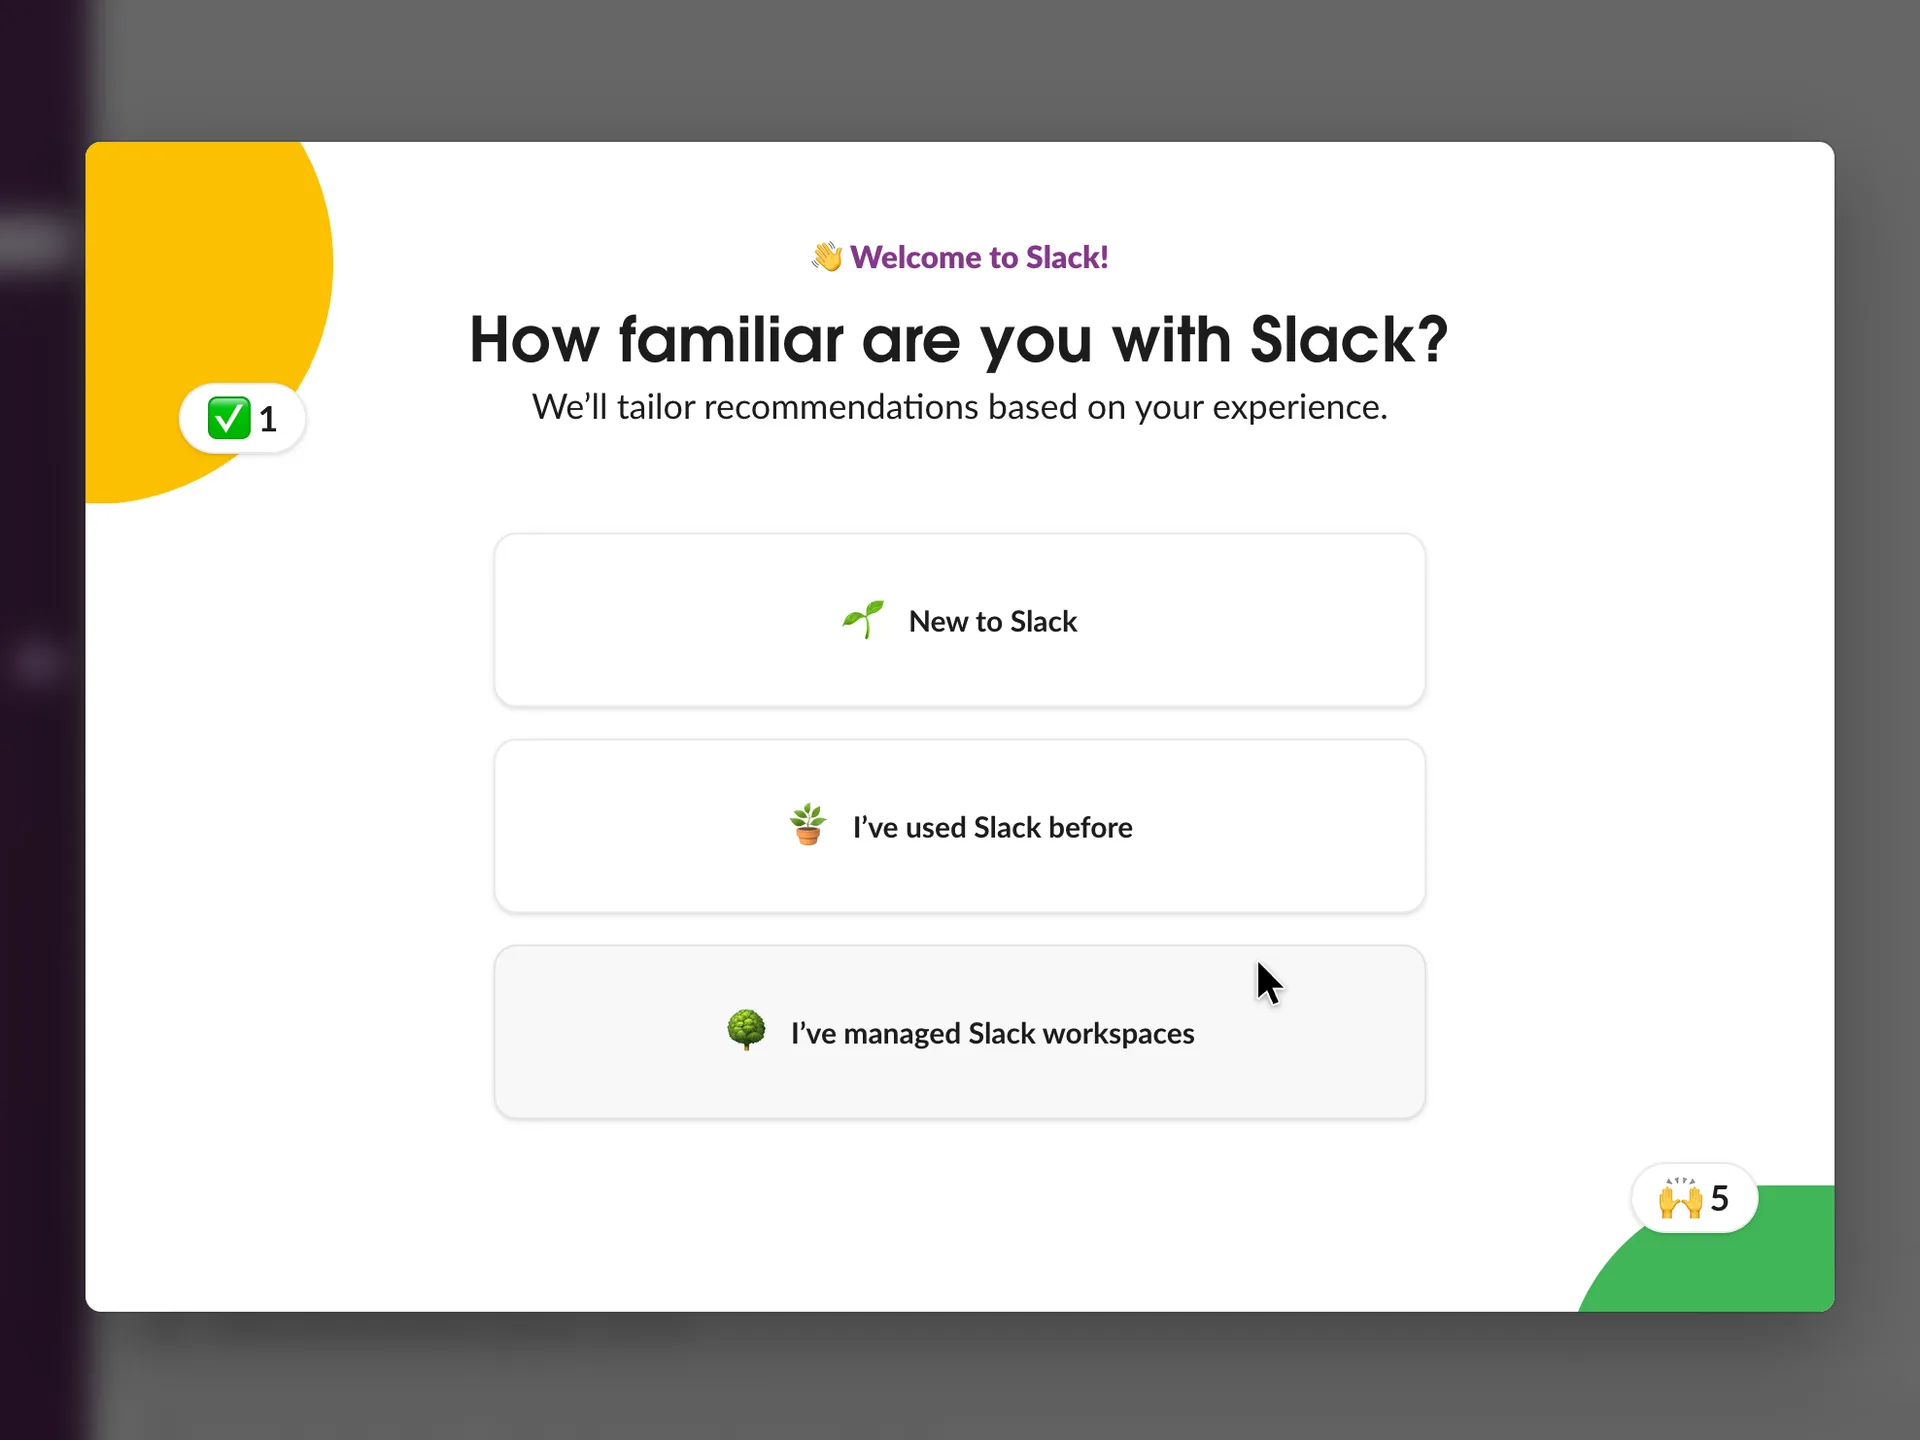
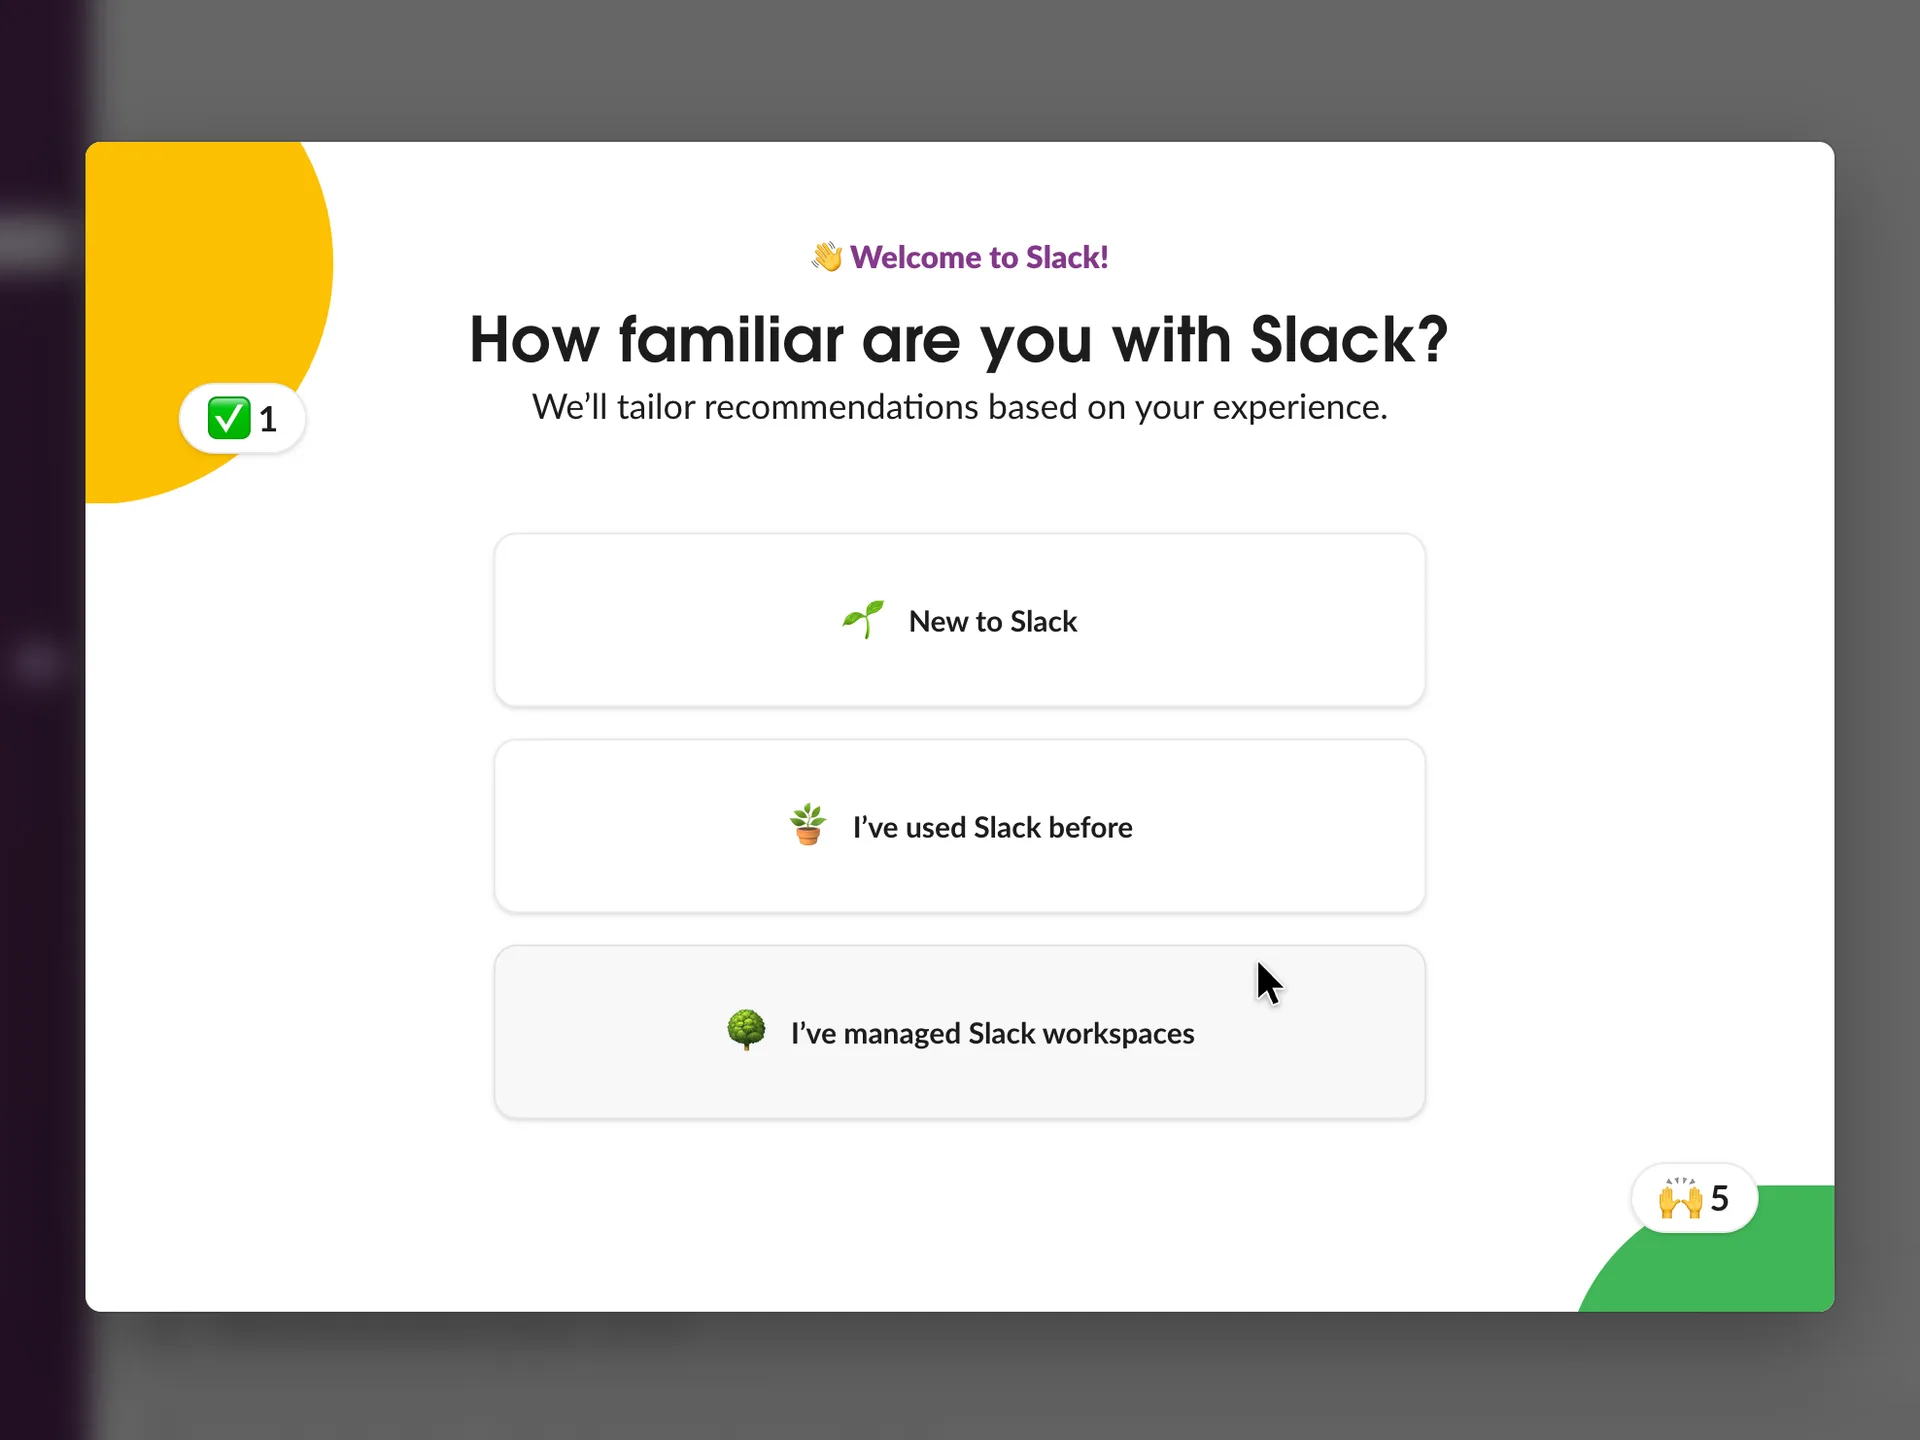
Welcome to Slack: How familiar are you with Slack?
Chose New to Slack (Robin is evaluating Slack after a web search)
Why it works
One question with three answers that describe experience, not job titles, and it says what the answer is for.
What gets in the way
Before this question, Slack had already created three channels on its own, without asking which channels the team needs or what to call them: all-quillmark (named after the workspace), new-channel and social. They sit in the sidebar behind this modal and show at step 13. Answering here can't rename them, so the team's work starts in a channel called new-channel.
What’s on this screen
The workspace has loaded, blurred behind a modal. "Welcome to Slack!" over the question "How familiar are you with Slack?" and "We'll tailor recommendations based on your experience." Three answers as large buttons: New to Slack, I've used Slack before, I've managed Slack workspaces. Reaction badges (a tick with 1, raised hands with 5) decorate the corners. Behind it, blurred and mostly outside the part shown here, the workspace already has three channels, all-quillmark, new-channel and social, with new-channel open; step 13 shows them. Setup never asked what the team works on, so the project channel is called new-channel.
Step 10 of 14:Setup question
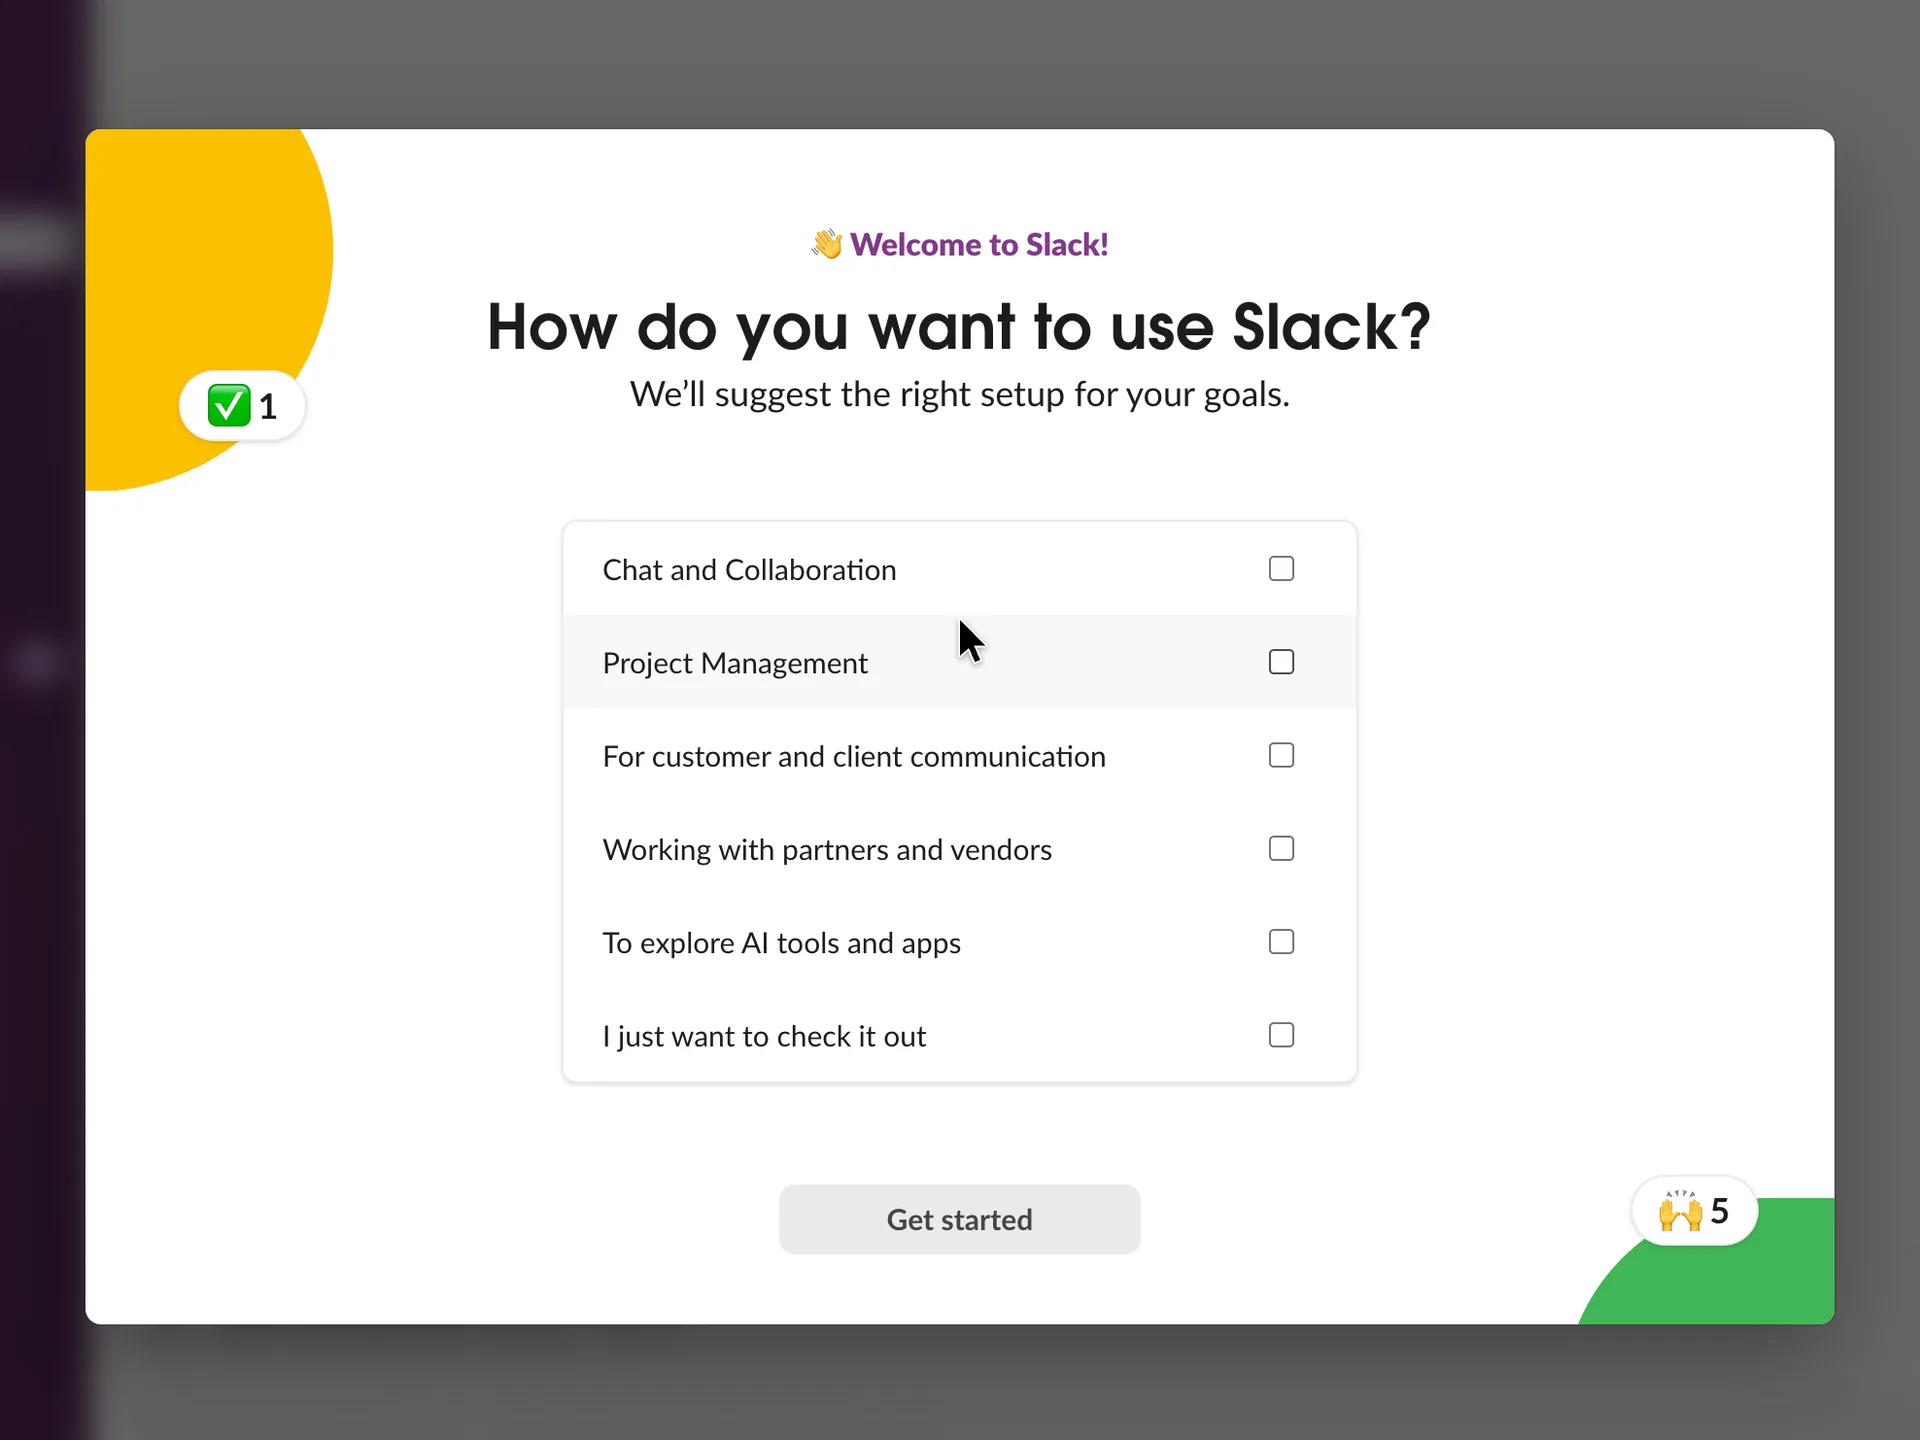
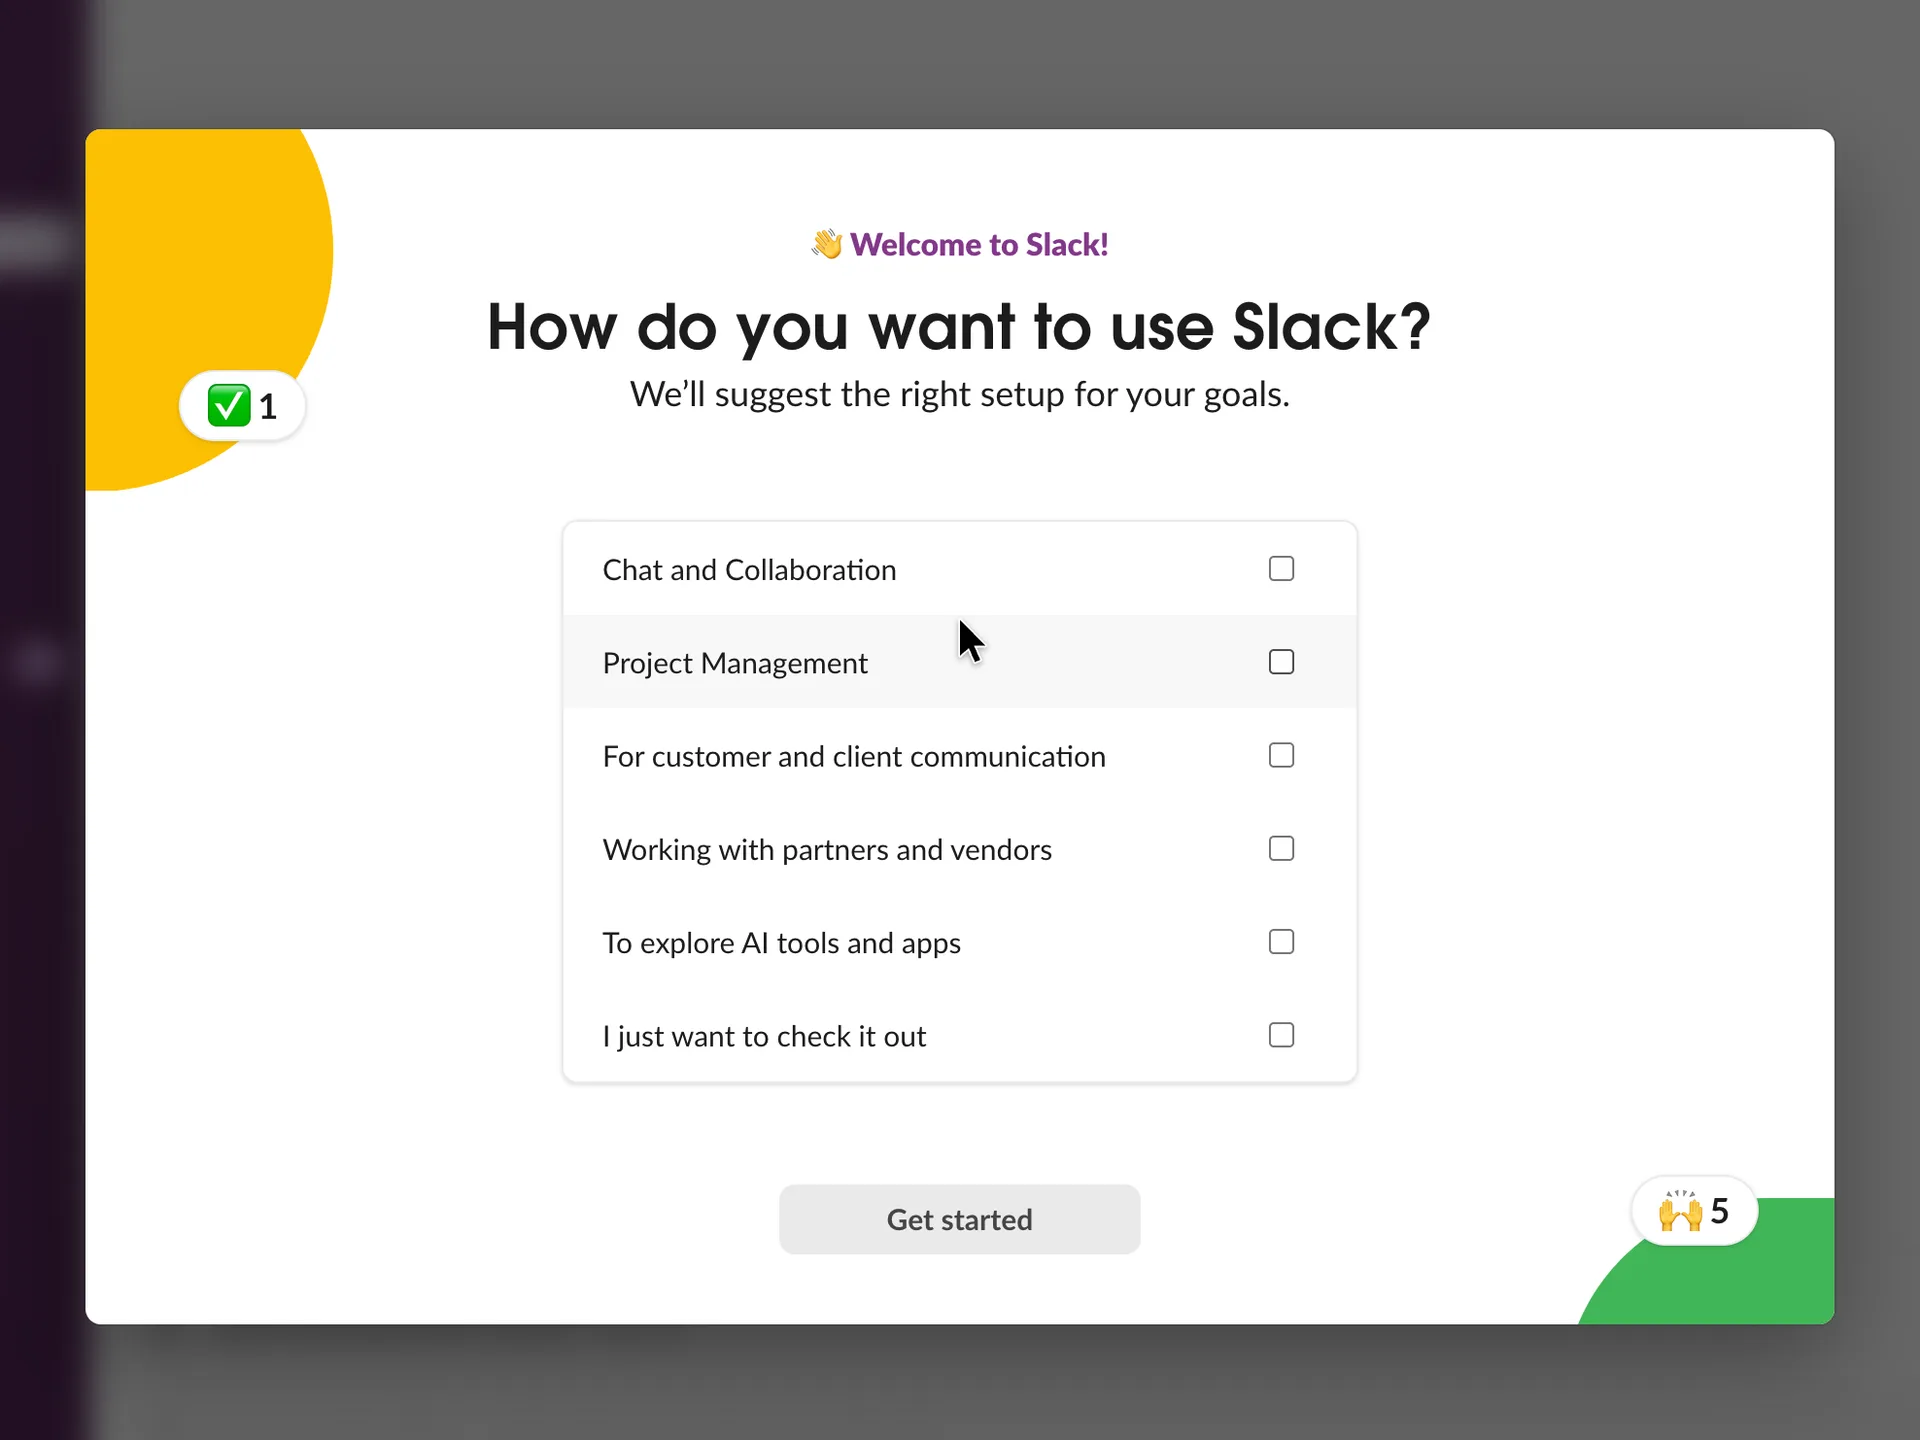
How do you want to use Slack? Six goals to tick
Ticked Chat and Collaboration and pressed Get started
Why it works
More than one goal can be ticked, and "I just want to check it out" gives an honest answer to someone who is only evaluating. The line under the question says what the answer changes.
What gets in the way
The questions arrive one at a time with no count, after the user thought setup (the three-part bar) was over.
What’s on this screen
The same modal moves to a second question: "How do you want to use Slack?" with "We'll suggest the right setup for your goals." Six rows with checkboxes: Chat and Collaboration, Project Management, For customer and client communication, Working with partners and vendors, To explore AI tools and apps, I just want to check it out. Get started stays greyed out until one is ticked. No progress indicator says how many questions are left.
Step 11 of 14:Plan choice
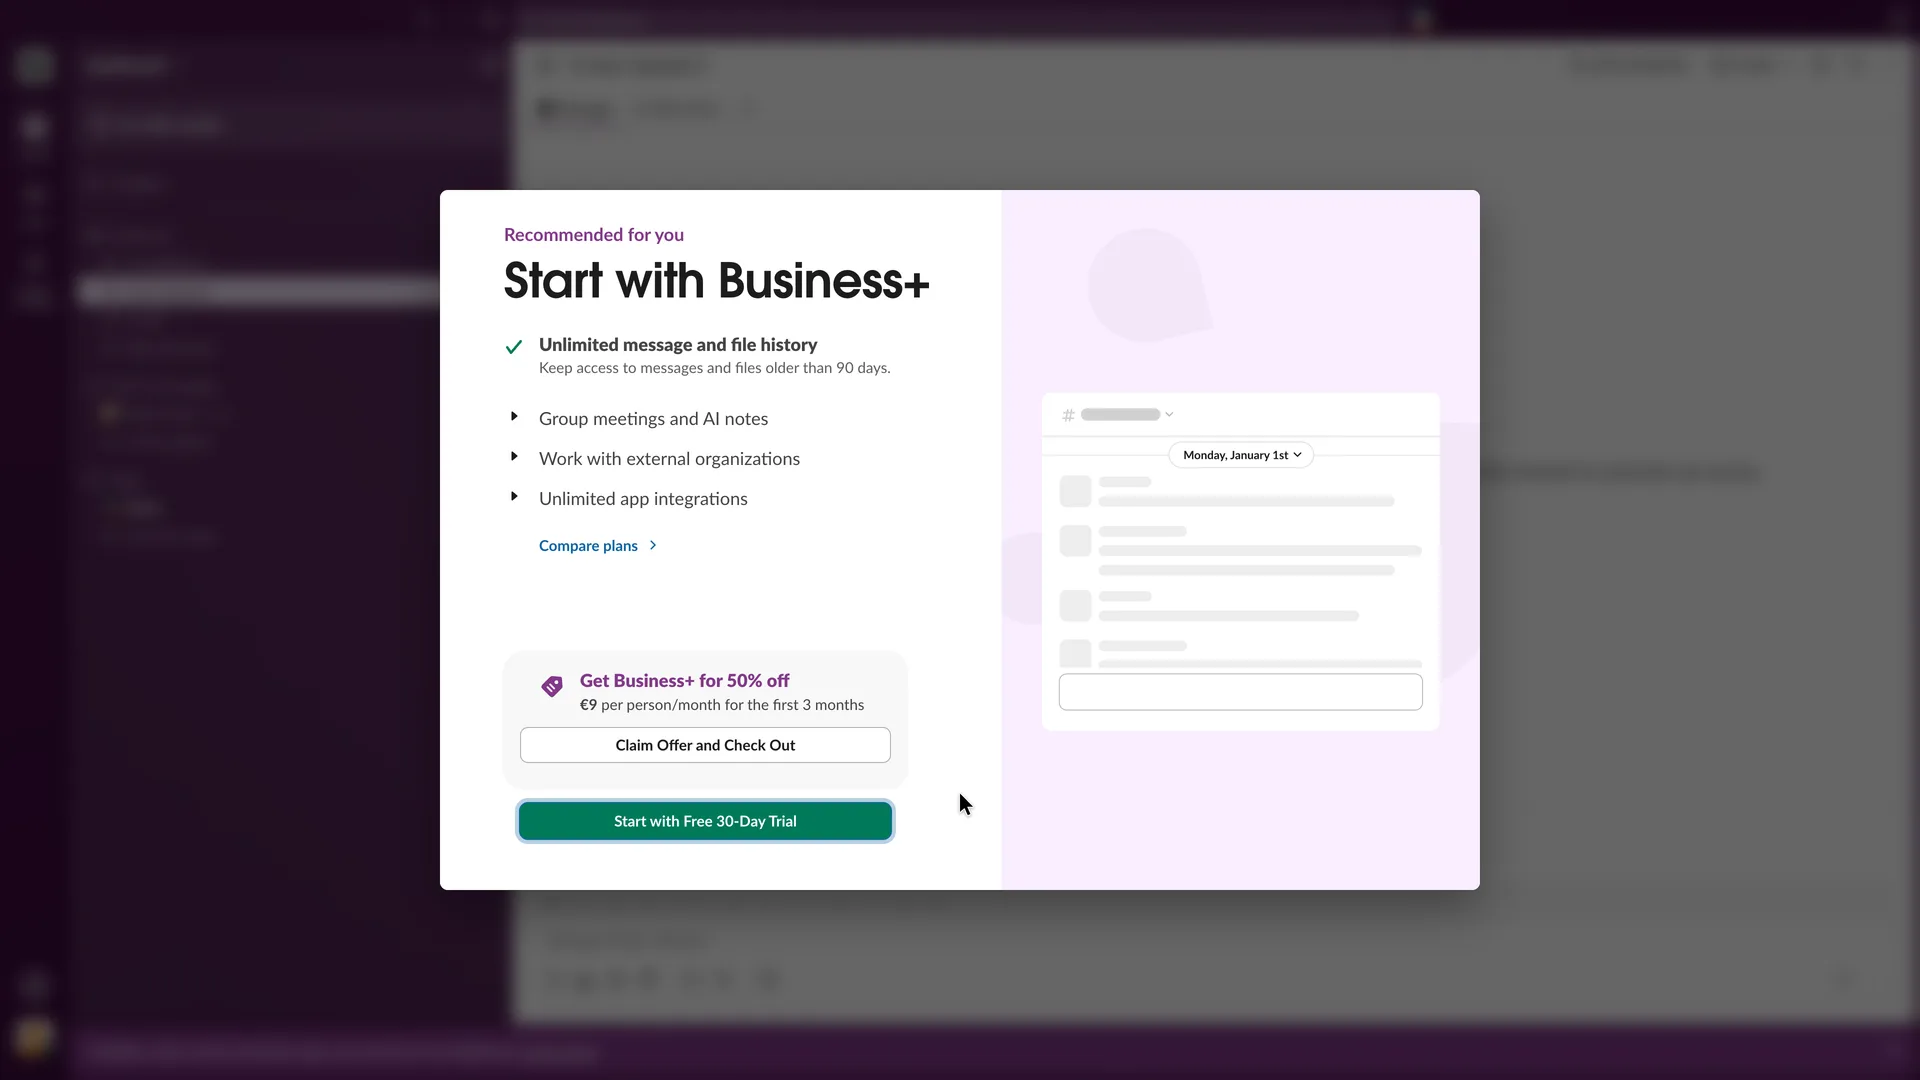
Choose a plan: Start with Business+, with no free option on screen
Looked for a free option: the dialog has none and no close button; pressed Compare plans
Why it works
It leads with the one limit a free team meets first, the 90-day history, which is a concrete reason to pay rather than a list of features.
What gets in the way
The only two buttons start a trial or a checkout. A team that wants the free plan has no visible way to say so on this screen.
What’s on this screen
Right after the welcome questions, a dialog labelled Choose a plan: "Recommended for you" over "Start with Business+". Four features with expanders, the first open: Unlimited message and file history ("Keep access to messages and files older than 90 days."), Group meetings and AI notes, Work with external organizations, Unlimited app integrations; then Compare plans. A tag card: "Get Business+ for 50% off, €9 per person/month for the first 3 months" with Claim Offer and Check Out; prices are in euros, most likely because the recording ran from Portugal. Below it a green Start with Free 30-Day Trial button, focused. On the right, a sketch of a channel with a date picker. No Free plan button, no Skip, no close cross.
Step 12 of 14:Plan choice
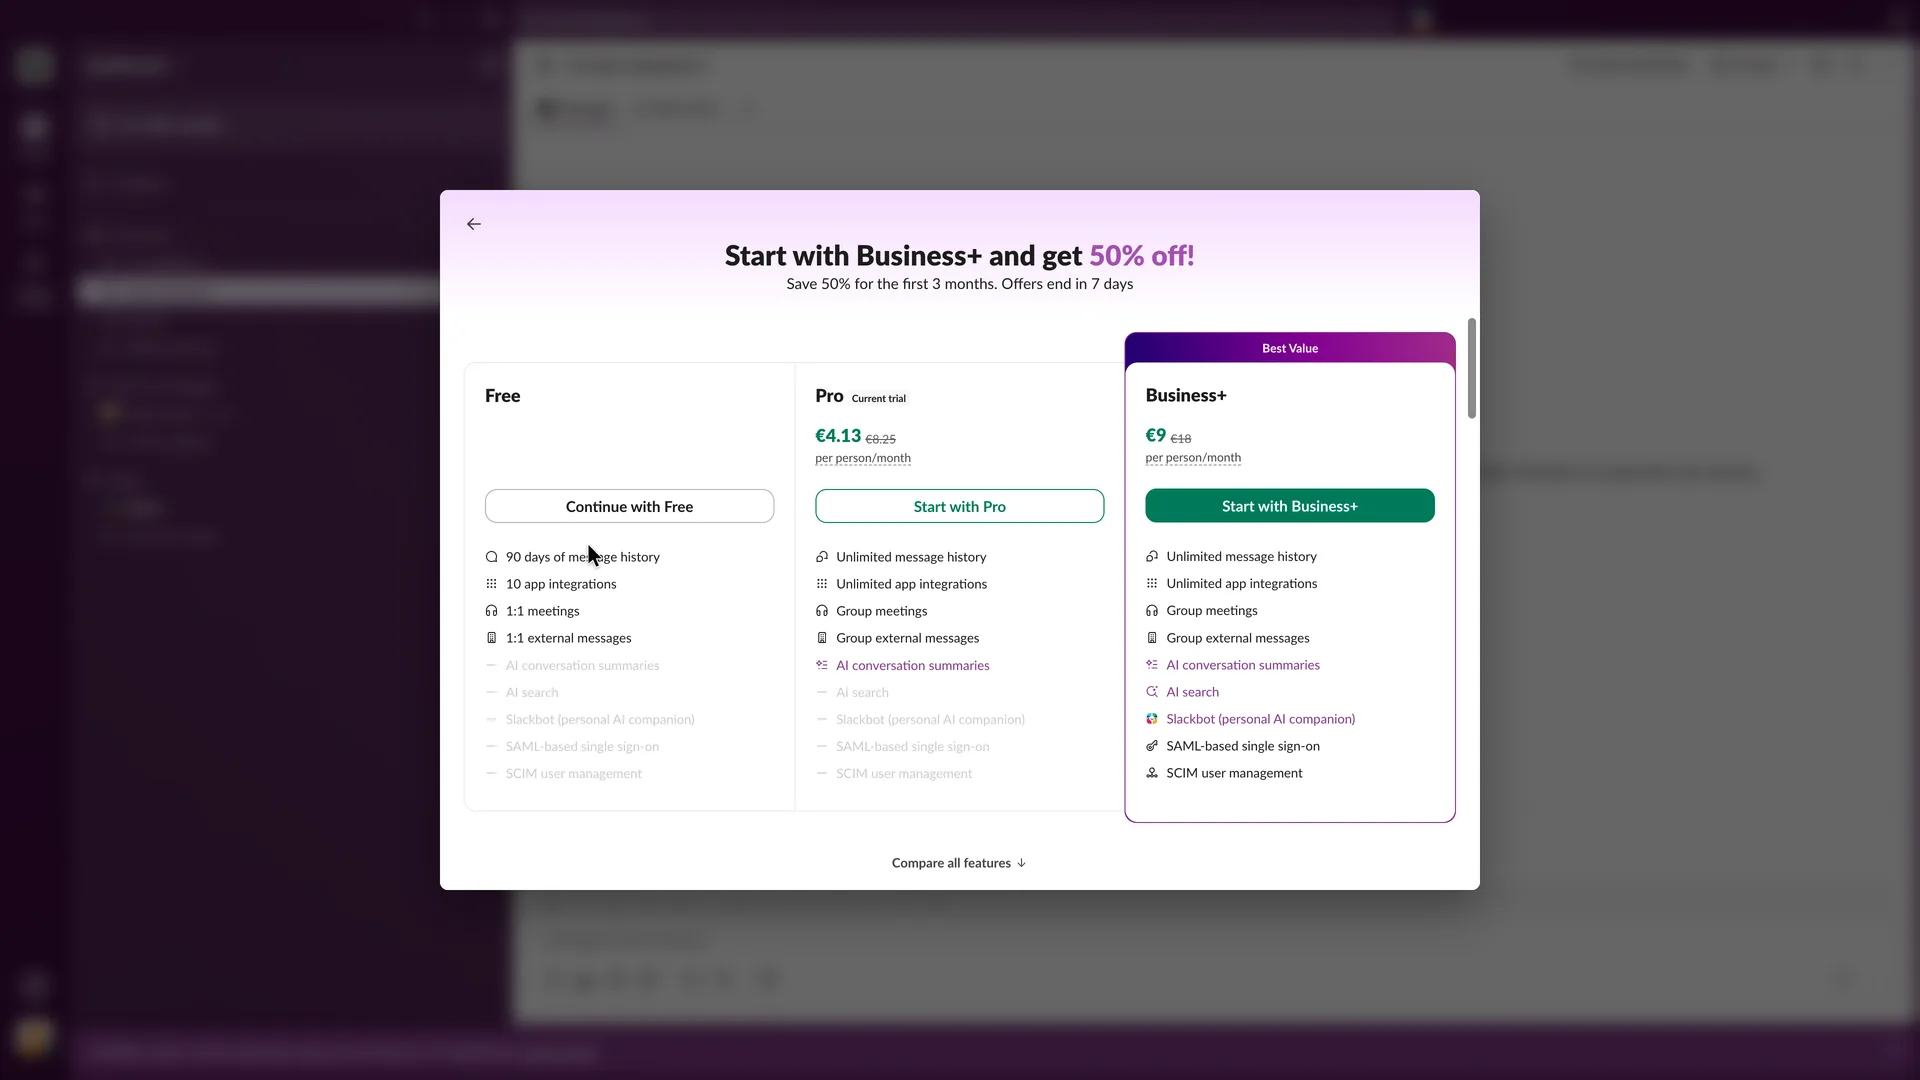
Compare plans: Continue with Free, one click behind the offer
Pressed Continue with Free
Why it works
Once found, the table is plain: the free plan's limits are listed in the same words as the paid plans' features, and Continue with Free is a real button, not a text link.
What gets in the way
The free choice sits one screen behind Compare plans, a text link on the previous dialog. The Pro column says "Current trial": the workspace was already on a Pro trial that no screen had asked about.
What’s on this screen
The dialog turns into a plan table under "Start with Business+ and get 50% off!" and "Save 50% for the first 3 months. Offers end in 7 days", with a back arrow. Three columns, priced in euros as on the previous screen: Free (no price; 90 days of message history, 10 app integrations, 1:1 meetings, 1:1 external messages; the AI and admin rows greyed out) with Continue with Free; Pro, tagged "Current trial", €4.13 instead of €8.25 per person/month, with Start with Pro; Business+, under a Best Value banner, €9 instead of €18, with Start with Business+ in solid green. Compare all features at the bottom leads to a full table and a billing FAQ.
Step 13 of 14:Empty state
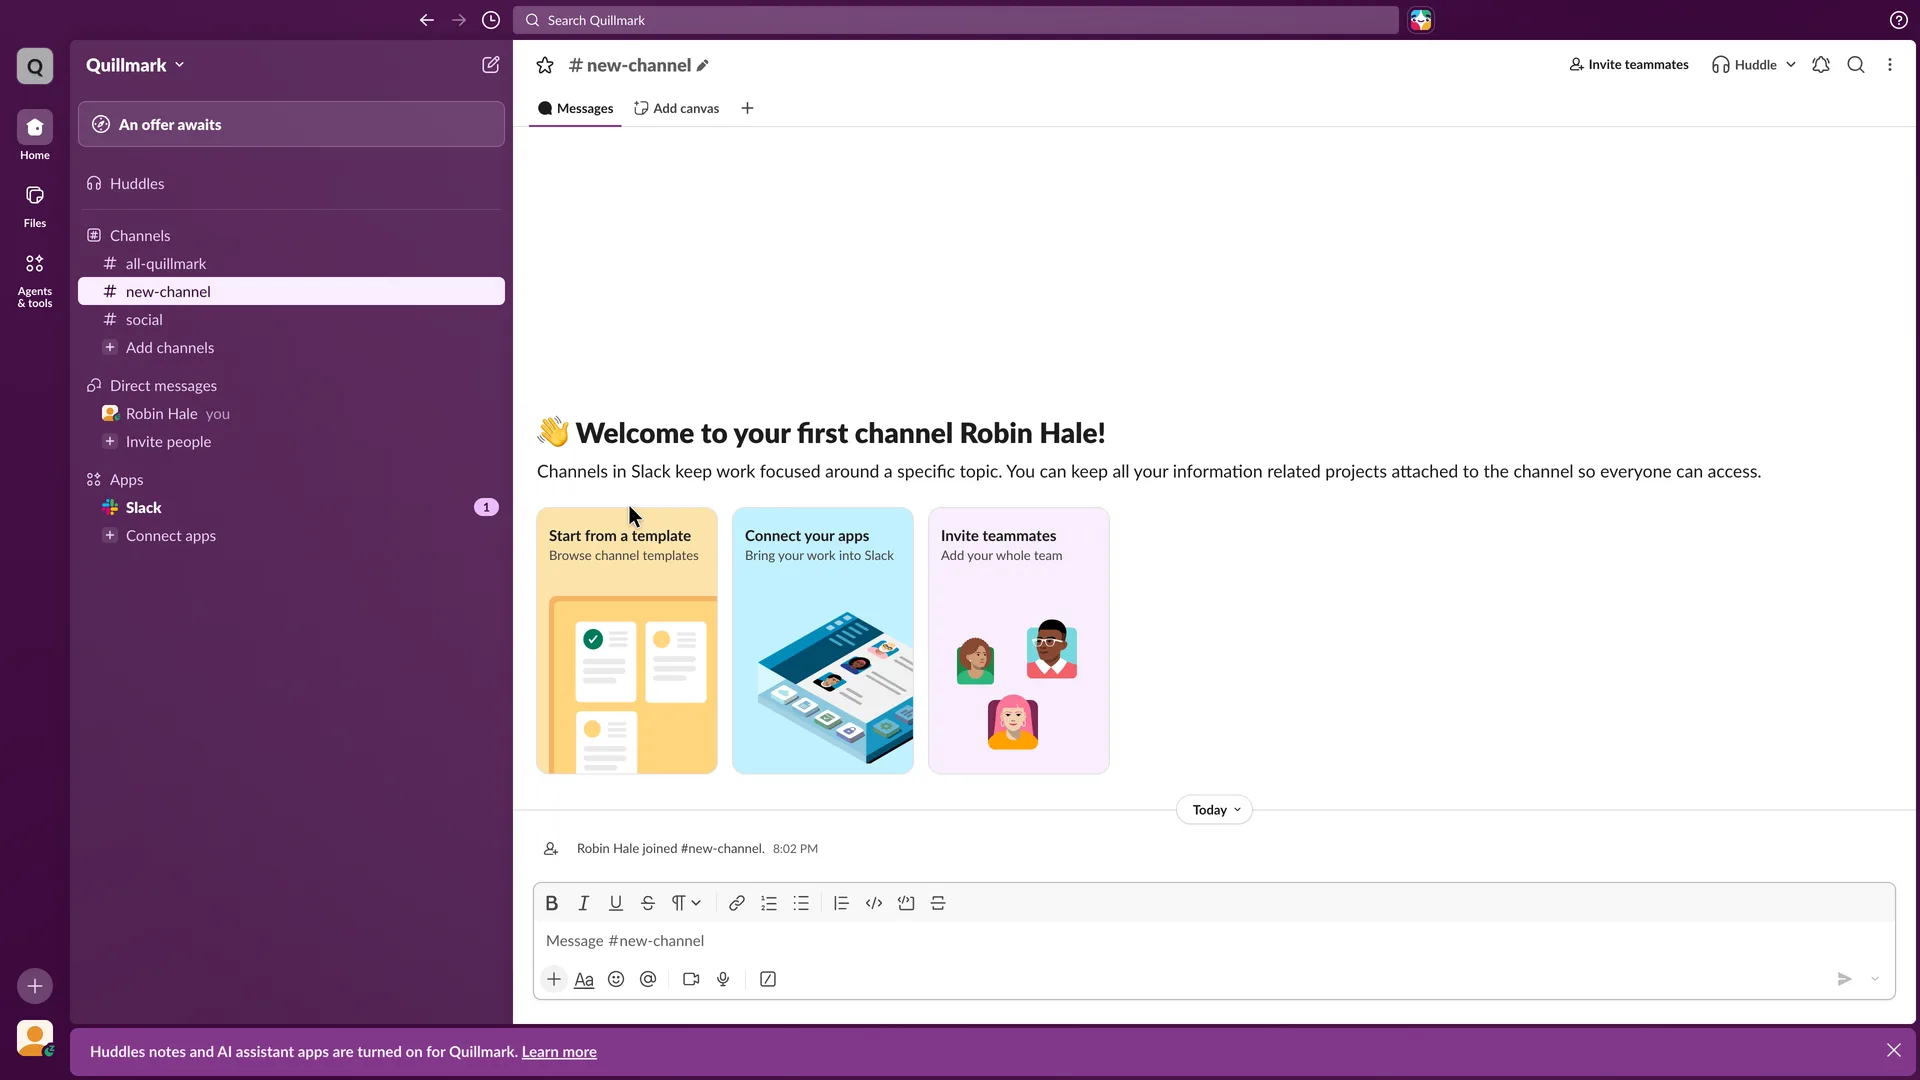
The workspace opens on #new-channel with three welcome cards
Clicked the message box of #new-channel and typed Robin's first message
Why it works
The first screen is the real product with the cursor's next job obvious: a channel with an empty history and a message box. The welcome copy explains what a channel is for in one sentence.
What gets in the way
The channel for the team's work is named new-channel because setup never asked what it was for; renaming it is left to the user. The offer button sits above every channel, and AI apps were switched on for the workspace without a question.
What’s on this screen
Slack in the browser, no tour or tooltip. Sidebar: Quillmark, an "An offer awaits" button at the top, Huddles, Channels (all-quillmark, new-channel, social, Add channels), Direct messages (Robin Hale, you; Invite people), Apps (Slack with a badge of 1; Connect apps). The open channel, #new-channel, shows "Welcome to your first channel Robin Hale!" and "Channels in Slack keep work focused around a specific topic." with three illustrated cards: Start from a template, Connect your apps, Invite teammates. Below: "Robin Hale joined #new-channel." and the message box "Message #new-channel". A purple bar along the bottom: "Huddles notes and AI assistant apps are turned on for Quillmark. Learn more". No desktop-app prompt appeared at any point.
Step 14 of 14:First value
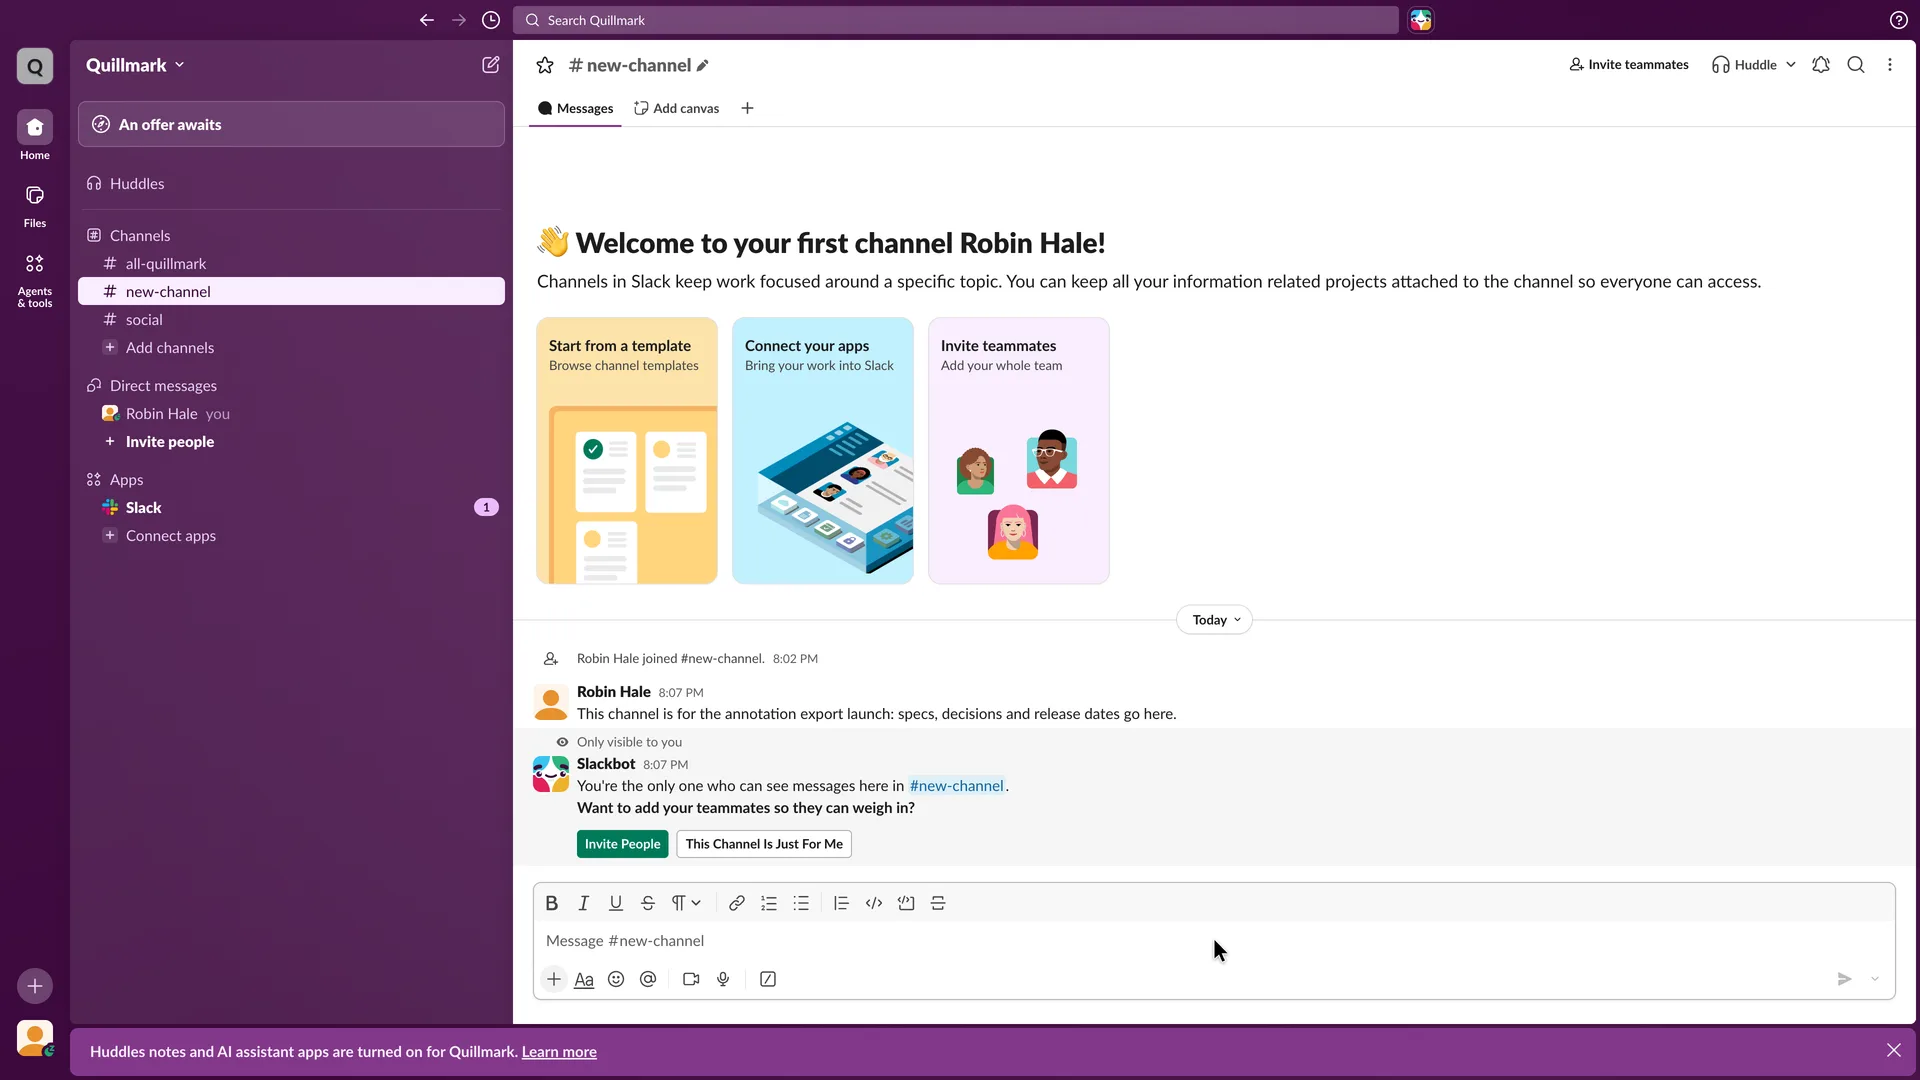
Robin's first message in #new-channel, and Slackbot's reply
Pressed Enter to send the message
Why it works
The first message is sent with Enter and shows at once, and Slackbot's reply is private and arrives at the moment the user can see why teammates matter: a message nobody else can read. It offers a way out as a button too.
What gets in the way
The third invite prompt in the flow (after the setup step and its confirmation), and the channel name new-channel says nothing about the launch the message describes.
What’s on this screen
Robin's message sits under the welcome cards: "This channel is for the annotation export launch: specs, decisions and release dates go here." at 8:07 PM. At once a Slackbot message marked "Only visible to you" follows: "You're the only one who can see messages here in #new-channel. Want to add your teammates so they can weigh in?" with Invite People (green) and This Channel Is Just For Me. Invite people in the sidebar is now in bold. The channel is still named new-channel.
Verdict
What Slack gets right
- No password to invent. One email field, then a six-character code that is in the email's subject line, so it can be read from a notification.
- The terms sit on the button that creates the workspace, and the marketing-email question below them has no answer picked in advance.
- Setup is three short screens with a progress bar, beside a sketch of the Slack window that shows each answer where it will appear.
- Going on alone is always possible: Skip this step in setup, Don't Invite Anyone on the check that follows, and This Channel Is Just For Me on Slackbot's reply.
- The first screen in the app is a real channel whose welcome message says in one sentence what channels are for and offers three next steps as cards: a template, apps and invites. The first message goes out with Enter, and Slackbot answers it privately with a nudge to bring the team in.
What we’d change
- Ask what the team is working on and name the first channel after it. Setup made new-channel and opened the workspace there, so the first message about a launch sits in a channel whose name says nothing.
- Leave "Let anyone with an @<domain> email join this workspace" unticked until the user chooses it, and ask for the user's name instead of filling the field with the part of the email address before the @. Ticked by default, the box lets anyone at the email's domain join without an invite.
- Put a free choice on the plan dialog. Its only buttons start a 30-day Business+ trial or a checkout; Continue with Free is behind Compare plans, and the workspace was already on a Pro trial that no screen had asked about.
- Ask about invites once. Setup asks, a "Skip without inviting?" dialog asks again, and Slackbot asks a third time after the first message.
- Ask the welcome questions inside setup, where the progress bar counts them. They arrive after the bar has shown three of three, with no count of their own, and after Slack has already created the workspace's three channels.
How we recorded it
- Recorded
- 5 Nov 2026
- Agent
- Claude Opus 5.5 in Claude Code
- Browser
- Chromium driven through Playwright MCP 0.0.84, a 1920 × 1080 window at 2× pixel density
- Signed up as
- Robin Hale, product manager at Quillmark (a made-up B2B SaaS company); a team of 26 to 50 people; wants one place for the product team's daily conversation, with a channel per project instead of email threads and DMs
- Stopped at
- Posted a first message in new-channel, the channel Slack's setup created and opened the workspace on
- Done by a person
- step 2, first, enter your email and step 4, start a new workspace: the terms and a marketing email question. An agent never accepts a product’s terms or gets past a verification on its own.
The agent answered every setup question as that person and skipped anything that would connect real data or invite real people. Screenshots are cropped to the part of the screen each step is about, and personal data in them is blurred. The figures at the top count the screens up to first value; form fields count every field shown, filled in or not.
Onboarding flows change, and this one is as Slack showed it on 5 Nov 2026. Seen a different flow, or want this page corrected or removed? Write to hello@useronboarding.academy.