
Onboarding teardown · Linear
Linear onboarding, screen by screen: from signup to a first issue
We had an AI agent sign up for Linear as a fictional product manager and go through onboarding until it had created a first issue. A person stepped in once, to submit the email address that creates the account. These are the screens it saw, in order, with what each one does well and what gets in the way.
By the UserOnboarding Academy teamRecorded 5 Nov 2026How we recorded it
UserOnboarding Academy isn't owned by Linear or any onboarding tool, and Linear didn't sponsor or review this page. The account was created for this recording only.
In short
Linear signs a new user in with an emailed code instead of a password, then asks for three things on one form: a workspace name, a URL that fills itself and a data region preset, most likely from where the visitor connects. A five-screen setup with progress dots follows (profile, invites, GitHub, Slack, newsletters), and every screen can be skipped. There is no tour: the workspace opens on a team Linear has created, with four starter issues that serve as the checklist. The cost comes at the first issue: the New issue dialog files it under Backlog, so it never appears in the Active tab the team's Issues view opens on, and once the confirmation fades nothing on screen shows it exists.
- Screens to first value
- 15
- Setup questions
- 1
- Form fields shown
- 12
- Steps a person did
- 1
The flow at a glance
marks a step a person did
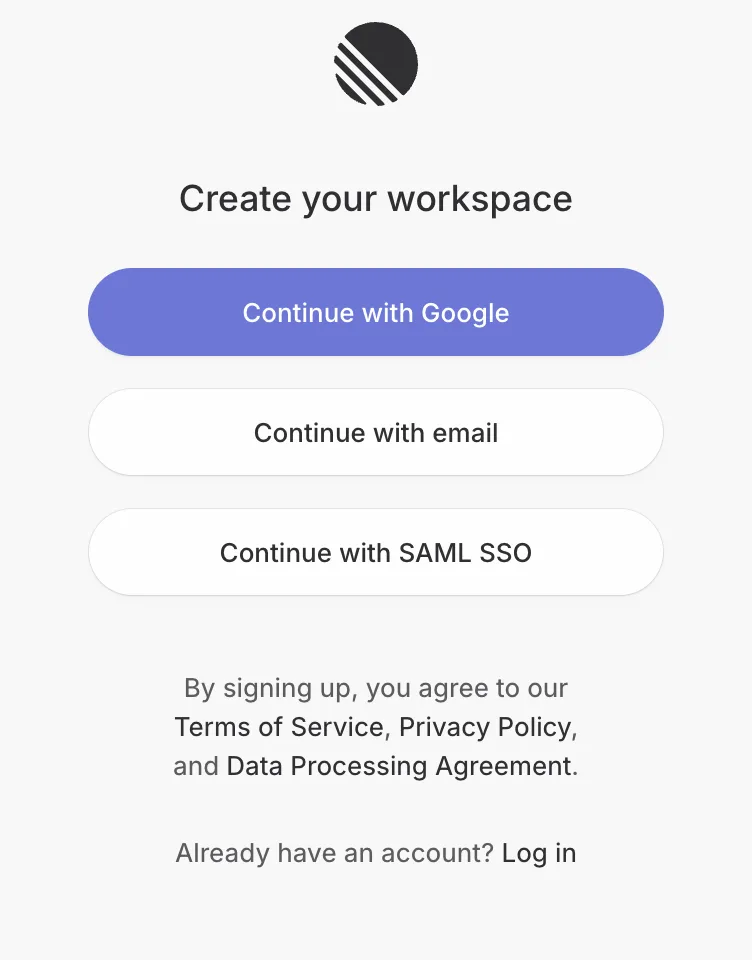 01Create your workspace: Google, email or SAML SSO
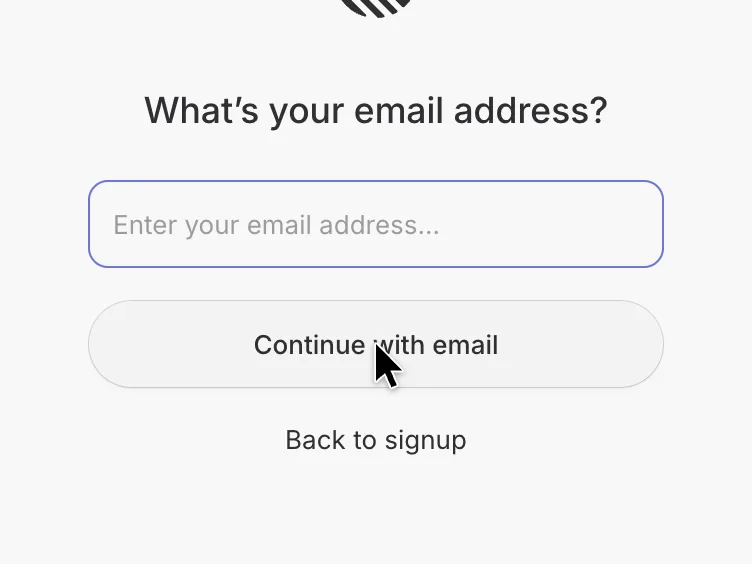 02Type your email address
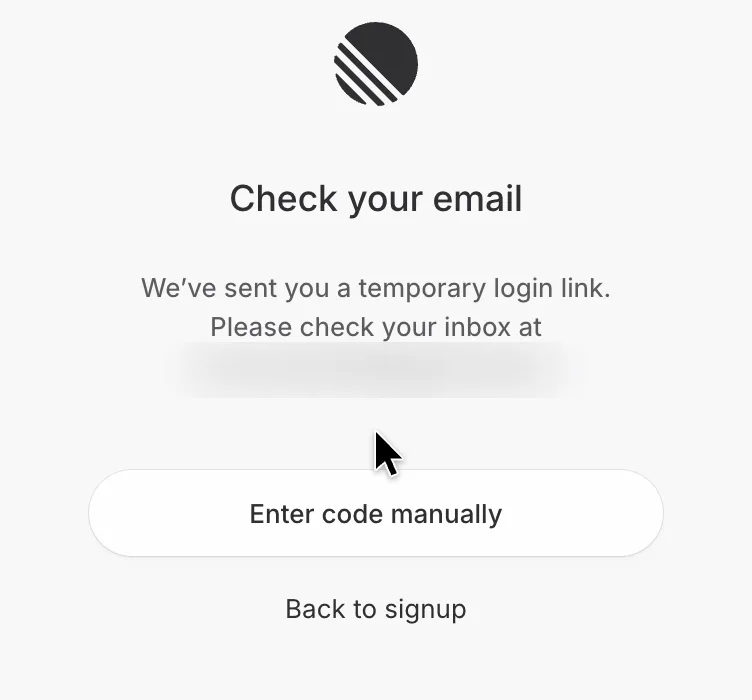 03Check your email for a login link
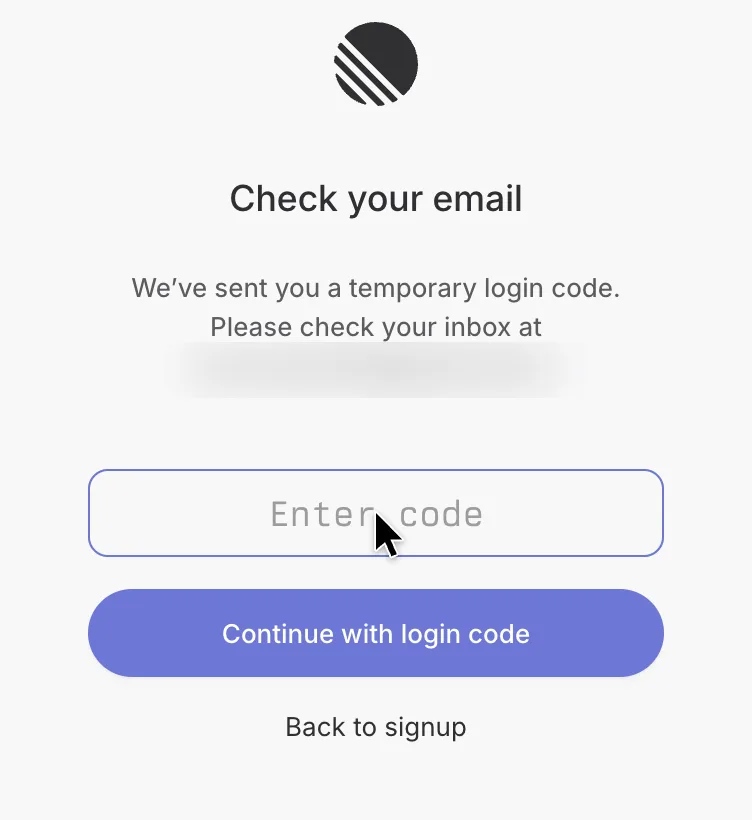 04Enter the login code from the email
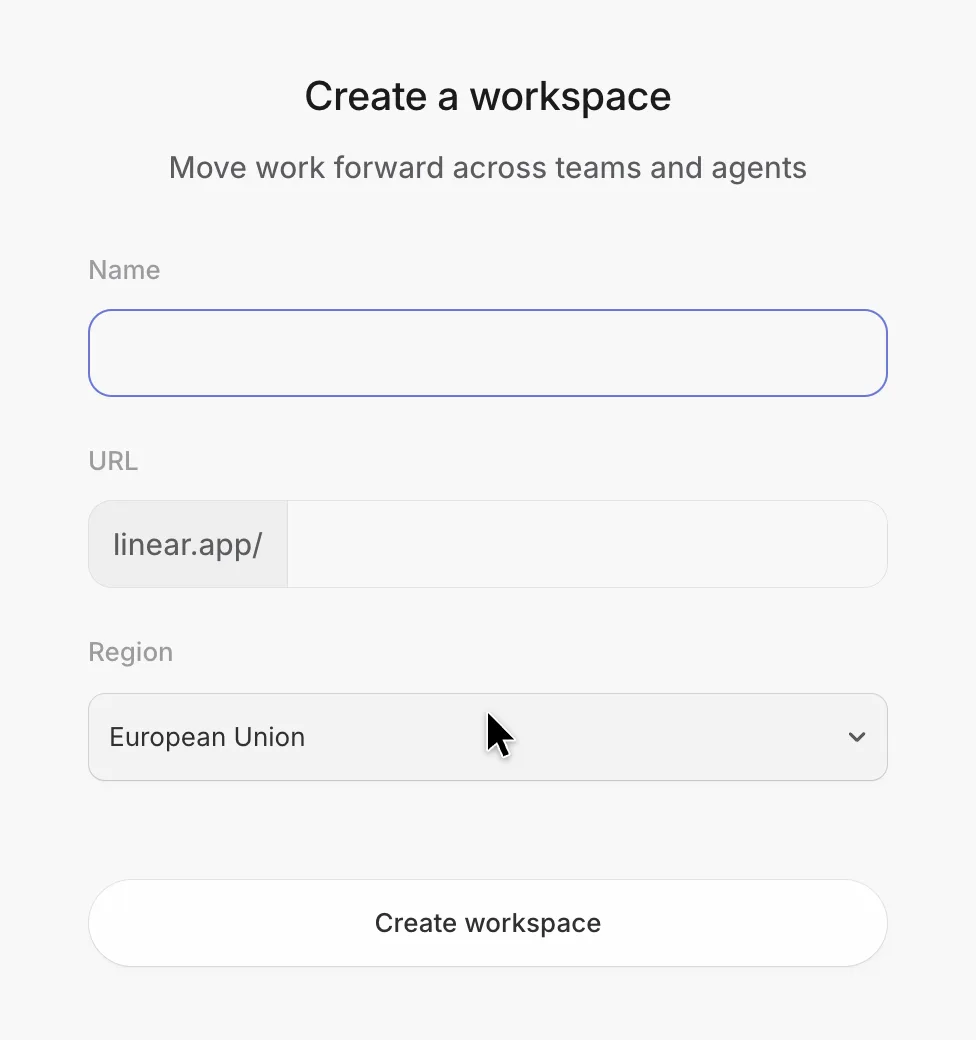 05Create a workspace: name, URL and data region
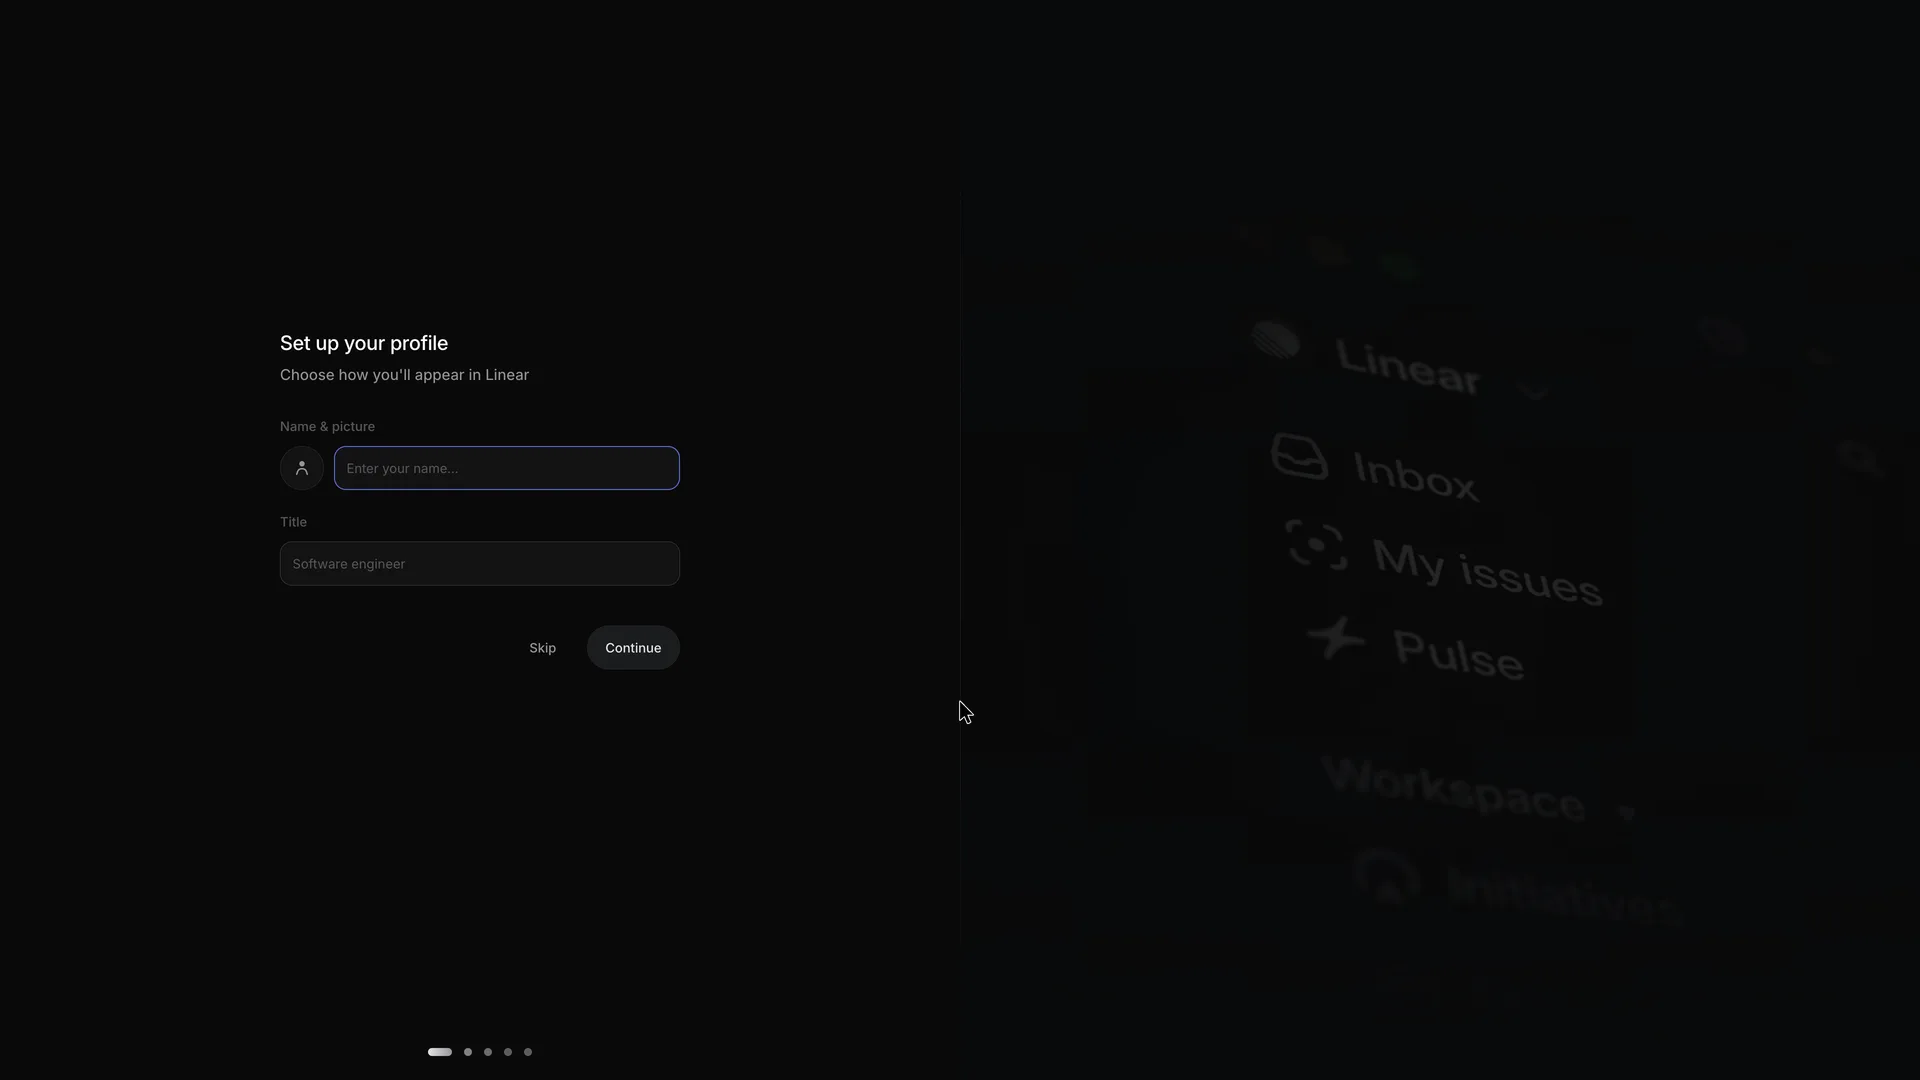 06Set up your profile: name and title
 07Invite teammates by email or link
 08Connect GitHub, offered third
 09Connect Slack, offered fourth
 10Subscribe to updates, with both emails off
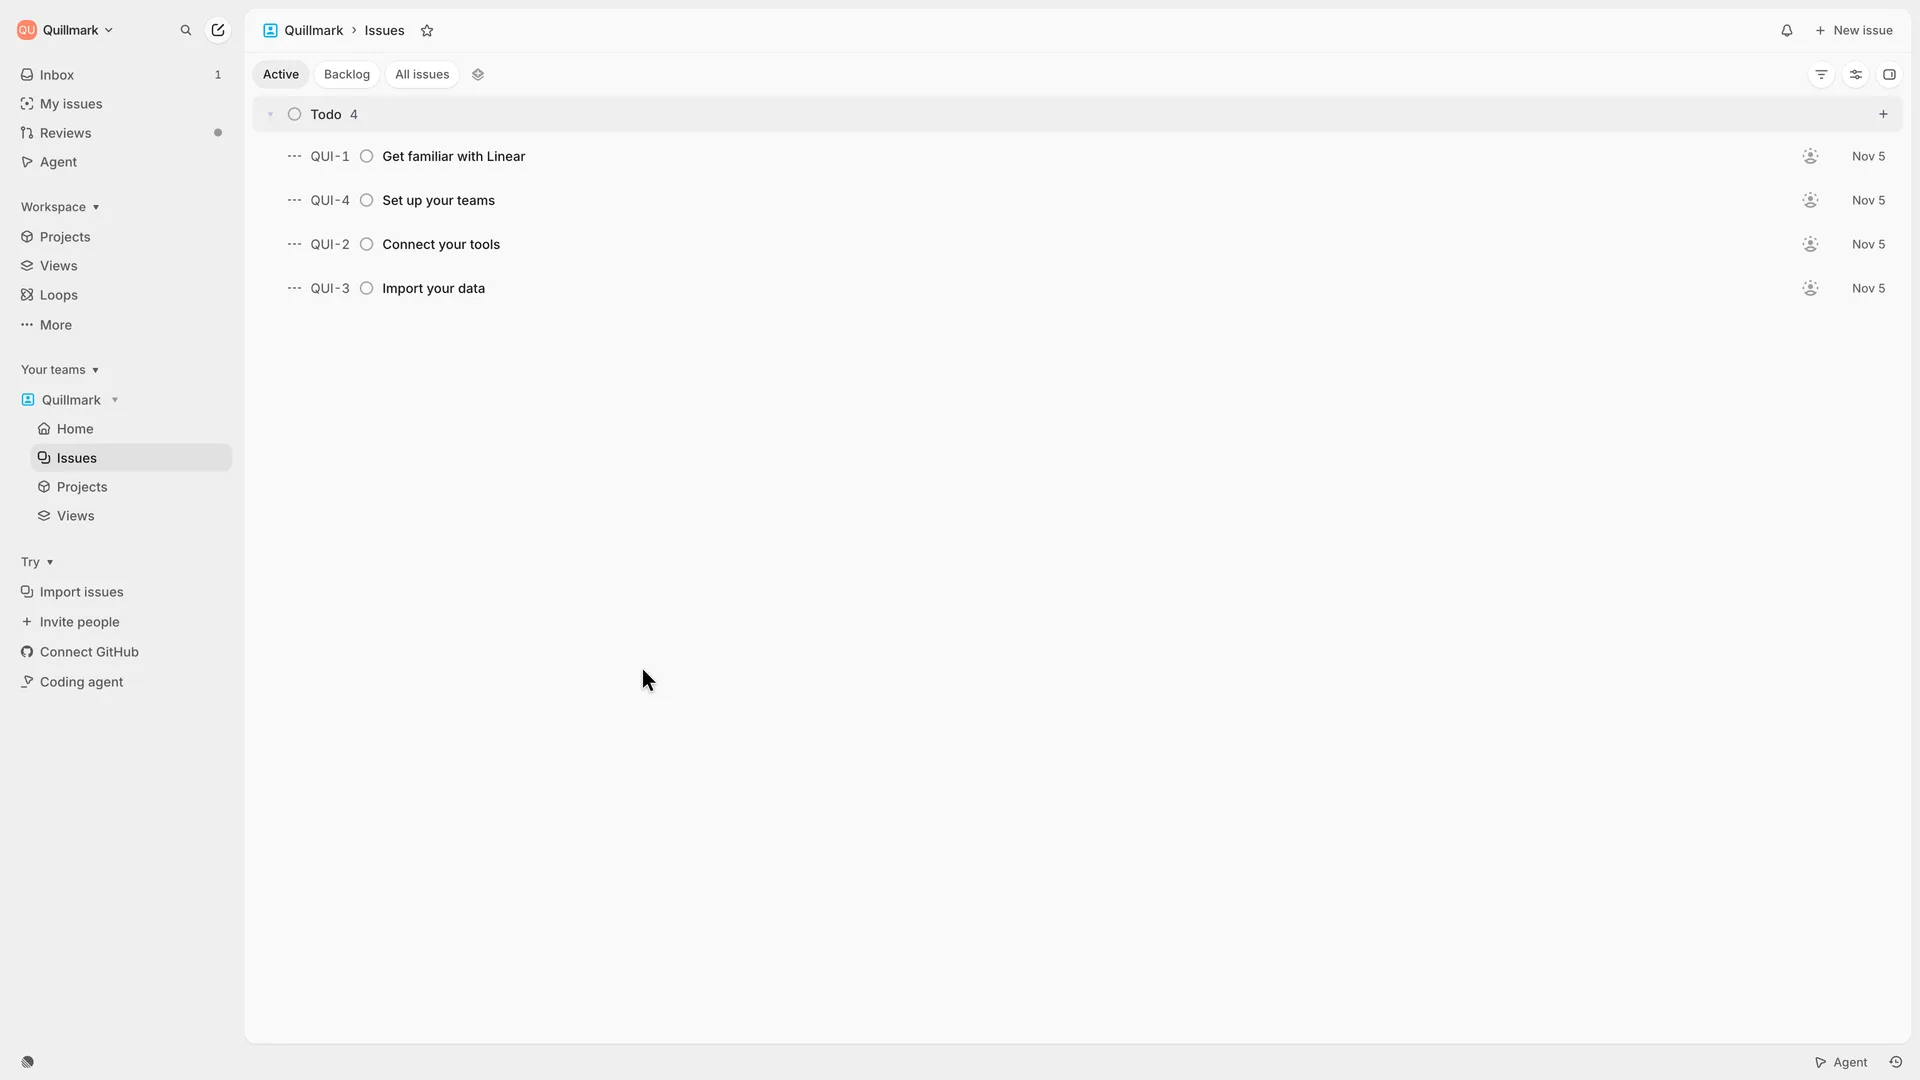 11The team's issue list, seeded with four starter issues
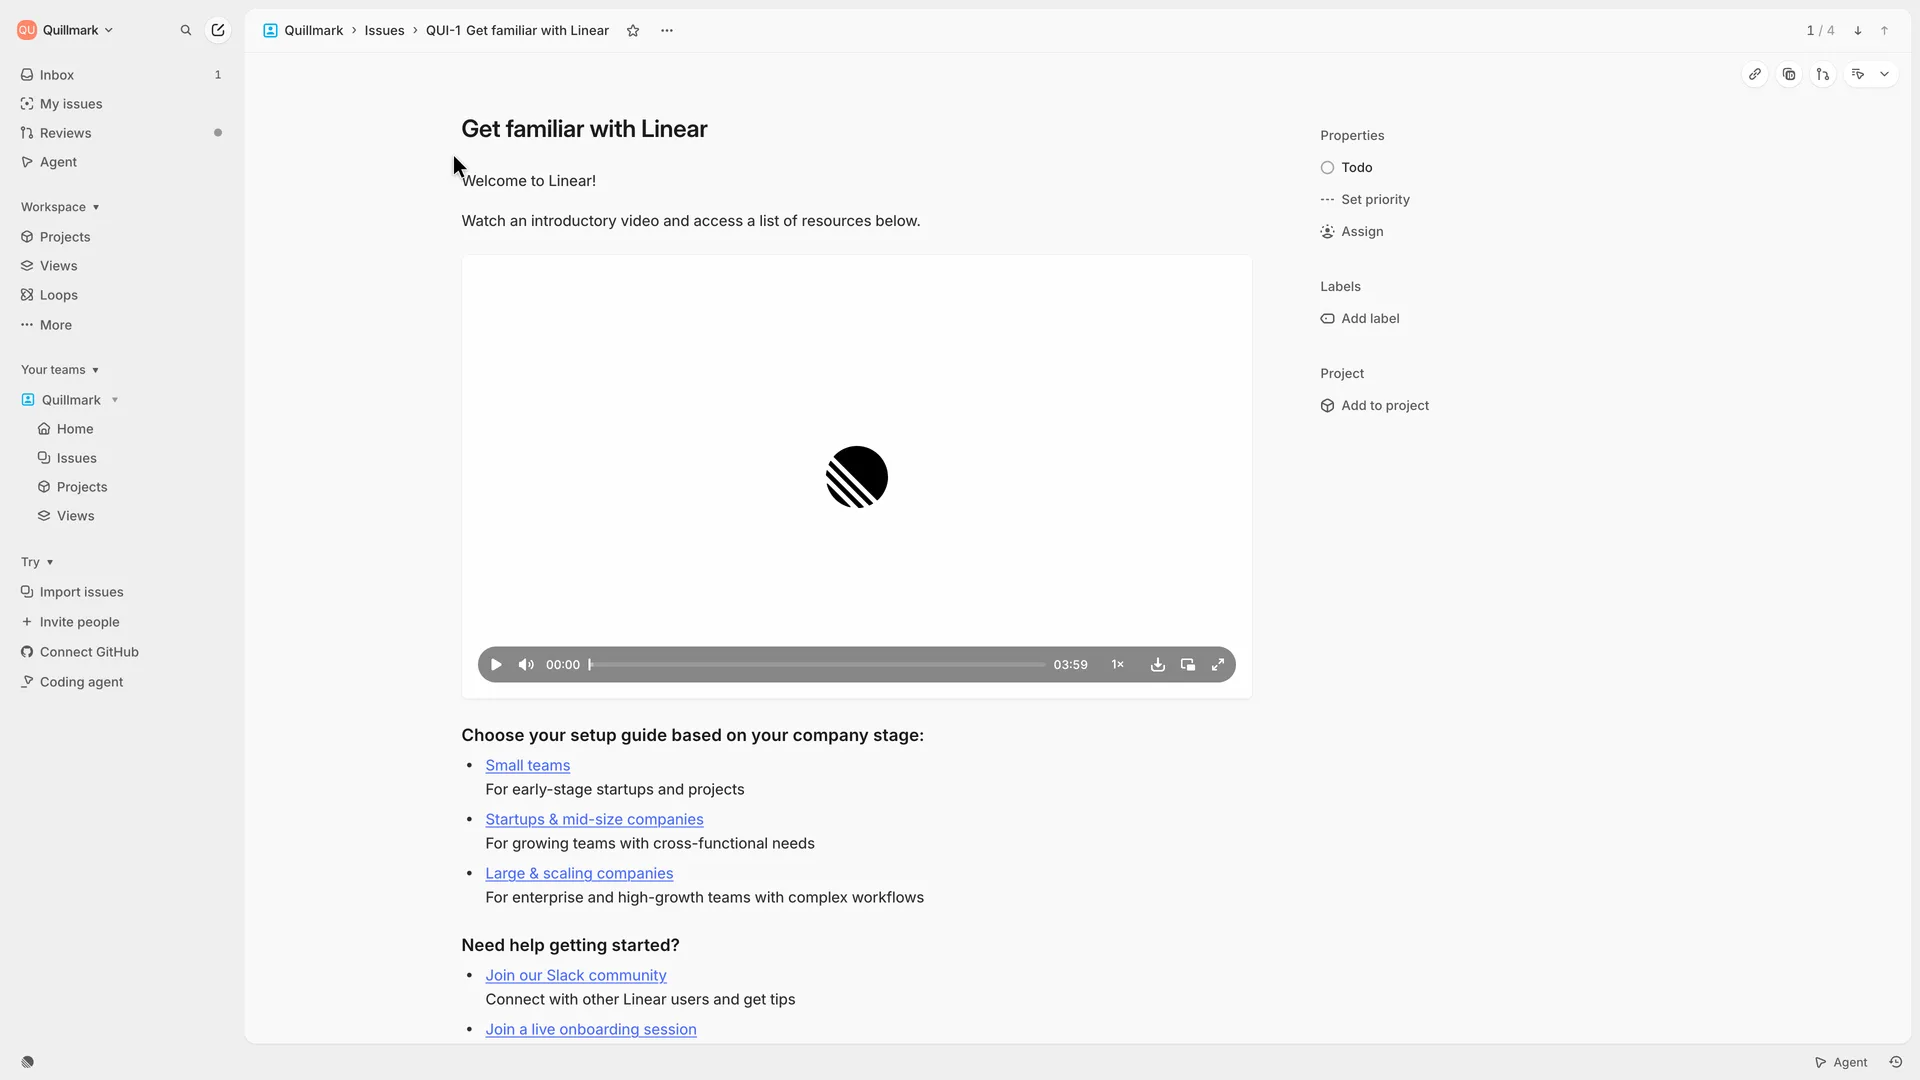 12The first starter issue: a video and setup guides
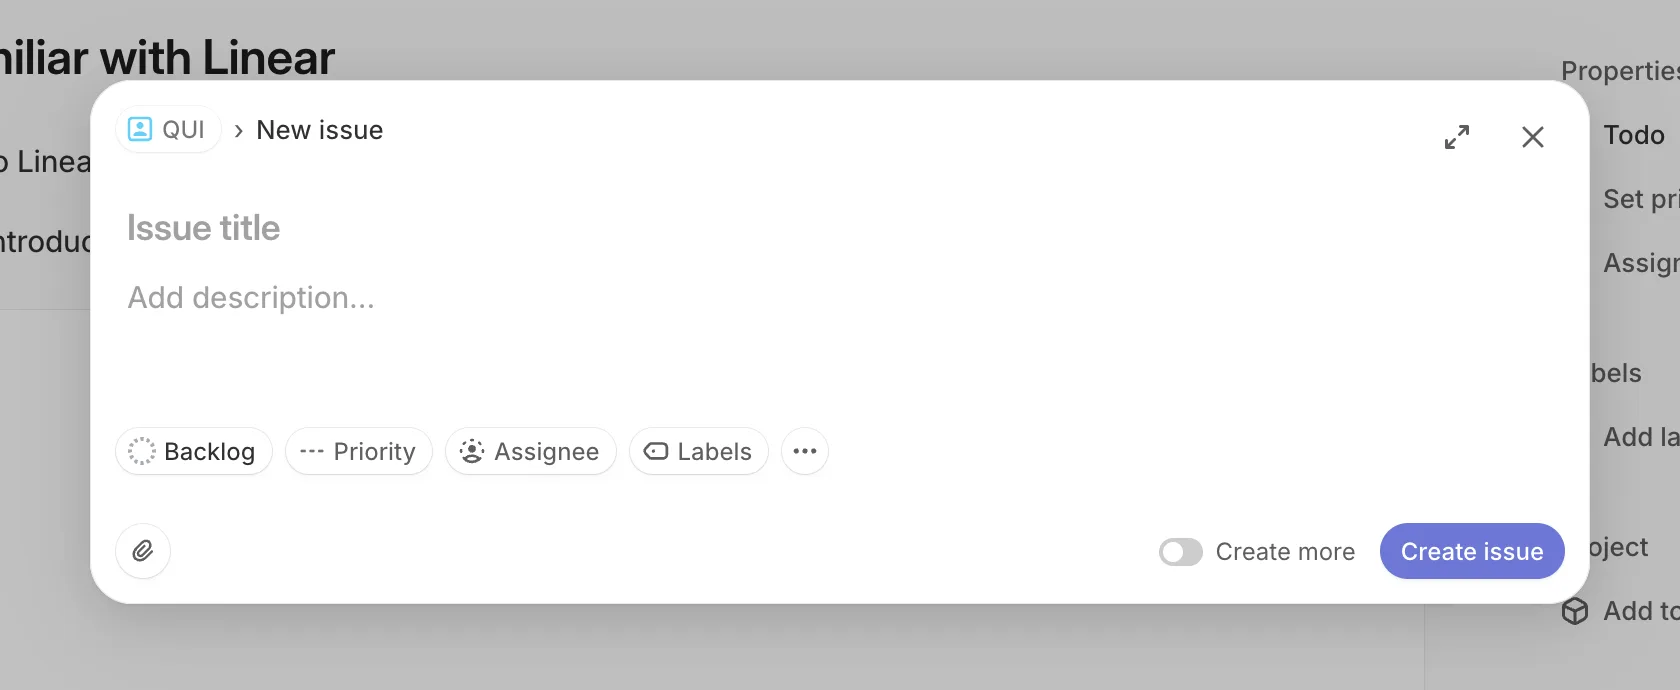 13New issue: title, description and properties in one dialog
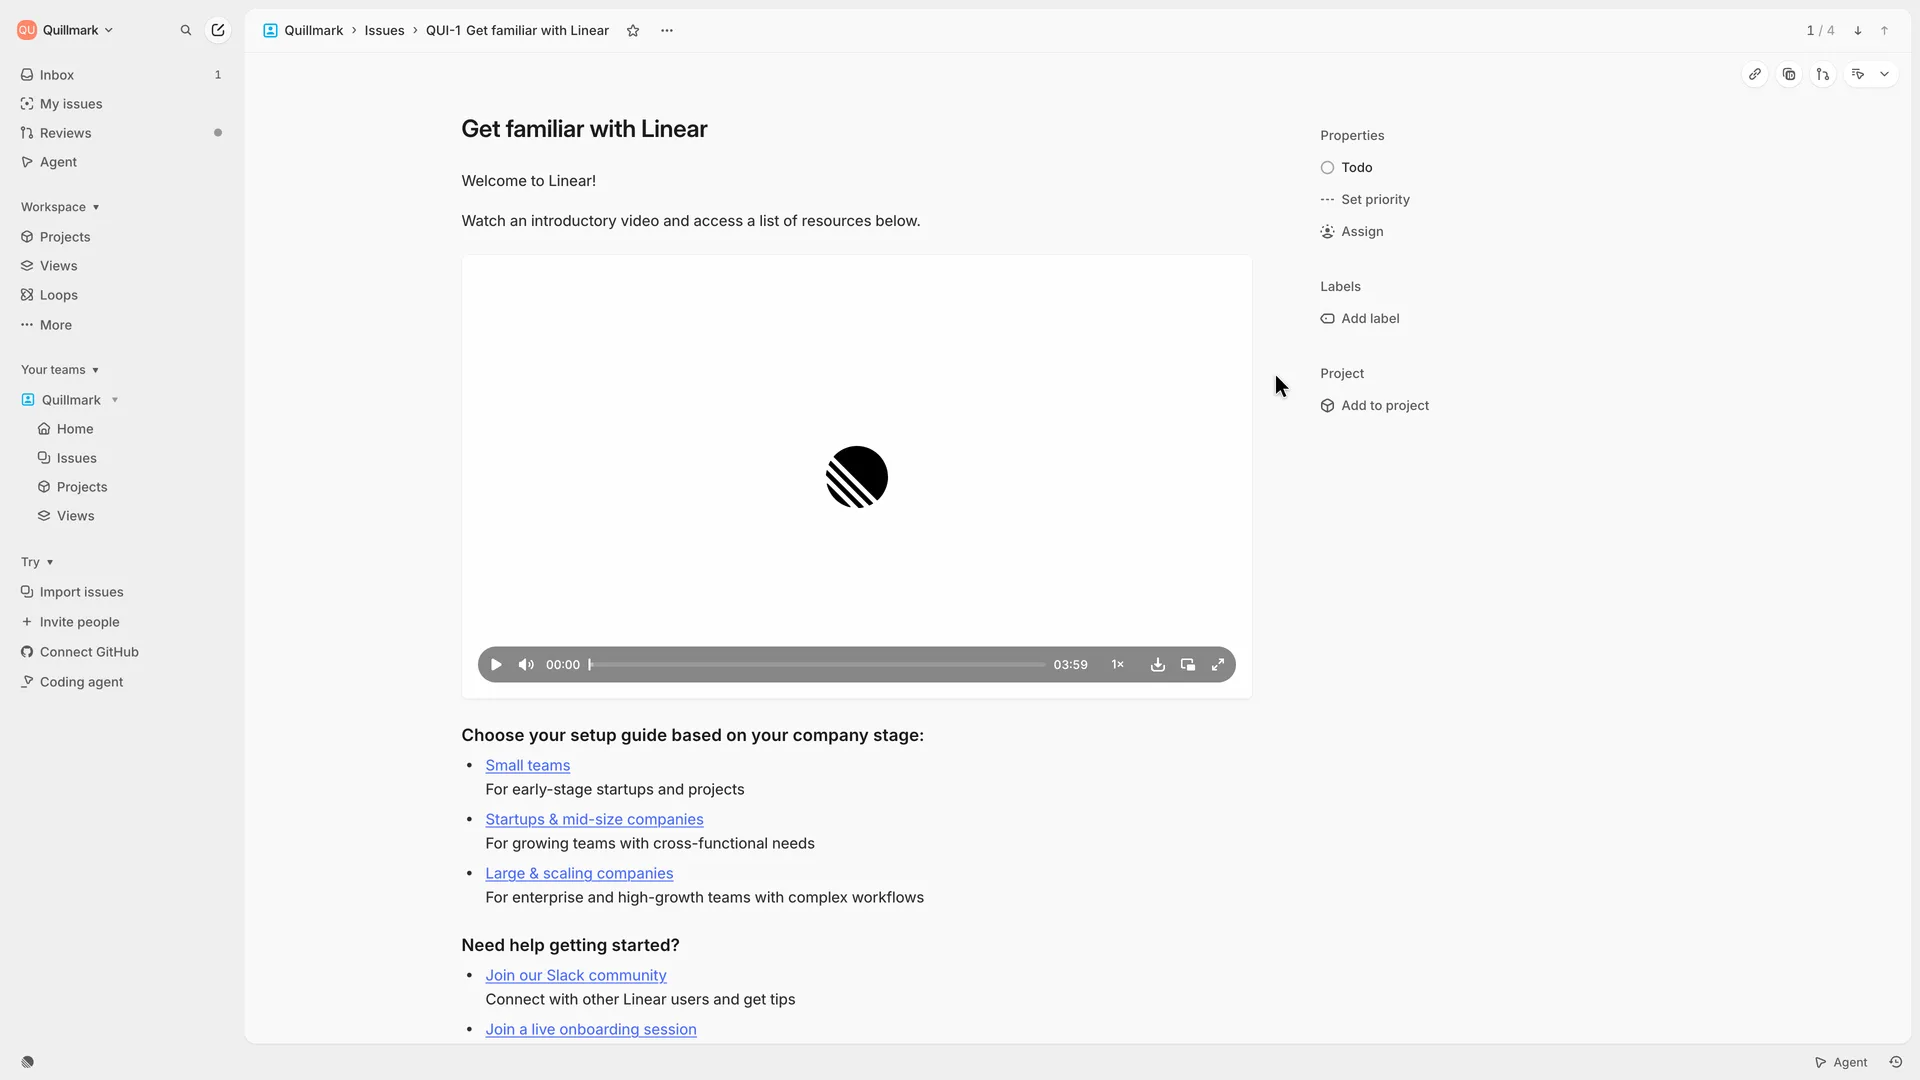 14Back on the starter issue after Create issue
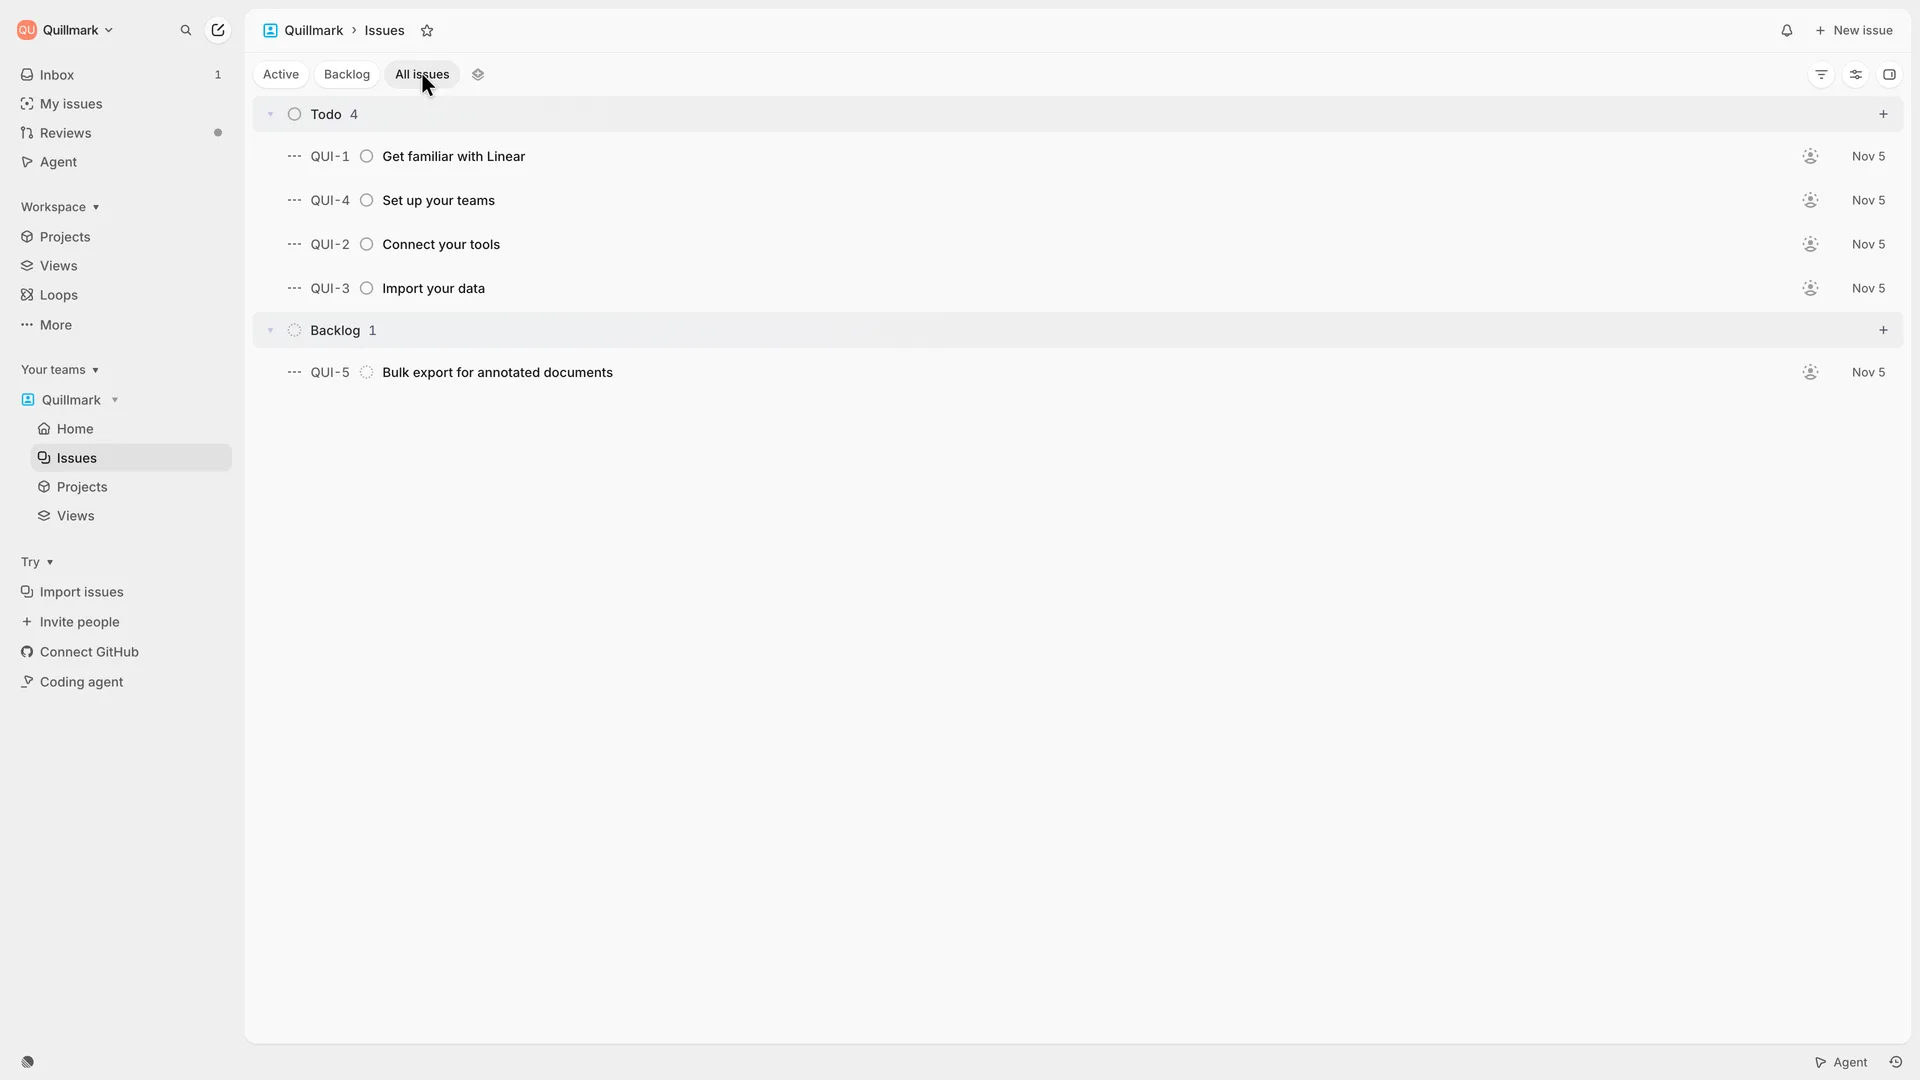 15 · first valueRobin's first issue, QUI-5, under Backlog
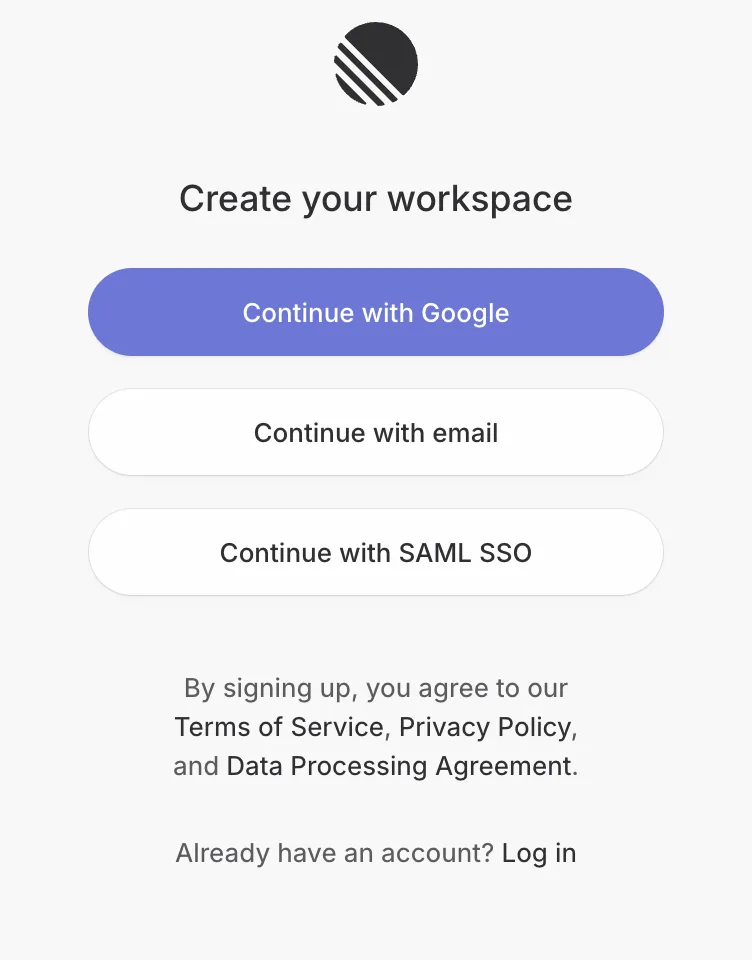
Step 1 of 15:Signup form
Create your workspace: Google, email or SAML SSO
Opened linear.app as a visitor from a web search, clicked Sign up in the header, then chose Continue with email
Why it works
The heading names the outcome (a workspace, not an account), and there is nothing on the page but the three ways in. SAML SSO sits beside Google and email, so a company buyer sees on the first screen that single sign-on is supported.
What’s on this screen
The homepage's Sign up link goes to linear.app/signup, which first shows 'Loading…' and then a page headed 'Create your workspace' with three buttons: Continue with Google, Continue with email and Continue with SAML SSO. Below them: 'By signing up, you agree to our Terms of Service, Privacy Policy, and Data Processing Agreement', and a Log in link. No cookie banner appeared.
Step 2 of 15:Signup formDone by a person
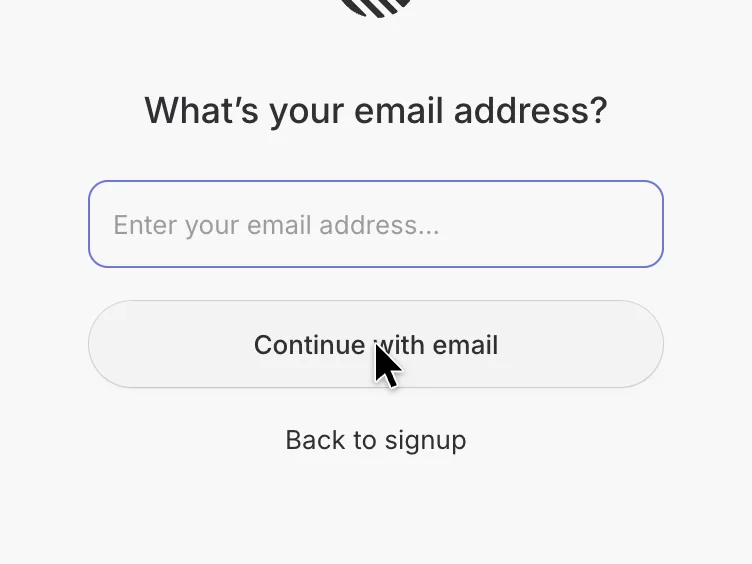
Type your email address
The agent typed the email address; a person pressed Continue with email, the click that creates the account
Why it works
One field and no password: Linear signs people in with a link or code sent by email, so there is nothing to invent or remember at this point.
What’s on this screen
The same page now asks 'What's your email address?' with one field ('Enter your email address…'), a Continue with email button and a Back to signup link. There is no name or password field.
Step 3 of 15:Email verification
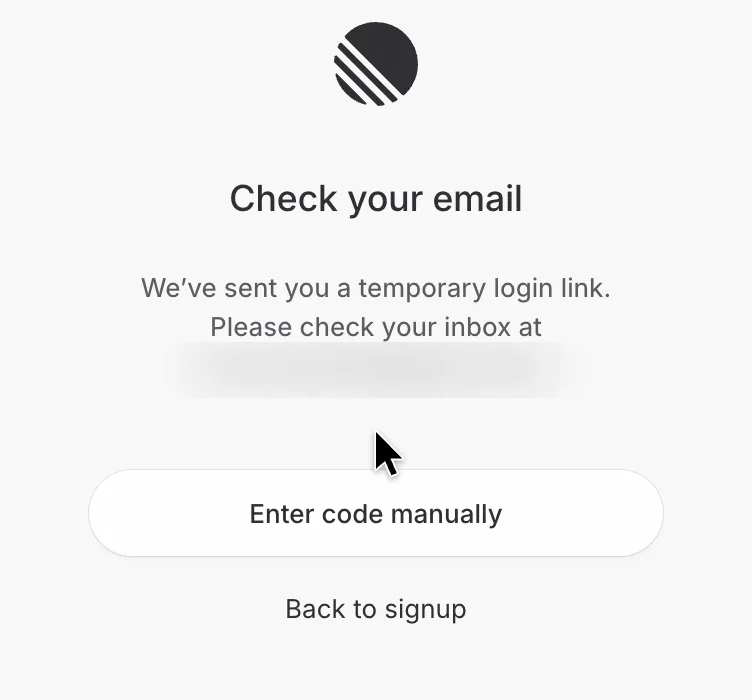
Check your email for a login link
Read Linear's email in the inbox (it holds a login link and a code) and chose Enter code manually
Why it works
The screen offers both routes: open the link, or type the code if the email is open on another device. The address is repeated, so a typo is easy to spot.
What’s on this screen
'Check your email': 'We've sent you a temporary login link. Please check your inbox at' followed by the address. Below: Enter code manually and Back to signup. The email, subject 'Login for Linear', arrived within a minute and carries both the link and a ten-character code.
Step 4 of 15:Email verification
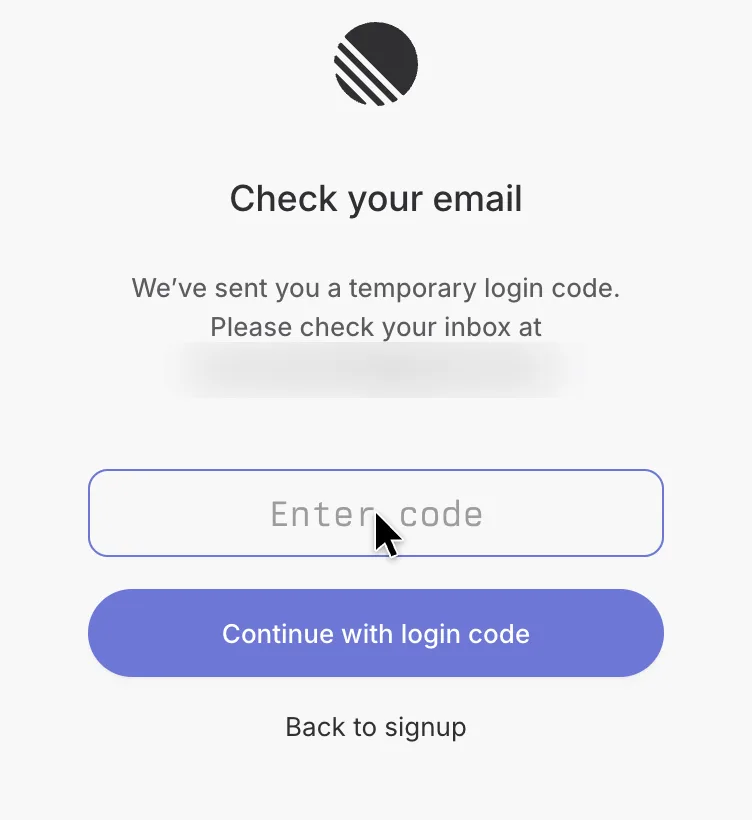
Enter the login code from the email
Typed the ten-character code from Linear's email and pressed Enter
Why it works
The code replaces both a password and a separate 'confirm your email' step: by the time the account exists, the address is already proven.
What’s on this screen
With Enter code manually chosen, the screen reads 'We've sent you a temporary login code' and shows an Enter code field with a Continue with login code button. Submitting the code goes straight to workspace creation at linear.app.
Step 5 of 15:Signup form
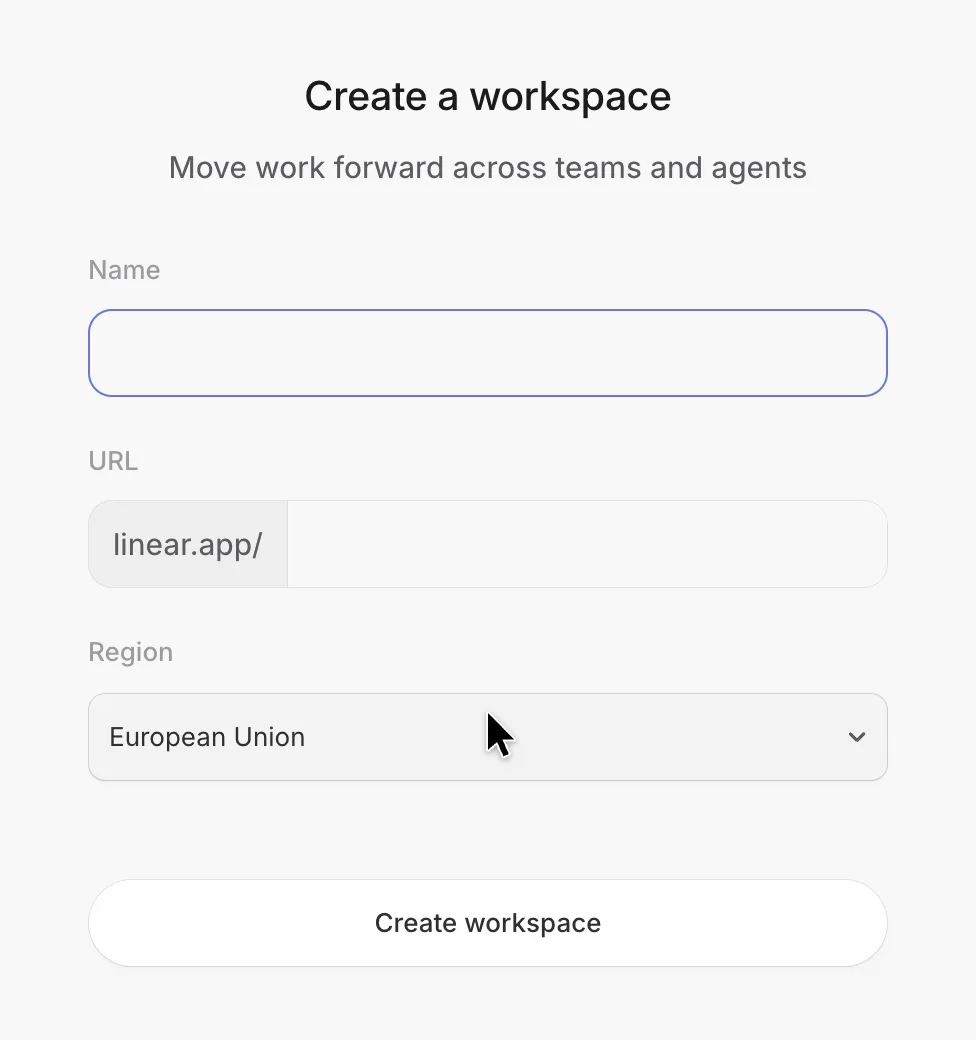
Create a workspace: name, URL and data region
Typed Quillmark as the name; the URL filled itself as linear.app/quillmark; left the region on European Union and pressed Create workspace
Why it works
Two of the three fields fill themselves: the URL from the name, and the region, most likely from where the visitor connects. A product manager setting up for a team gets data residency asked once, up front, rather than discovering it later.
What gets in the way
The form doesn't say the region is permanent. Linear's workspace settings state that it is set when the workspace is created and cannot be changed.
What’s on this screen
'Create a workspace', subtitle 'Move work forward across teams and agents'. Three fields: Name, URL (prefixed linear.app/, filled from the name as you type) and Region, preselected to European Union, most likely from where the visitor connects. Below the part shown here: 'Using' and the signup address, with a Use a different email link.
Step 6 of 15:Setup question
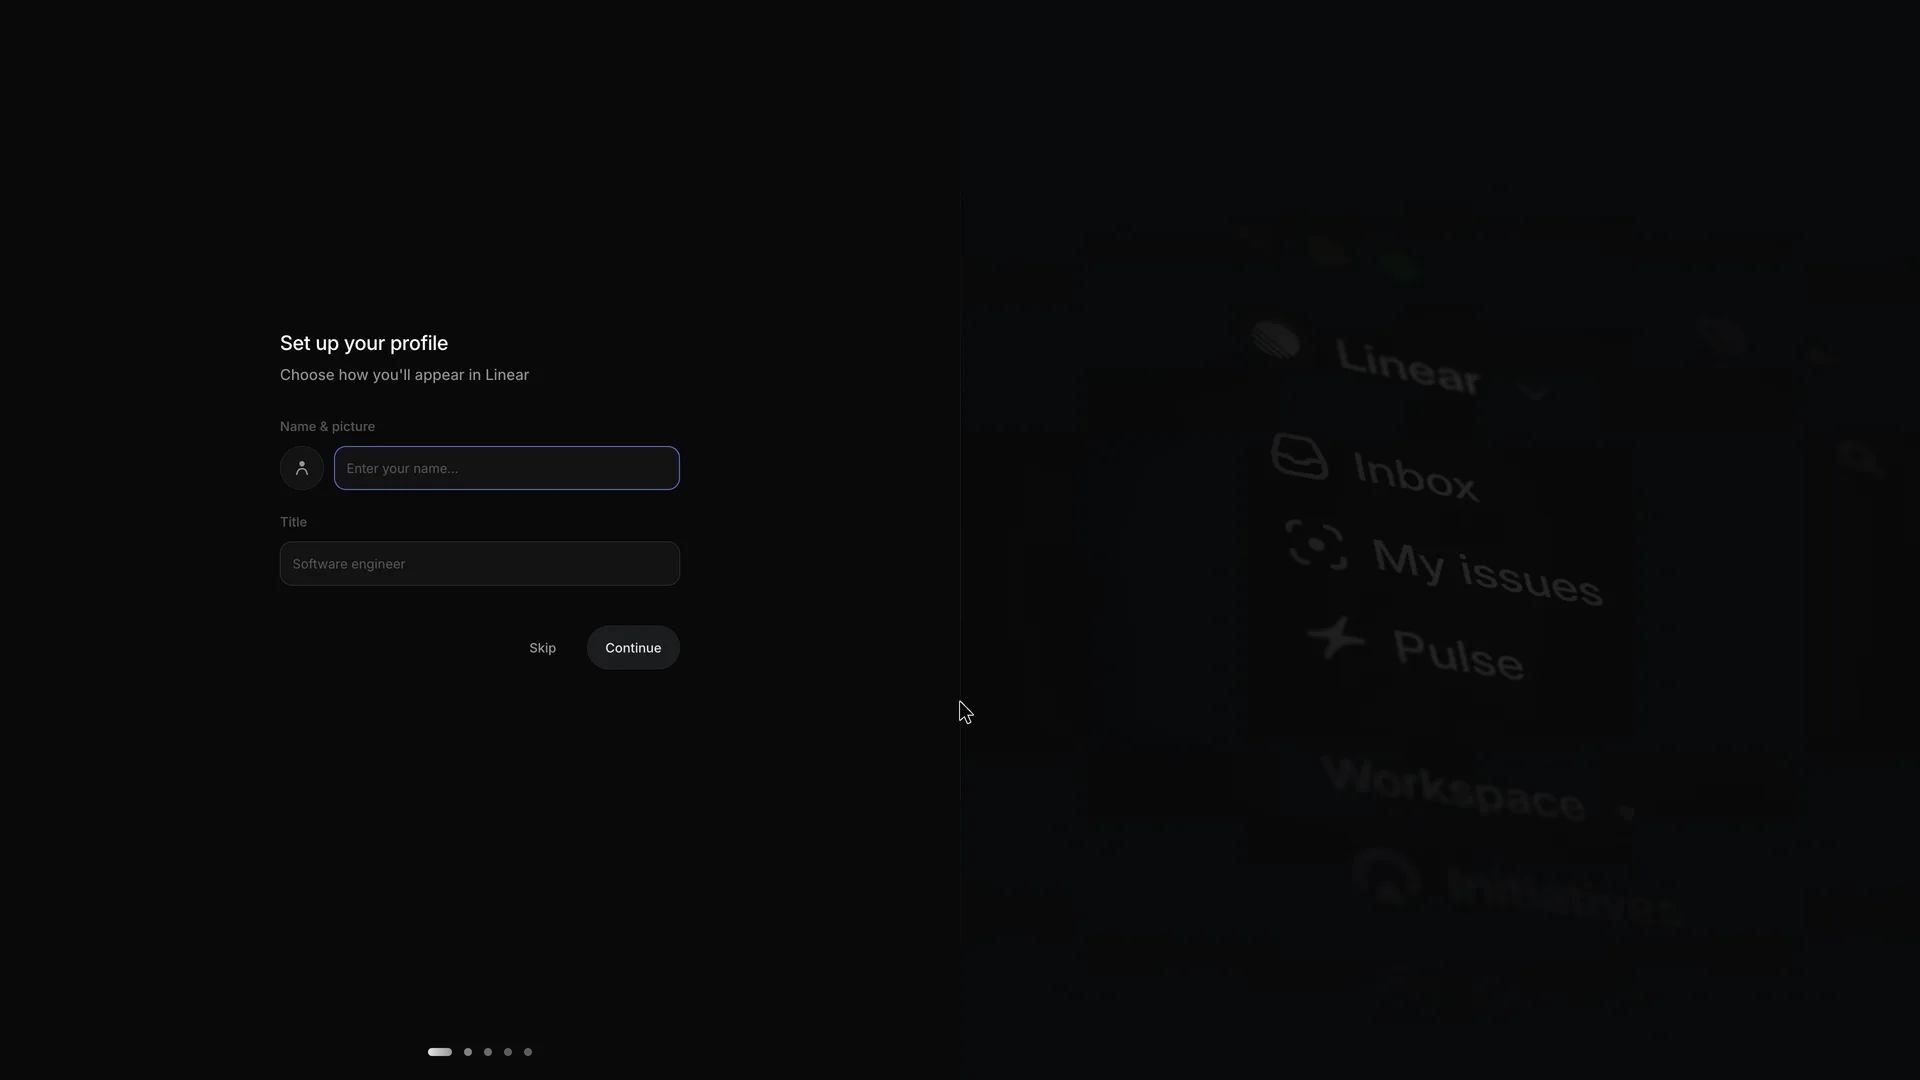
Set up your profile: name and title
Typed Robin Hale and Product manager and pressed Continue
Why it works
The five dots show how much setup is left, and Skip is offered on the very first question. The blurred sidebar previews the product the setup leads to.
What’s on this screen
The interface turns dark. Left half: 'Set up your profile', 'Choose how you'll appear in Linear', a photo button, a name field ('Enter your name…') and a Title field with the placeholder 'Software engineer'. Skip and Continue. Five dots at the bottom mark the steps of this setup. Right half: a blurred, tilted view of Linear's sidebar (Inbox, My issues, Pulse, Workspace, Initiatives).

Step 7 of 15:Invite teammates
Invite teammates by email or link
Pressed Skip (no invitations to real people)
Why it works
Invites come second, right after the profile, while the person setting up still has the team in mind; one box takes a whole list, and Skip is as easy as Send.
What gets in the way
Invites come before there is a single issue to show a teammate.
What’s on this screen
'Invite teammates', 'Get your team on Linear to start working'. One box for several addresses, whose placeholder repeats the signup email's domain, a Copy invite link button, then Skip and Send invitations. No role picker on this screen.

Step 8 of 15:Connect your apps
Connect GitHub, offered third
Pressed Skip
Why it works
Each benefit is one line about what changes for the team, not a list of features, and Skip sits beside the main button.
What gets in the way
For a product manager without engineering's GitHub access, this is a step they cannot complete and can only skip.
What’s on this screen
'Connect GitHub', 'Automate your pull request and commit workflows', with three benefits: Code reviews (review and merge code directly in Linear), Automate issues (auto-assign issues and update status from PR activity) and Code context for Linear AI. Skip, or Authenticate with GitHub.

Step 9 of 15:Connect your apps
Connect Slack, offered fourth
Pressed Skip
Why it works
Same layout as the GitHub screen, so the choice takes a glance. Slack is where a product manager collects bug reports and requests, so 'turn messages into Linear issues' speaks directly to the use case.
What gets in the way
Two integration screens in a row, before the workspace has any of the team's own work in it.
What’s on this screen
'Connect Slack', 'Bring your issues and notifications into Slack', with three benefits: Create issues from Slack, Issue notifications in channels, and Personal notifications by DM for assignments, mentions and comments. Skip, or Authenticate with Slack. The fourth of five dots is lit.

Step 10 of 15:Other
Subscribe to updates, with both emails off
Left both toggles off and pressed Finish
Why it works
Marketing email is opt-in: both toggles start off, and the screen says how often the changelog arrives and that onboarding emails are limited. The setup ends on a screen with no decision that blocks.
What gets in the way
Onboarding emails are also off by default, so a new user who presses Finish without reading gets no follow-up help by email.
What’s on this screen
'Subscribe to updates', 'Stay in the loop as Linear evolves'. Two toggles, both off: Changelog (bi-weekly email with new features and updates) and Onboarding emails (a limited set of emails to help you ramp up). A Follow @linear row with an X button. One button: Finish.
Step 11 of 15:Checklist
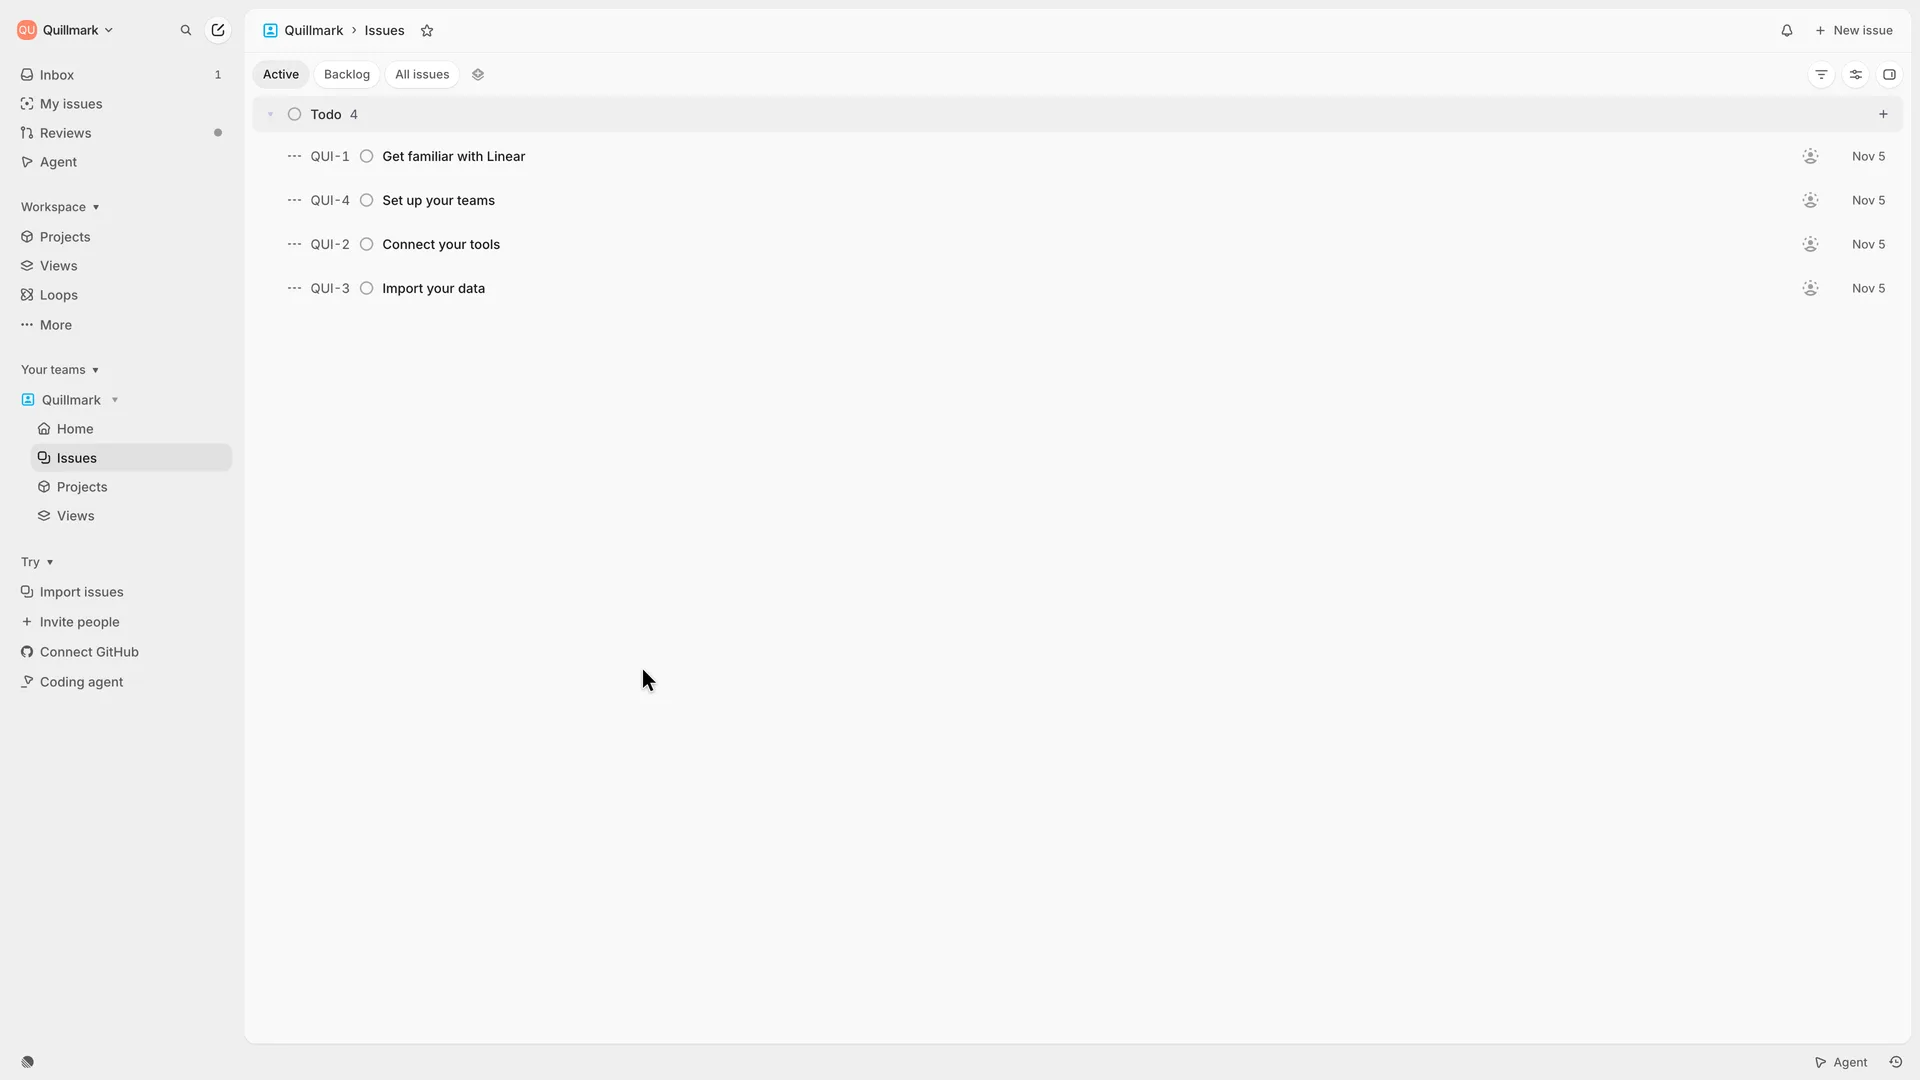
The team's issue list, seeded with four starter issues
Opened the first starter issue, QUI-1 Get familiar with Linear
Why it works
The onboarding checklist is made of real issues, so a new user learns how an issue looks, opens and closes by working through the list itself. The sidebar's Try section adds four more next steps (Import issues, Invite people, Connect GitHub, Coding agent). Nothing covers the product: the first screen is the real workspace.
What gets in the way
The team name, the key QUI and the starter issues were all decided for the user; nothing asked what the team works on, so the first list is Linear's to-do, not Quillmark's.
What’s on this screen
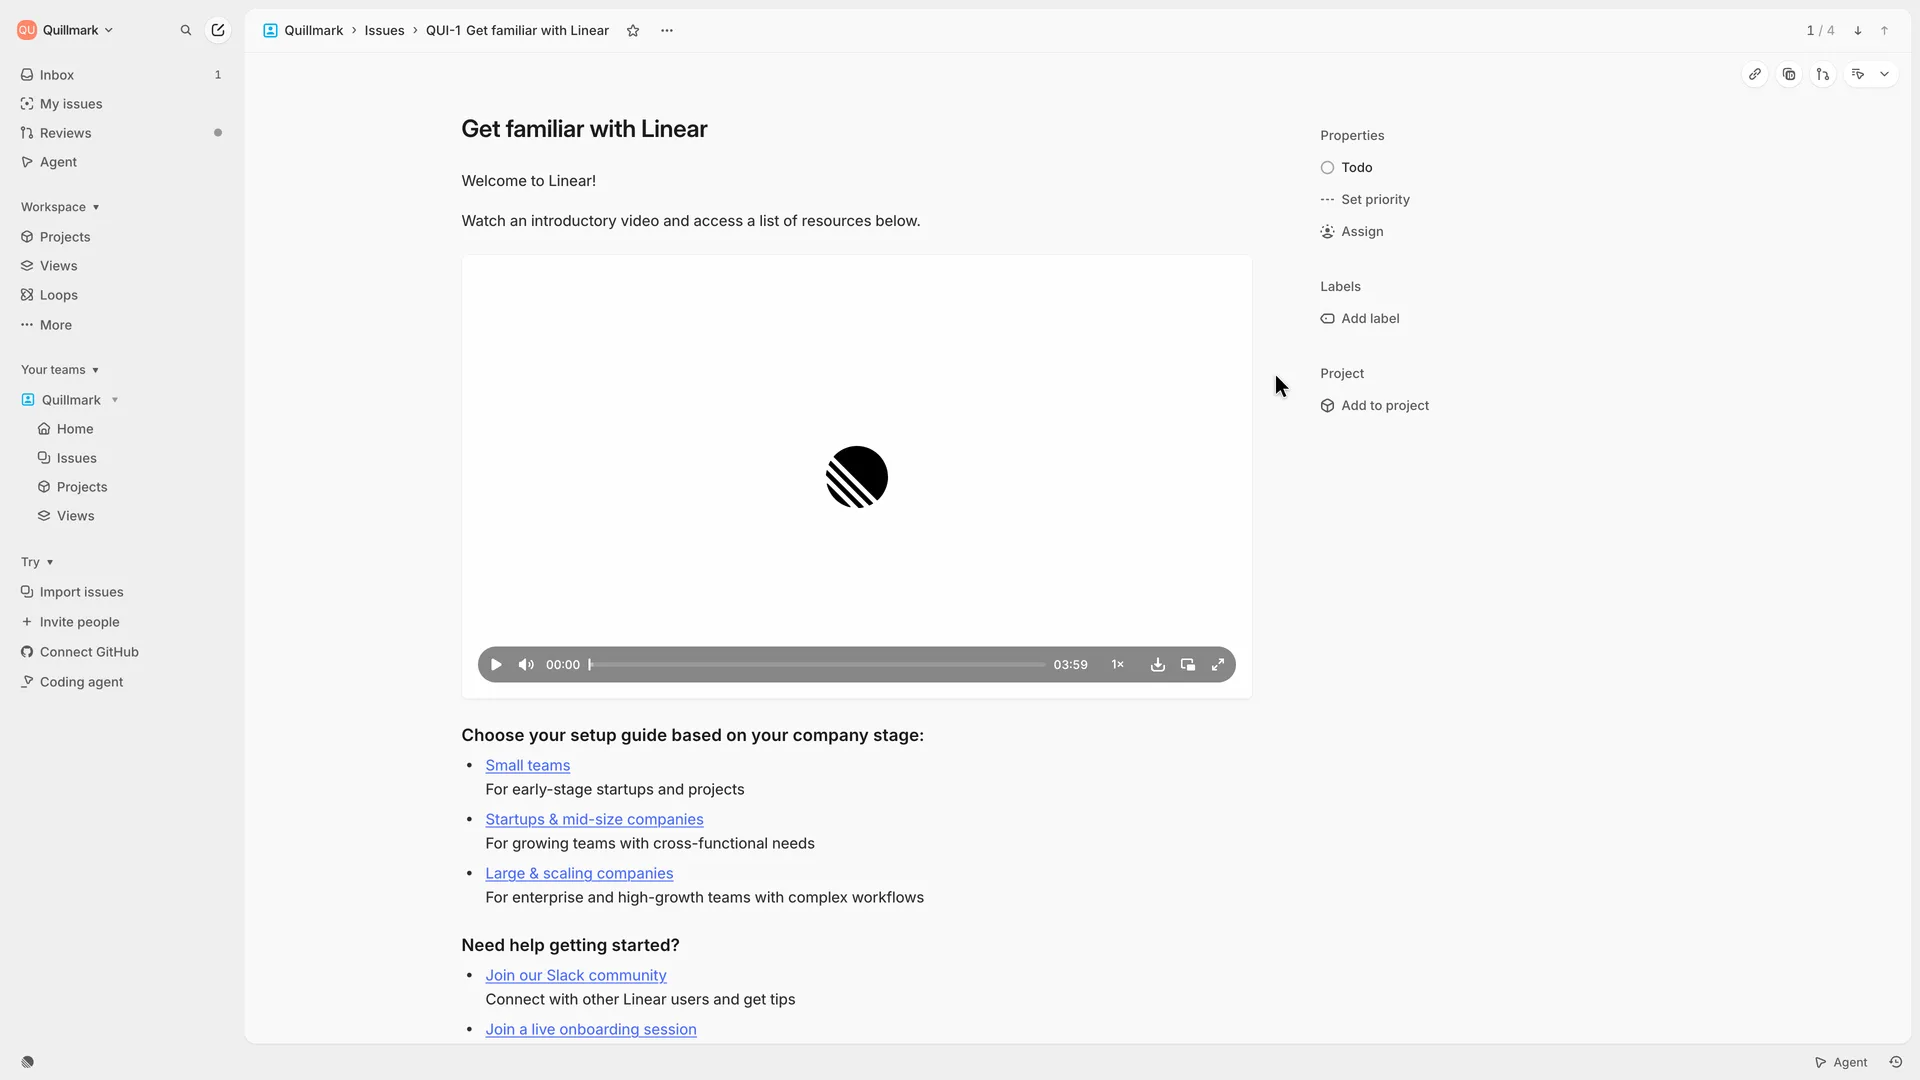
The interface turns light again and opens on Quillmark › Issues, Active tab. Linear has created a team named after the workspace, with the key QUI, and four issues assigned to no one and dated Nov 5 in Todo: QUI-1 Get familiar with Linear, QUI-4 Set up your teams, QUI-2 Connect your tools, QUI-3 Import your data. The sidebar shows Inbox (1), My issues, Reviews, Agent, Projects, Views, Loops, the Quillmark team, and a Try section with Import issues, Invite people, Connect GitHub and Coding agent. No modal or tour appears.
Step 12 of 15:Checklist
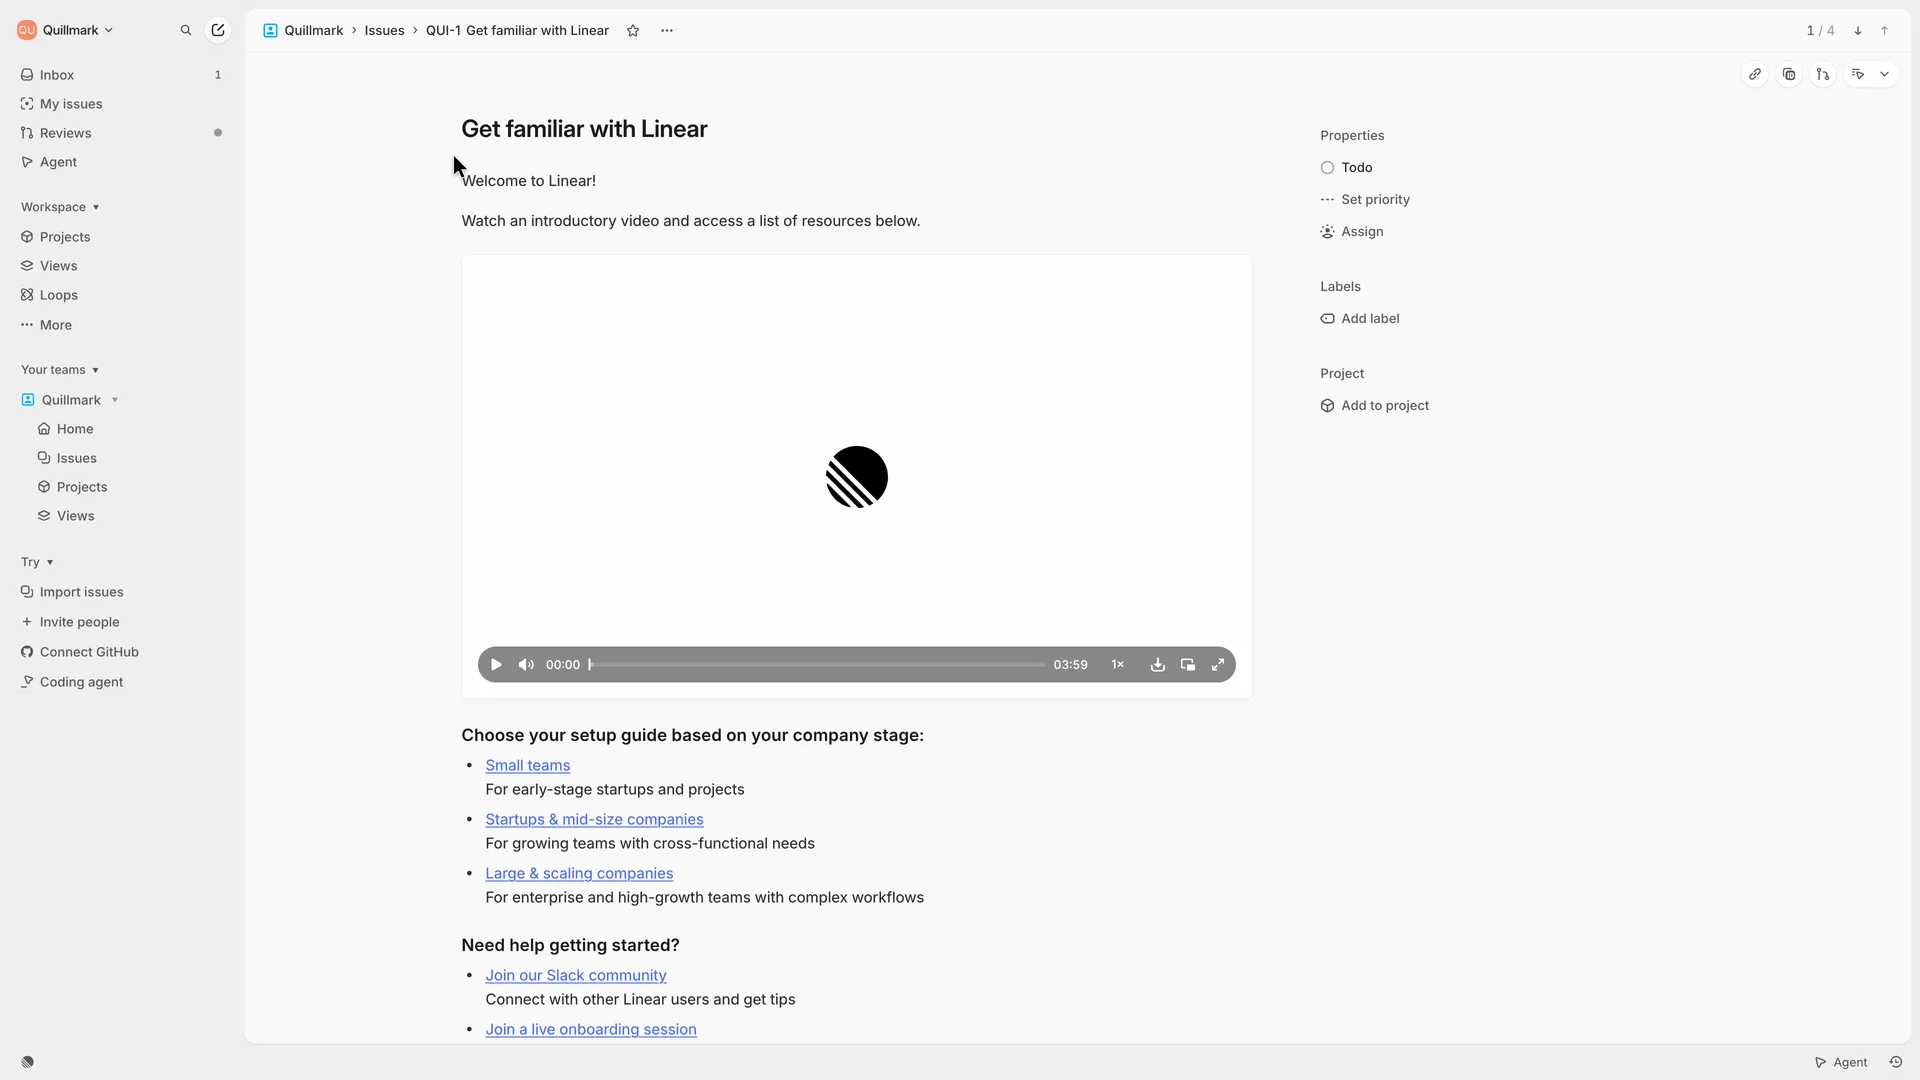
The first starter issue: a video and setup guides
Clicked the Create new issue button next to search at the top of the sidebar
Why it works
The welcome content lives in an issue, so reading it already teaches the issue layout: title, description, properties and activity. The guides are split by company stage, so a 26 to 50 person company can go straight to its own.
What gets in the way
Everything here is a link or a four-minute video; nothing on the page asks the user to make their own first issue.
What’s on this screen
QUI-1 opens as a normal issue: 'Welcome to Linear! Watch an introductory video and access a list of resources below.' A video player (03:59). Under 'Choose your setup guide based on your company stage': Small teams, Startups & mid-size companies, Large & scaling companies. Under 'Need help getting started?': Join our Slack community and Join a live onboarding session. Properties on the right: Todo, Set priority, Assign, Labels, Project. The header shows 1 / 4.
Step 13 of 15:First value
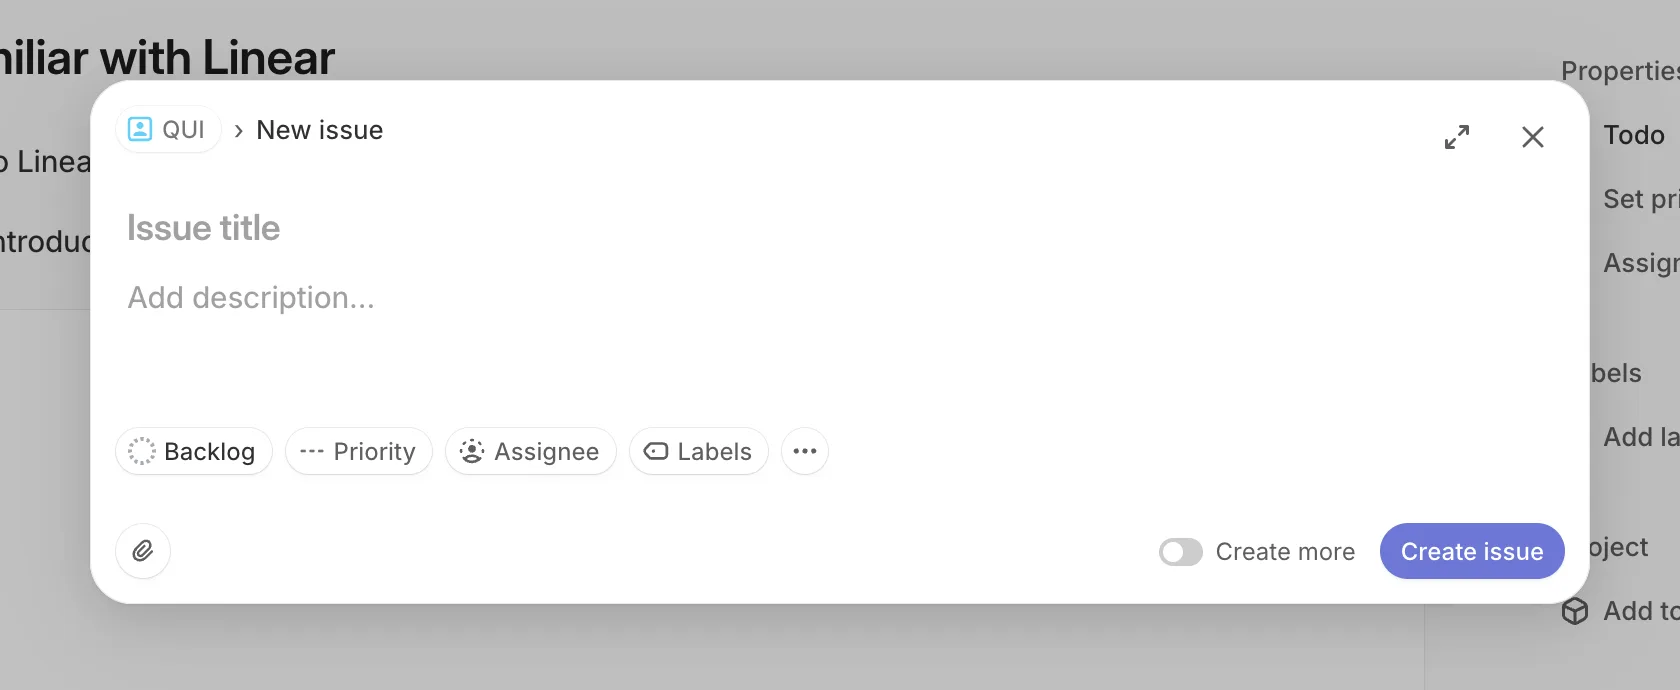
New issue: title, description and properties in one dialog
Typed the title 'Bulk export for annotated documents' and a two-sentence description, left the properties as they were, and pressed Create issue
Why it works
Only the title is needed; every property can be set later. The team key in the header shows where the issue will land, and Create more lets someone enter a list of issues without reopening the dialog.
What gets in the way
Status defaults to Backlog, while the team's Issues view opens on the Active tab, which shows only active issues; the dialog does not say the new issue will be out of that view.
What’s on this screen
A New issue dialog over the page, labelled QUI › New issue. Issue title and Add description… fields, then property chips: Backlog (the preselected status), Priority, Assignee, Labels and a menu for more. A paperclip for attachments, a Create more toggle (off) and Create issue.
Step 14 of 15:Other
Back on the starter issue after Create issue
Clicked My issues by mistake (empty: 'No issues assigned to you'), then the team's Issues, whose Active tab showed only the four starter issues, then All issues
Why it works
Creating an issue does not move the user away from what they were reading, and the notice offers a direct link to the new issue.
What gets in the way
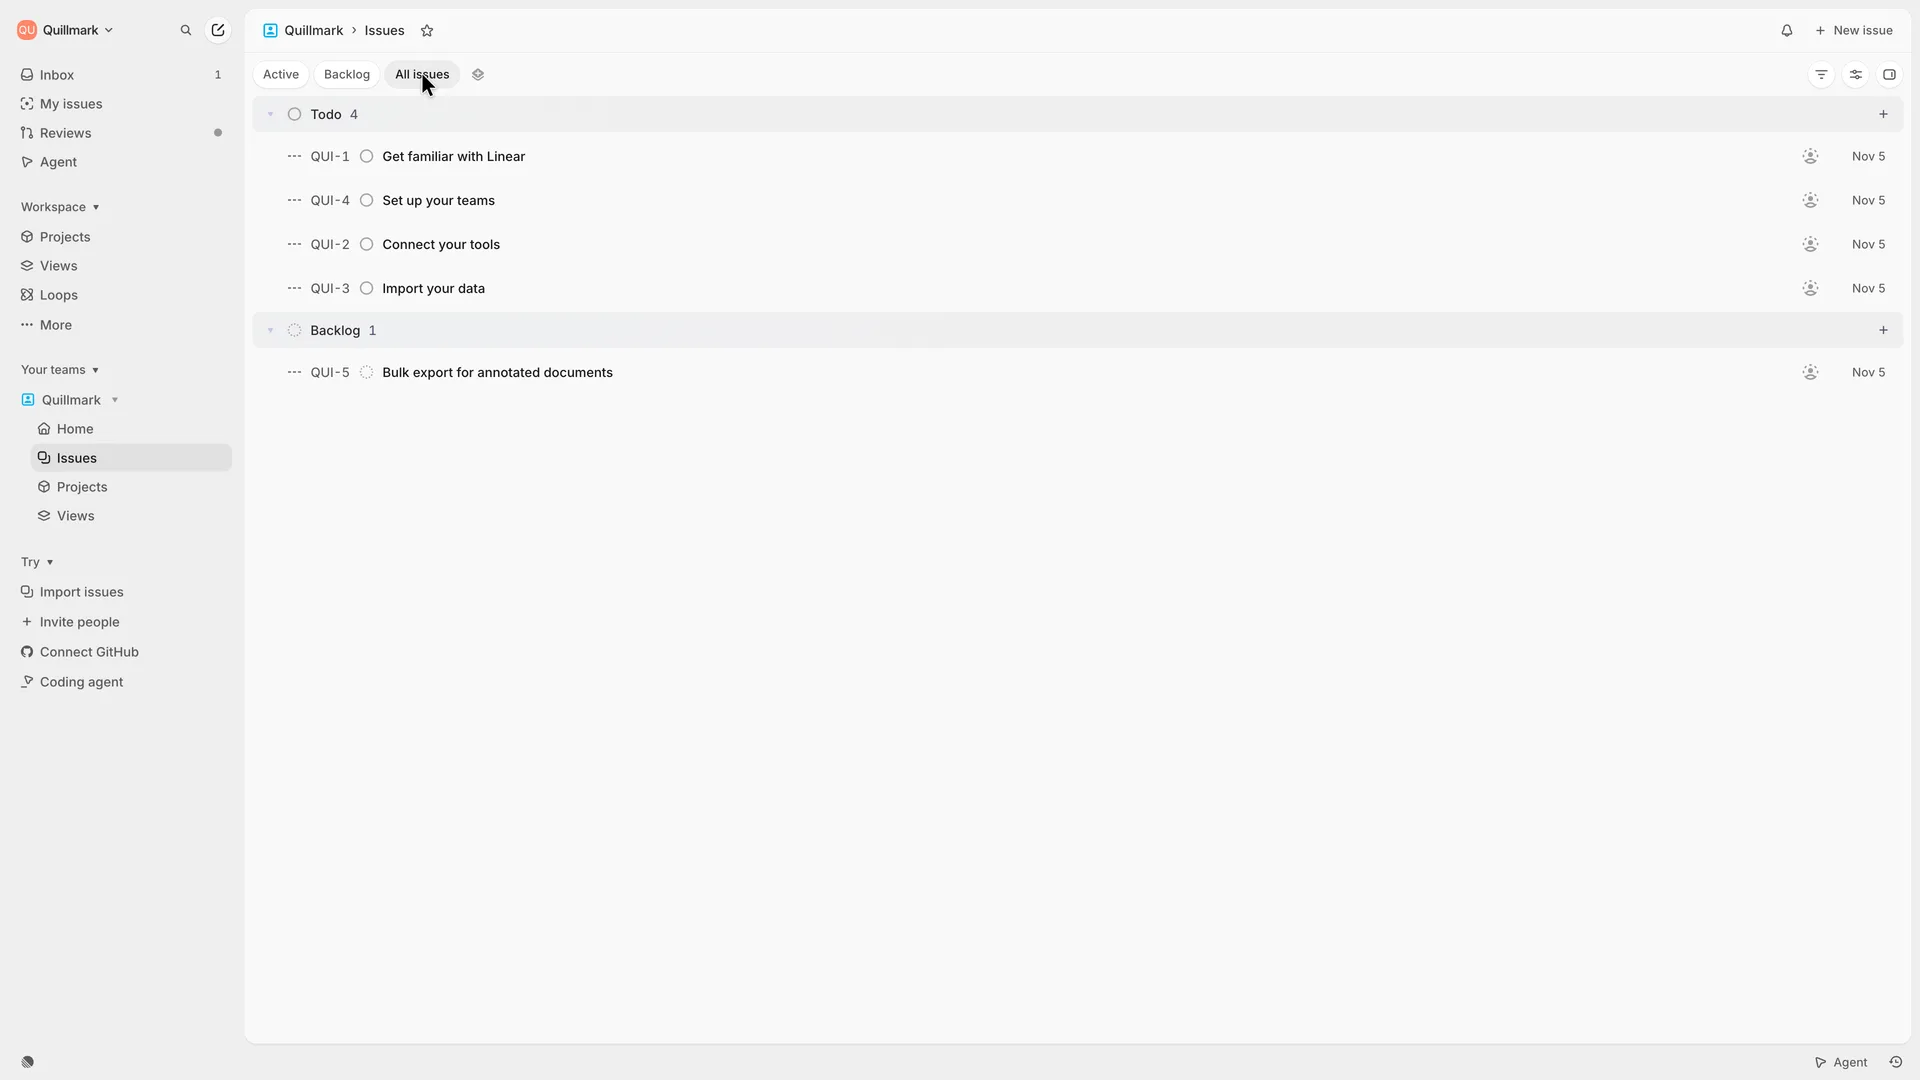
Once the notice fades, there is no trace of the new issue in the views a new user has seen so far: not on this page, not in My issues (it has no assignee), and not in the Active tab (it is in Backlog). It appears only under All issues or Backlog.
What’s on this screen
The dialog closes and the page is QUI-1 again. In the recording, a notice appears at the bottom right for a few seconds: 'Issue created', the new issue's key and title (QUI-5, Bulk export for annotated documents) and a View issue link. It had gone by the time of this screenshot. Back in the team's Issues, the Active tab still lists only QUI-1 to QUI-4.
Step 15 of 15:First value
Robin's first issue, QUI-5, under Backlog
Stopped the recording: first value reached
Why it works
The new issue sits in the same list as Linear's starter issues, with its own key, so the team's own work and the onboarding to-do are visibly the same kind of thing.
What gets in the way
Robin's issue is the only one not in Todo, and it is the last row: the starter issues still lead the list.
What’s on this screen
Quillmark › Issues, All issues tab. Todo (4): QUI-1 Get familiar with Linear, QUI-4 Set up your teams, QUI-2 Connect your tools, QUI-3 Import your data. Backlog (1): QUI-5 Bulk export for annotated documents, dated Nov 5, assigned to no one.
Verdict
What Linear gets right
- No password at any point: the email brings a code (or a link), and entering it also proves the address, so there is no separate confirmation step later.
- The workspace form fills two of its three fields itself: the URL from the name, and the data region, most likely from where the visitor connects.
- Five dots show how long setup is, every screen has Skip beside the main button, and both marketing emails start switched off.
- No tour or modal covers the product. The onboarding checklist is four real issues in the team's list, the first with a welcome video and setup guides, and the sidebar's Try section lists four more next steps; working through them teaches how issues work.
- The New issue dialog needs only a title, shows which team the issue goes to, and offers Create more for entering a list in one go.
What we’d change
- File a new issue where the user can see it, or say where it went. The New issue dialog defaults to Backlog, so a first issue never shows up in the Active tab the team's Issues view opens on.
- Ask what the team works on before seeding the workspace. The team name, its key (QUI) and all four starter issues are chosen for the user.
- Move the GitHub and Slack screens after the first issue. Both come before the workspace holds any work, and a product manager may not be able to connect GitHub at all.
- Say on the workspace form that the data region can't be changed later. Linear's settings state it, but the screen where it is chosen doesn't.
How we recorded it
- Recorded
- 5 Nov 2026
- Agent
- Claude Opus 5.5 in Claude Code
- Browser
- Chromium driven through Playwright MCP 0.0.84, a 1920 × 1080 window at 2× pixel density
- Signed up as
- Robin Hale, product manager at Quillmark (a made-up B2B SaaS company); a team of 26 to 50 people; wants a shared issue tracker for the team's feature work and bugs, planned in two-week cycles
- Stopped at
- Created a first issue, 'Bulk export for annotated documents' (QUI-5), in the Quillmark team; Linear filed it under Backlog
- Done by a person
- step 2, type your email address. An agent never accepts a product’s terms or gets past a verification on its own.
The agent answered every setup question as that person and skipped anything that would connect real data or invite real people. Screenshots are cropped to the part of the screen each step is about, and personal data in them is blurred. The figures at the top count the screens up to first value; form fields count every field shown, filled in or not.
Onboarding flows change, and this one is as Linear showed it on 5 Nov 2026. Seen a different flow, or want this page corrected or removed? Write to hello@useronboarding.academy.
